• Home
  • About
  • Blog
  • Ebooks and Printables
  • Etsy
  • Sewing Journal

Make it Yourself. Yes You Can!

  • Sewing Projects
  • Tips and Techniques
  • Embroidery
  • Other Crafts
    • Crochet
    • Felting
    • Jewellery
    • Wreaths
  • Christmas

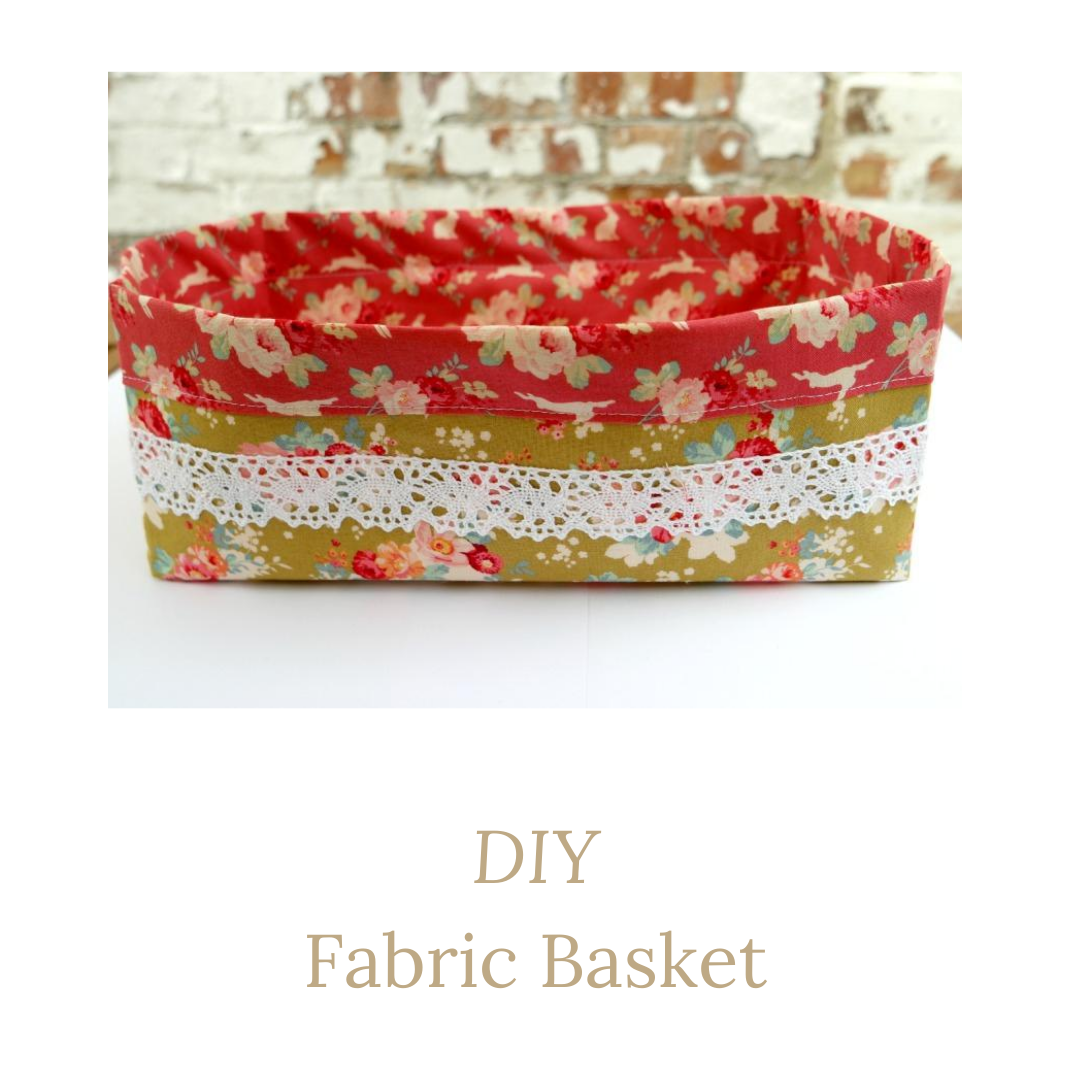
DIY Fabric Basket: A Quick and Easy Fat Quarter Project

August 7, 2020 · 2 Comments

diy fabric basket

Fabric baskets are always useful. In fact, any kind of basket is useful! This DIY fabric basket is quick and easy to make, and is a perfect way to use up fat quarters bought on impulse that have never been used. And being something that you make yourself, you can decide on the fabric and the size that will meet your needs best.

For this project I used 2 fat quarters, but you can use fabric of any size. All you need to do is make the lining fabric 12 cm (4 3/4 inches) wider than the outer if it has a directional print, or 10 cm (4 inches) wider if it doesn’t.

diy fabric basket

Instructions For a DIY Fabric Basket

You Will Need

how to make quick easy fabric basket tutorial tilda bloghop

2 fat quarters, interfacing (I used heavyweight fusible interfacing, but the sew in kind will work fine), trim (optional), usual sewing supplies.

Cutting Out

From the outer fabric, cut a rectangle 43 cm x 37 cm (17″ x 14 1/2 “)
From the interfacing, also cut a rectangle 43 cm x 37 cm (17″ x 14 1/2 “)
From the lining, cut a rectangle 43 cm x 49 cm (17″ x 19″)

If you are in a real hurry, providing that your fat quarters are the same size, you could just cut 12 cm (4 3/4″) of the long edge of the outer, and if your lining fabric does not have a directional print, cut 10 cm (4″) off the long edge.

Be warned though, this version of the DIY fabric basket will be a longer rectangle!

Sewing Up

Outer

1. If you are using fusible interfacing, fuse it to the wrong side of the outer.

2. Cut 2 pieces of trim the same width as the outer. Measure down 5 cm (2″) from one of the long edges and pin the trim in place.

how to make quick easy fabric basket tutorial tilda bloghop

Repeat for the other side of the fabric. Sew the trim in place.

how to make quick easy fabric basket tutorial tilda bloghop


3. Fold the outer in half length ways. Check that the trim is lined up on both sides. Pin the sides, then sew. Trim the seams.

how to make quick easy fabric basket tutorial tilda bloghop


4. To make the boxed corners, crease the fold at the bottom with your finger. Open it out and squash the corner flat so that the seam is next to creased line.

5. Measure up 7 cm (2 3/4″) from the corner and pin at right angles to the seam. Sew where you have pinned. Cut the corners off.

how to make quick easy fabric basket tutorial tilda bloghop


Lining

If you are using different fabric and it does not have a directional print, you don’t need to cut it in half. Just fold it length ways and sew the side seams, then make the boxed corners.

1. Fold the lining in half length ways. Cut where you have folded.

how to make quick easy fabric basket tutorial tilda bloghop

2. Take one of the halves and turn it round so that the print goes the opposite way. Pin the 2 halves together and sew along the sides and the bottom. Trim the seams.

3. Make the boxed corners in the same way as for the outer.

Finishing the DIY Fabric Basket

1. Pop the lining inside the outer so that the right sides are together. Push the corners of the lining right into the outer. You might want to pin the lining to the outer at the sides to make things easier.

how to make quick easy fabric basket tutorial tilda bloghop

2. Fold the lining over the top of the outer and press with your fingers as you go. Tuck the raw edge underneath and pin in place.

how to make quick easy fabric basket tutorial tilda bloghop

3. Top stitch all the way round.

how to make quick easy fabric basket tutorial tilda bloghop

Your DIY fabric basket is finished!

The off cuts don’t need to be wasted! You could save them for a scrap project, like a wrist pin cushion or pattern weights!

If you like sewing things for organising stuff, I have a Pinterest board devoted to boxes and baskets you can make.

Share this:

  • Click to email this to a friend (Opens in new window)
  • Click to share on Pinterest (Opens in new window)
  • Click to share on Facebook (Opens in new window)
  • Click to share on Twitter (Opens in new window)

Filed In: Blog, Sewing Projects / Tagged: craft fair, gift ideas, sewing for the home

DIY Ironing Board Cover

July 31, 2020 · 2 Comments

diy ironing board cover

This post contains affiliate links.

A mild annoyance in my life is my ironing board.

I’m not one for ironing. I belong to the “give a good shake and it will be fine” school of laundry! Hubby wears casual clothes for work so does’t need nicely ironed shirts, and on the rare occasions that he does, he’ll iron it himself.

When I do use the iron and the ironing board however, is when I’m sewing.

As a non ironer, it’s tempting to skip the pressing stage! But I know that to get a neat finish, I need to press the seams.

The problem with our ironing board is that it is huge. And being huge, it’s difficult to find an ironing board cover that fits when it needs replacing.

The last one I bought claimed to fit all ironing boards including large ones, but it didn’t! I could barely get it to stay on for long enough to press a couple of seams. Being a normal tired human and not an octopus, I found it rather difficult to hold the ironing board cover on to the ironing board, operate the iron and move the thing I was ironing around.

Anyway, I decided that I’d finally had enough, so I would make one.

I’m being quite good at the moment about not buying fabric, but when I had a rummage in the fabric pile, I couldn’t find any pieces of fabric big enough to make a DIY ironing board cover for the ridiculously enormous ironing board. So I’ve had to buy some.

I love this fabric. The koi carp and the cherry blossom remind me that although we didn’t make it to Japan in April, it’s still there and we’ll visit at some point.

I also used Insul Bright to make the DIY ironing board cover, which is a brand of thermal interfacing.

Both the batting and the fabric came from Remnant House in Yorkshire. This isn’t an affiliate link, I want to do my bit to support small businesses. They have lots of lovely fabric, in particular Rose and Hubble and their prices are reasonable. They’re also helpful if you need to talk to them on the phone.

The cover is attached to the board using elastic.

The instructions below will work of any size of ironing board as you make it to fit your particular board.

diy ironing board cover

Instructions

You Will Need

Large pieces of paper. Pattern paper is ideal. You could also use brown paper or newspaper as an alternative.

Pencil or pen

Fabric. It needs to be cotton so that it can cope with the iron getting hot.

Interfacing. I used Insul Brite which has thermal properties, but cotton batting will do if that’s what you have.

Elastic. You’ll need enough to go all round the outside of the ironing board. I used this.

Bias binding to finish the raw edges.

Making the Pattern

The best way to make a DIY ironing board cover that fits your ironing board perfectly is to draw round it!

If you don’t have enough floor space, you could prop the ironing board against the wall with the paper in between. My advice here would be to use a pencil rather than a Sharpie, especially of your pattern paper is on the thin side!

When you’ve done this, fold it in half. You might need to adjust it a bit.

You’ll need to add a bit around the outside to allow for the depth of the board and the seam allowance. My ironing board is 1.5 cm deep, so I added 3.5 cm to allow for a 2 cm seam allowance plus the depth.

diy ironing board cover

The bit that keeps the cover on the ironing board is made from 2 different pieces cut out on folded fabric.

Take your pattern piece and fold it into 4.

diy ironing board cover

Draw round the outside edge of one of the quarters. Now draw a line 12 cm down from your original line, following the shape of the line. Do the same with the other quarter. Don’t forget to add seam allowances at either end!

diy ironing board cover

Before you do this, you might like to check that this is a good size for your ironing board and you won’t end up with the cover getting in the way of the legs unfolding. This was a good size for my ironing board.

Cutting Out

From the main pattern piece, cut one from your cotton fabric. You might prefer to fold your pattern piece in half and cut it on the fold. You’ll also need to cut at least one from your batting. I cut two layers.

For the bottom sections, you’ll need 2 of each, cut on folded fabric. I used 1 layer of interfacing for these.

How you cut them is up to you! I had originally intended to cut 2 of each and sew them together, but I ended up cutting the top section on the fold, so it was in one piece, and the lower section as separate pieces. If you do decide to cut one or both pieces on the fold, remember that you won’t need the seam allowance on the folded part.

Assembling the Ironing Board Cover

Join the bottom sections together, with the interfacing on the wrong side of the cotton fabric. Insul Bright doesn’t have a wrong side, so it doesn’t matter which way round it goes.

diy ironing board cover

Finish the inside edge with bias binding.

diy ironing board cover

Pin the bottom bit to the top section. The cotton sections should be next to each other with the right sides together, with the interfacing on either side.

Sew the bottom and top bits together. Trim the seam.

diy ironing board cover

Almost there! The last job is to sew the elastic to the inside of the bottom bit. While you’re sewing, stretch the elastic a little bit. It’s not necessary stretch it out all the way, but pulling it a bit will help to fit snugly round the ironing board.

diy ironing board cover

All done! I might even take up ironing!

diy ironing board cover

Share this:

  • Click to email this to a friend (Opens in new window)
  • Click to share on Pinterest (Opens in new window)
  • Click to share on Facebook (Opens in new window)
  • Click to share on Twitter (Opens in new window)

Filed In: Blog, Sewing Projects / Tagged: how to, sewing for the home

I'm Anna and I live in rural Norfolk in the UK. My mum taught me how to use a sewing machine when I was 10 and I haven't looked back! I love making all sorts of things and I hope you find inspiration here.

Join the list

Join the mailing list to receive updates, useful and interesting links and free pages from the Sewing Journal.

My New Ebook

things to male and do in the autumn

Bunting Makes Everything Better Tote Bag

Featured Kit

The Sewing Journal

My Kits and Patterns on Etsy

Shop the Christmas Shop at Sew and So


Join the List

Join the mailing list to receive updates, useful and interesting links and free pages from the Sewing Journal.

Privacy Policy

For information about cookies and Tea and a Sewing Machine's privacy policy, please click here.

Instagram

Instagram Widget by SnapWidget


UK Sewing Blogs

Theme by 17th Avenue · Powered by WordPress & Genesis

loading Cancel
Post was not sent - check your email addresses!
Email check failed, please try again
Sorry, your blog cannot share posts by email.
We use cookies to ensure that we give you the best experience on our website. If you continue to use this site we will assume that you are happy with it.Ok