• Home
  • About
  • Blog
  • Ebooks and Printables
  • Etsy
  • Sewing Journal

Make it Yourself. Yes You Can!

  • Sewing Projects
  • Tips and Techniques
  • Embroidery
  • Other Crafts
    • Crochet
    • Felting
    • Jewellery
    • Wreaths
  • Christmas

Negative Space Embroidery Clasp Purse

January 12, 2018 · 3 Comments

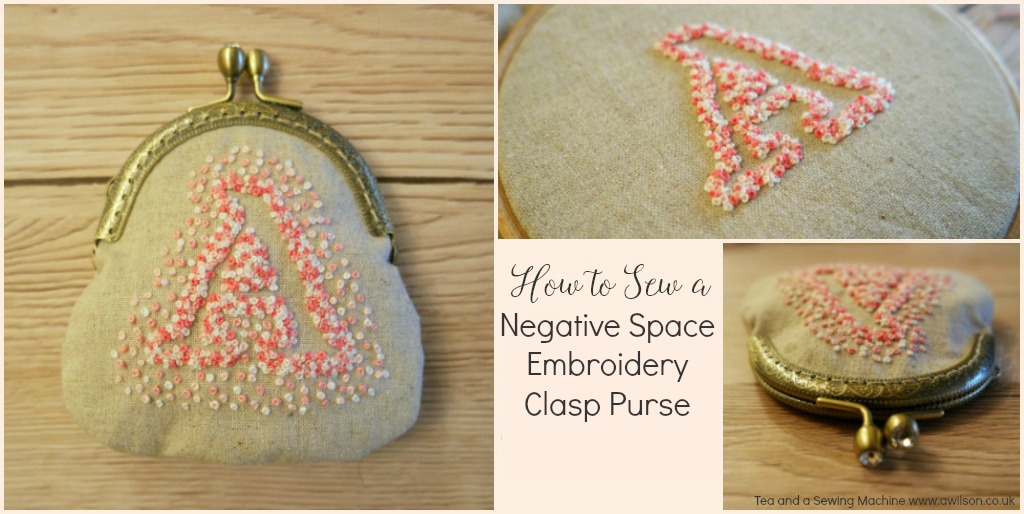
Negative Space Embroidery Clasp Purse

Negative space embroidery is a fun way to create letters and other simple shapes. Instead of embroidering the letter or the shape, you embroider the space around it.

You can do this on all kinds of things (I’ve seen lovely embroidery hoop art things on Pinterest). I chose to do this to a little purse. I used the first letter of my name, but you could do anything, as long as it’s a simple shape!

French knots are great for negative space embroidery.

There’s something very satisfying about sewing French knots. Once you get the hang of it, they’re easy to do. The trick is to pull the thread tight around the needle, then poke the needle through the fabric next to where you started the stitch, not in the same place or your French knot will disappear!

To make it up into a purse, I used the same method as I did for this embroidered clasp purse. Here’s a tutorial if you want to make one yourself! And you might be interested to know that I have these little purses as kits for sale here on Etsy.negative space embroidery clasp purse

Negative Space Embroidery: Clasp Purse Tutorial

I have included some affiliate links.

You Will Need

Fabric for the outer and the lining, a purse clasp, interfacing (optional), embroidery thread and a needle, Google Docs or similar and a printer, a pencil, usual sewing supplies. An embroidery hoop is also useful.

Before You Start

1. The purse clasp I used was approximately 9 cm x 6 cm (3.5 inches x 2.5 inches), and if you’re using one the same size, you can download the pattern pieces here.

Otherwise you will need to make the pattern piece, and the instructions for doing this can be found in this tutorial here.

2. Once you’ve got your pattern piece sorted out, you can decide how big you need your letter to be. The easiest thing to do is to find a font you like on Google docs, type the letter and print it out. You will need to check that it will be the correct size, and don’t forget that your purse piece will include a seam allowance!

For my letter, I used a font called Alice, in size 200.

3. If you haven’t sewn French knots before, it’s probably a good idea to have a go on a spare piece of fabric first. There’s a tutorial here if you need one.

Cutting Out

Using your pattern piece, cut 2 pieces from your lining fabric and 2 from interfacing. Cut one from the outer, and for the other outer piece, draw it onto the fabric but don’t cut it out yet! It’s much easier to embroider it first, then cut it out when you’ve finished the letter.

Sewing the Letter

1. Cut out the letter you printed and draw round it onto the fabric.

2. Start to sew French knots around the outside of your letter. If you’re using more than one colour or shade, space them out a bit so that you’ve got room to come back in with a different colour. I used 3 shades of pink plus white.negative space embroidery clasp purse

3. Once you’ve done this, go round again, then once more so that the French knots are 3 deep. If you have using a letter with a space inside, like an A, a P or a B, you might like to fill this in.negative space embroidery clasp purse

4. Now add some more French knots around your letter, but more spaced out. I did these mostly about 3 deep as well, but you can decide to do more or less depending on what you like!negative space embroidery clasp purse

Assembling the Purse

1. Place one of the purse pieces on top of an interfacing piece with the right side up. Take the other outer piece and place that on top of the outer piece so that the right sides are together. Place the other piece of interfacing on top.

2. Take the clasp frame and line the top of the bobbles up with the top edge of the purse. Check that it is centred and that the distance all the way round the top between the clasp and the purse pieces is roughly the same.negative space embroidery clasp purse

3. Using pins, mark where the top of the hinges are on the purse pieces.

4. Sew the bottom of the purse outer between the pins. Repeat for the lining.negative space embroidery clasp purse

5. Pop the purse lining inside the outer so that the right sides are together. Pin the lining to the outer. Leaving an opening on one side, sew the lining to the outer.

6. Turn the purse the right way out. Slip stitch the opening.negative space embroidery clasp pursenegative space embroidery clasp purse

Attaching the Clasp Frame

To sew in the purse frame, you will need to identify the centre hole on one side.how to sew in a purse frame

You will also need to find the centre of the top edge of your purse. The easiest way to do this is usually by folding it in half.

1. Take your needle and thread and bring the thread through from the inside of the purse to the outside, in the centre of the top edge, about 5 mm down from the edge.how to sew in a purse frame

2. Now bring the needle through that hole in the centre of the purse frame, from the inside to the outside. Push the edge of the purse into the purse frame so that it is right inside. Pull the thread taut.how to sew in a purse frame

3. Put the needle through the next hole and through the top of the purse. Pull it out through the other side so that it comes out just underneath the frame. You might need to do this at a bit of an angle. We’re aiming for the stitching to be hidden underneath the purse frame.how to sew in a purse frame

4. Take the needle back through the purse and the frame to the next hole.how to sew in a purse frame

5. Now put the needle through the hole where you ended the first stitch, through to the wrong side.how to sew in a purse frame

6. Pull it taut, then sew upwards through the second hole away from where you have just sewn.

Keep checking that the edge of the purse is pushed right inside the purse frame.

You are basically working a backstitch to sew the frame to the purse, with the neat bit of the backstitch visible on the front and the messier side hidden underneath the other side of the frame, on the inside of the purse.

When you get to the hinge, tie the thread off on the wrong side.how to sew in a purse frame

Then go back to the centre hole and sew the other half of that side to the purse in the same way.

Repeat for the other side.

Now your little purse is finished!negative space embroidery clasp pursenegative space embroidery clasp pursenegative space embroidery clasp pursenegative space embroidery clasp purse


negative space embroidery clasp purse

Share this:

  • Click to email this to a friend (Opens in new window)
  • Click to share on Pinterest (Opens in new window)
  • Click to share on Facebook (Opens in new window)
  • Click to share on Twitter (Opens in new window)

Filed In: Blog, Embroidery / Tagged: clasap frame, craft fair, embroidery, gift, purse

I'm Anna and I live in rural Norfolk in the UK. My mum taught me how to use a sewing machine when I was 10 and I haven't looked back! I love making all sorts of things and I hope you find inspiration here.

Join the list

Join the mailing list to receive updates, useful and interesting links and free pages from the Sewing Journal.

My New Ebook

things to male and do in the autumn

Bunting Makes Everything Better Tote Bag

Featured Kit

The Sewing Journal

My Kits and Patterns on Etsy

Shop the Christmas Shop at Sew and So


Join the List

Join the mailing list to receive updates, useful and interesting links and free pages from the Sewing Journal.

Privacy Policy

For information about cookies and Tea and a Sewing Machine's privacy policy, please click here.

Instagram

Instagram Widget by SnapWidget


UK Sewing Blogs

Theme by 17th Avenue · Powered by WordPress & Genesis

loading Cancel
Post was not sent - check your email addresses!
Email check failed, please try again
Sorry, your blog cannot share posts by email.