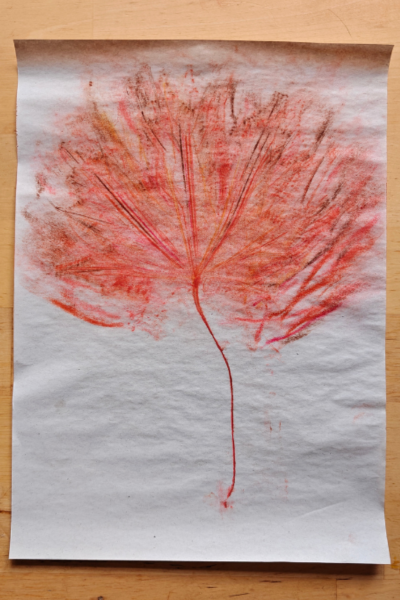
• Home
  • About
  • Blog
  • Ebooks and Printables
  • Etsy
  • Sewing Journal

Make it Yourself. Yes You Can!

  • Sewing Projects
  • Tips and Techniques
  • Embroidery
  • Other Crafts
    • Crochet
    • Felting
    • Jewellery
    • Wreaths
  • Christmas

Easiest Notebook Ever! How To Make a Notebook

February 19, 2020 · Leave a Comment

how to make a notebook

Easiest Notebook Ever! How To Make a Notebook

This post contains affiliate links. It doesn’t cost you anything but if you click on a link and make purchase, you’ll help to support Tea and a Sewing Machine.

Oh my goodness, who doesn’t love stationery??

Pretty notebooks, matching pens, washi tape, colouring pencils that are pretty to look at and colour nicely too, it all comes second only to a pile of fat quarters!

Notebooks are probably my favourite. I usually have several on the go at once, and I’ll buy another one at the slightest excuse.

One of the things I want to do with the home ed boys is nature journaling. (I’ll be writing a post at some point about how home education looks in my house!)

Writing is often an issue for boys in particular. During his time at school, Barnabas was put off writing, and I’m treading carefully with Cosmo as I don’t the same to happen with him.

Nature journaling sounds like fun. It’s one of those things where there’s no one way, so you can make it whatever you like! Cosmo has said that he wants to learn about space, so we’ve started using it to record stars and things that we’ve seen. With any luck, Barnabas will decide that he wants to do one too!

It’s also the perfect excuse for a new notebook, and what could be better than making one yourself?

how to make a notebook

These notebooks are made from stuff you may well have lying about already. Using elastic to attach pages makes it very easy (no faffing about trying to sew through paper!) and you can add as many different sections as you like.

How To Make a Notebook

how to make a notebook

You Will Need

Thick cardboard. Amazon boxes are ideal. A cereal packet might be a bit thin, but you could stick to pieces together to give it some more weight.

Pretty paper. I used scrapbooking paper that I had already (this from Amazon). You could try wrapping paper as long as its quite thick. The cheapy thin kind probably won’t last long. Paper packs that come free with papercraft magazines would be just the thing, although you’ll probably need to patch pieces together to make it big enough.

If you don’t want to use paper, here are some other things you could try: fabric, felt, an old map, your own artwork, pretty much anything that you could fold round a piece of cardboard and sew it or glue it!

Glue that will stick whatever it is you are using. I used a glue stick. For fabric or felt you’ll need to use PVA.

Elastic. I used this from Amazon. The kind you might put in a waistband probably won’t do. It needs to be the stringy kind. At a push, you could use long elastic bands.

A button. You’ll need this for the closure so a largish one is best.

Paper for the pages. The easiest thing to do is to take some sheets of printer paper and fold them in half.

Instructions

Decide on how big you want your notebook to be.

For the pages I was planning to use sheets of A4 folded in half, so the cover needed to be slightly bigger than A5 so as to protect the pages inside.

Cut a piece of cardboard so that it will be a little bit bigger than the pages when folded in half. I cut the cardboard 32 cm x 23 cm. Yours can be whatever size you like, but ideally slightly larger than the pages.

Cover the inside of the notebook. I used a piece of plain paper, cut to the same size as the cardboard, and glued on using a gluestick.

how to make a notebook

Cut a piece of scrapbooking paper (or whatever you’ve chosen to use instead) a couple of cm (about an inch) larger all the way round than the piece of cardboard. This is so that you have enough to fold over the edges.

how to make a notebook

If you are using bits of paper or fabric that are of different sizes, you could glue them on as you go or stick them to a piece of paper the correct size first. You could even sew them straight onto the cardboard. I haven’t actually tried this, so you might want to experiment a bit yourself first!

Don’t forget to cut a little square out of each of the corners!

how to make a notebook

Attach your covering to the outside of the cover, then fold the edges over and stick them down onto the inside.

If you’re using paper and a gluestick, you might want to leave it for an hour or two under a heavy book so it has a chance to stick properly.

When everything has had a chance to dry, fold the cover in half.

Adding Pages

Cut some pieces of elastic about the same length as the distance round the spine of your notebook. I’ve started off with three. It will be easy enough to add more later if I need them.

Tie the ends together and slip them over the notebook so that they sit in the spine of the cover.

how to make a notebook

how to make a notebook

Add some pages. The easiest way to do this is by taking some sheets of A4 and folding them in half. I used black paper for the first section because I’m going to be recording space stuff too! Slip the pages under one of the pieces of elastic so that the elastic is in the fold of the paper.

how to make a notebook

Making the Elastic Closure

Having some way of keeping the notebook closed is handy. The cover of mine springs open, but even if yours doesn’t, you might find that if it gets very full, you might want an option for keeping it closed.

Cut a piece of elastic long enough to go all the way round your notebook widthwise doubled.

Slip a button onto the elastic and knot the ends. Move the button down so that it hides the knot.

how to make a notebook

To keep your notebook closed, pop the elastic round the it and loop the end of the elastic over the button.

To keep your notebook closed, pop the elastic round the it and loop the end of the elastic over the button.

If you’re worried about losing it, you could make a couple of little holes in the back of the notebook and thread it through.

Now your notebook’s ready to use! If you find yourself running out of pages, or if you need another section, just add some more elastic to the spine and slip some more in.

To keep your notebook closed, pop the elastic round the it and loop the end of the elastic over the button.
how to make a notebook

If you liked this post, you might also like this one showing how to make a fabric diary cover.

Share this:

  • Click to email this to a friend (Opens in new window)
  • Click to share on Pinterest (Opens in new window)
  • Click to share on Facebook (Opens in new window)
  • Click to share on Twitter (Opens in new window)

Filed In: Blog, Other Crafts / Tagged: beginner, easy, how to, notebook, papercraft

Easy Christmas Decorations To Sew in Under an Hour

November 19, 2019 · Leave a Comment

Easy Christmas Decorations To Sew in Under an Hour

Easy Christmas Decorations To Sew in Under an Hour

Welcome to the Easy Christmas Decorations To Sew in Under an Hour blog hop!

It’s a lovely idea to make things for Christmas, but it can be difficult to find the time when everything’s so busy.

I used to have this perfect idea of how I wanted Christmas to be at my house with lots of things I’d made, and then feel annoyed with myself that I’d not managed to do even half the things I’d wanted to!

One solution to this is to start early. I even did this one year (it was the year of the dinosaur hats when I still only had 3 boys!), but I don’t like making Christmas things when Christmas is still some way off. Also I like autumn and I want to enjoy it as a season in its own right.

So the other option is to choose things that are quick to make and not too complicated.

If this is you too, you’ve come to the right place!

Here are 8 ideas for things you can make for Christmas that are both quick and easy. I’ve included the links below and I encourage you to pop over to these talented ladies’ blogs to have a look.

All the links will open in a new tab, so you don’t have to worry about getting lost in the internet jungle!

Embroidery Hoop Christmas Decoration

easy christmas decorations blog hop

This one’s mine :).

It’s made from tulle and scraps of cotton fabric, and a 30 cm embroidery hoop. I wanted to make something that I could put up straight away and leave up for the rest of winter.

There are downloadable templates (in exchange for an email address) and you can find the instructions here.

Embroidered Snowflake Felt Ornaments

quick and easy christmas decorations to sew in under an hour

These lovely felt ornaments by Lisa from Cucicucicoo are made from scraps of felted jumpers and embroidered with white thread. There’s a link in the post to the embroidery pattern.

If you don’t have any jumpers that have suffered a mishap in the wash, or any that you have felted on purpose, you could always use ordinary felt instead.

The tutorial for the embroidered snowflake ornaments is here.

Fabric Christmas Tree Ornament

quick and easy christmas decorations to sew in under an hour

This tutorial from Domenica from Easy Sewing For Beginners shows how to make Christmas tree decorations from scraps of Christmas fabric.

She uses ricrac to decorate them, and there’s one with a star button at the top! Obviously you could something else if you don’t have ricrac. As you won’t need very much, it’s a good way to use up little bits of ribbon.

The post is here.

Christmas Pudding Decoration

quick and easy christmas decorations to sew in under an hour

If you’re not British and you don’t know what a Christmas pudding is, you’re missing out! It’s a delicious, very rich fruit pudding that usually needs to be steamed for several hours if you make it yourself in the traditional way, or warmed up in the microwave if you buy one from Marks and Spencer.

These decorations are made using scraps of fabric and a little embroidery hoop. Vicky suggests putting them on a card as a little extra thing for somebody to hang on their own tree.

There are templates for the applique, and the post can be found here.

DIY Christmas Coasters

quick and easy christmas decorations to sew in under an hour

These coasters by Damjana from Apple Green Cottage are made in an ingenious way.

You know how annoying it is trying to get all the edges neat when you’ve had to leave one open so that you could turn it the right way out?

These coasters are made in such a way that you don’t have to do this!

Damjana’s coasters are made from fabric that are Christmas colours but are not specifically Christmas prints, so they can be used at other times too.

You can find the tutorial here.

Fabric Ribbon Candy Ornaments

quick and easy christmas decorations to sew in under an hour

Staci from Crafty Staci has made these fabric ribbon ornaments. I’ve seen something similar before made from ribbon, but these are made in a different way using 2 strips of fabric in contrasting prints.

Staci has used lovely fabric in candy cane colours, but you could use whatever you have or what you would like to use to fit in with your Christmas colour scheme.

The tutorial is here.

Mini Gift Bag

quick and easy christmas decorations to sew in under an hour

It’s an uncomfortable truth about Christmas that it generates an awful lot of waste.

One way to cut down on stuff that ends up in landfill is to make beautiful handmade decorations like the ones in this blog hop! They’ll last and you won’t want to throw them away just because you’re bored of them.

Another way to reduce waste at Christmas is to wrap presents in something that can be reused.

Julie from Sum of Their Stories has written this tutorial for making little gift bags from Christmas fabric. She even suggests mixing Christmas prints with plain fabric to make them go further.

The instructions for making the bags are here.

Felt Christmas Tree Ornament

quick and easy christmas decorations to sew in under an hour

This Christmas tree decoration from Lulu and Celeste is a nice little project if you want something that can be sewn by hand.

Sometimes it’s nice to have a project that you can pick up and work on when you have a few minutes, then put it down and come back to it later. This is that kind of project!

There’s a downloadable template for the tree. The post is here.

I hope you feel inspired to make some easy Christmas decorations. Happy making!

quick and easy christmas decorations to sew in under an hour

Share this:

  • Click to email this to a friend (Opens in new window)
  • Click to share on Pinterest (Opens in new window)
  • Click to share on Facebook (Opens in new window)
  • Click to share on Twitter (Opens in new window)

Filed In: Blog, Christmas / Tagged: easy, quick

Bunting Tote Bag Tutorial

March 29, 2019 · Leave a Comment

bunting tote bag tutorial

Bunting Tote Bag Tutorial

This is a post I actually wrote 3 years ago when a new law was introduced in the UK that required shops to charge for plastic bags.

I’m recycling it because it fits in nicely with the Year of Bunting!

For making the bunting tote bag, I’d recommend using a strong fabric, like a heavy weight cotton. The canvas I used was left over from some curtains I’d made, and the appliqued bunting from scraps of cotton from dresses and other things.

If you don’t have any canvas, you might have an old tablecloth or some curtains you could use.

If you’d rather use a lighter cotton or polycotton fabric, you could line it to make it stronger, or just decide to use it to carry bread and flowers instead of potatoes and gallons of milk!

The bunting tote bag has boxed corners, which means that depending on what you put it, it should stand up.

bunting tote bag tutorial

How to Make a Bunting Tote Bag

1. Cut a rectangle of fabric. Good dimensions would be the same width as a Lidl bag (or other bag for life) and twice as long, plus seam allowance. Mine measured at 48 cm x 120 cm.

If you are using fabric with a directional print, cut 2 rectangles and sew them together.

2. If you do not have an overwhelming urge to cover everything in bunting, you can skip this bit and go straight to Step 3.

shopping bag tutorial

To make the bunting, cut a rectangle 9 cm x 10 cm. Fold in half lengthways. Cut diagonally from the folded corner to the corner opposite. Use this triangle to cut 5 triangles. Position them onto the fabric, allowing for seams. Pin in place, then applique them to the fabric. Sew a piece on of ribbon so that it covers the tops of the triangles.

shopping bag tutorial

3. With the right sides together, pin the side seams then sew them up. Trim the seams. Finish the seams with zigzags, or an overcasting stitch if you don’t have an overlocker. This could be the difference between getting all of your shopping home and the bag breaking and veg and milk and stuff ending up all over the road!

shopping bag tutorial

4. To make the boxed corners, press firmly on the fold at the bottom. Squash one of the corners flat so that the seam is aligned with the fold at the bottom. Measure up 6 cm from the corner. Pin. Sew across the corner. Cut the corner off. For more detailed instructions for making boxed corners, visit this tutorial here.

5. Hem the top of the bag.

shopping bag tutorial

6. To make the handles, cut 2 pieces of fabric 40 cm long and 10 cm wide. Fold in half lengthways. Then fold the outer edges into the middle. Fold in half and pin. Sew. I like to sew along both edges so that it looks symmetrical. Repeat for the other handle.

shopping bag tutorial

7. Sew the handles to the bag. You will need to sew them on in a few places to ensure that they stay on when the bag is full of shopping.

shopping bag tutorial

Now all you have to do is remember to take it with you when you go shopping!

Tips

Heavy weight fabric will be strongest, but other fabrics can be made stronger by adding a lining.

Ripstop will make good bags that are both strong and waterproof.

You could make bunting tote bags in different sizes.

Decorate them as you like to jazz them up.

If you will be carrying your shopping a long way, add some wadding to the handles and quilt them to make them more comfortable.

They make great last minute Christmas gifts and are a good way of using up fabric that you don’t know what to do with!

Share this:

  • Click to email this to a friend (Opens in new window)
  • Click to share on Pinterest (Opens in new window)
  • Click to share on Facebook (Opens in new window)
  • Click to share on Twitter (Opens in new window)

Filed In: Blog, Sewing Projects / Tagged: beginner, bunting, craft fair, easy, gift, how to

DIY Embroidered Christmas Star

December 19, 2018 · 2 Comments

diy embroidered christmas star

DIY Embroidered Christmas Star

When I was younger, I did a lot of Christmas crafting. I used to make cards and decorations and bake stuff.

Then I had kids and everything changed! I’d plan to make lots of things, then feel frustrated and annoyed that I hadn’t managed to get them done.

One year I tried to get round the fact that I had several tiny children by starting early. I was making stuff from August onwards. But because I’d been thinking about Christmas for so long, by the time it eventually came round I was sick of it!

So a couple of years ago, I made the decision to not worry too much. I’d do a bit if I had time and if I felt like it, and not attempt anything too ambitious. There is a limit to how many decorations I can hang off the tree anyway and I don’t send that many Christmas cards.

This year has been different again. Home educating my younger three means that I have boys at home in the day again. As they were showing signs of needing a break from the academic stuff, we spent most of last week doing Christmas crafts while listening to The Lion, The Witch and the Wardrobe. It was lovely! 

One “grown up” thing that I’ve been working on recently is an diy embroidered Christmas star.

diy embroidered christmas star

It’s made from felt with a snowflake design embroidered in the centre. The stars are sewn together using blanket stitch. 

It’s a perfect project for a busy person who’s left things a bit late! It doesn’t take long to make. You can do a bit when you have a minute. You can make one, or a few and string them together. And to make things easier, you can download a template with the snowflake design at the bottom of the post.

How To Make a DIY Embroidered Star

You Will Need

Felt
Embroidery thread
Ribbon for hanging
Star shape
Snowflake design

diy embroidered christmas star

Making the Star

1.Cut 2 stars from felt.

2. Embroider the snowflake design onto one of the stars.

diy embroidered christmas star

3. Sew the 2 stars together. I used blanket stitch, but you could use back stitch or running stitch if you prefer.

diy embroidered christmas star

4. Attach some ribbon or twine for hanging.

diy embroidered christmas star

If you would like the template I used, please enter your email address in the form below. Please note that by doing this, you will be added to the Tea and a Sewing Machine email list. I never send spam, only a weekly email containing updates, links, and other things that you might like. You can unsubscribe from these emails at any time. For more information about why I do this, please click here.

chimpy_form(’41’)

Share this:

  • Click to email this to a friend (Opens in new window)
  • Click to share on Pinterest (Opens in new window)
  • Click to share on Facebook (Opens in new window)
  • Click to share on Twitter (Opens in new window)

Filed In: Blog, Christmas, Sewing Projects / Tagged: beginner, Christmas, craft fair, easy, embroidery, felt, how to

How to Turn a Jumper Into a Cushion Cover

December 7, 2018 · 2 Comments

How to Turn a Jumper Into a Cushion Cover

how to turn a jumper into a cushion

My husband turned 40 earlier this year, and among the presents he was given was this.

how to turn a jumper into a cushion cover

Bearing in mind that his birthday is in May, and that he never wears anything like this (he’s 40, not 80!) it was a case of politely saying thank you and then wondering what to do with it.

He was never going to wear it, but giving it away or throwing it out seemed wrong. After all, the present giver had remembered that it was his birthday and had gone to the trouble of getting him a present. They probably meant well. It was probably not a joke.

So as an alternative to offloading it onto a charity shop and then feeling guilty, I decided to turn the jumper into a cushion cover.

It was very quick and easy to do, and is a solution not only for unloved birthday presents, but also for old clothes once worn by people who were very much loved.

Keeping clothes in one’s wardrobe that used to belong to people who have since died can cause space issues. Turning a favourite jumper into a cushion cover is a way of keeping memories and little bit of that person still in your life. It could work equally well with old shirts too.

There are lots of ways to turn a jumper into a cushion cover, but I wanted to keep things as simple as possible. I also wanted to keep its jumperiness. The buttons have stayed, as have the pockets. Actually, the buttons made things easier because they serve as the opening for the cushion pad, and the pockets are useful for keeping things, like ear buds or sweets for later!how to turn a jumper into a cushion

Instructions

You Will Need

A jumper
A cushion pad (you could upcycle an old cushion or synthetic pillow. Instructions for doing this can be found here.)
Usual sewing supplies

How To

1. Cut the top part of the jumper off, underneath the arms.how to turn a jumper into a cushion cover

2. If you need to, pin the button bands so that the button holes are not pulling on the buttons.

3. Turn the jumper section inside out.

4. Decide where the seams will be. I wanted the cushion cover to be squareish, so I decided to resew the side seams about 4-5 cm away from the original seams. This was as close as I could get and keep the pockets as they were. Sew the seams and trim them if necessary.

how to turn a jumper into a cushion cover

how to turn a jumper into a cushion cover

5. Sort out your cushion pad. You might have one already that you could use. Alternatively, an old pad or a synthetic pillow can be given a new lease of life if it’s washed, dried, and then pulled apart and fluffed up. There are instructions for doing this here.

6. Turn the cushion cover the right way out. Put your cushion pad inside its cover and enjoy your new cushion!

how to turn a jumper into a cushion cover

how to turn a jumper into a cushion cover

In the interests of being real, here’s a picture of my new cushion with its cushion friends and some mess. The pad of the reindeer one went weird in the wash and I haven’t sorted it out yet!

how to turn a jumper into a cushion cover

Share this:

  • Click to email this to a friend (Opens in new window)
  • Click to share on Pinterest (Opens in new window)
  • Click to share on Facebook (Opens in new window)
  • Click to share on Twitter (Opens in new window)

Filed In: Blog, Sewing Projects / Tagged: cushion, easy, how to, upcycling

  • 1
  • 2
  • 3
  • …
  • 6
  • Previous Entries
I'm Anna and I live in rural Norfolk in the UK. My mum taught me how to use a sewing machine when I was 10 and I haven't looked back! I love making all sorts of things and I hope you find inspiration here.

Join the list

Join the mailing list to receive updates, useful and interesting links and free pages from the Sewing Journal.

My New Ebook

things to male and do in the autumn

Bunting Makes Everything Better Tote Bag

Featured Kit

The Sewing Journal

My Kits and Patterns on Etsy

Shop the Christmas Shop at Sew and So


Join the List

Join the mailing list to receive updates, useful and interesting links and free pages from the Sewing Journal.

Privacy Policy

For information about cookies and Tea and a Sewing Machine's privacy policy, please click here.

Instagram

Instagram Widget by SnapWidget


UK Sewing Blogs

Theme by 17th Avenue · Powered by WordPress & Genesis

loading Cancel
Post was not sent - check your email addresses!
Email check failed, please try again
Sorry, your blog cannot share posts by email.
We use cookies to ensure that we give you the best experience on our website. If you continue to use this site we will assume that you are happy with it.Ok