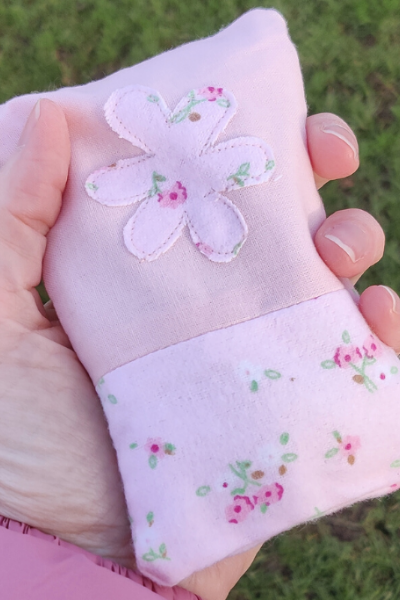
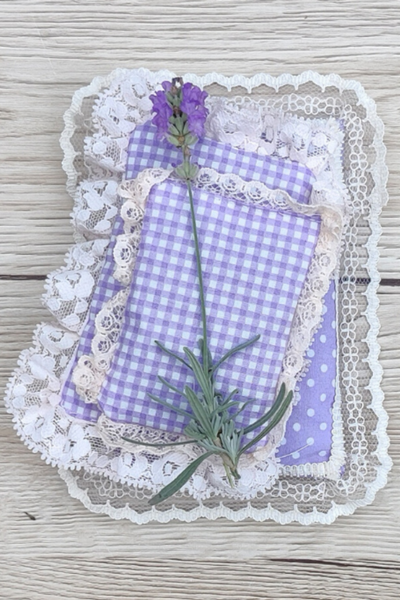
• Home
  • About
  • Blog
  • Ebooks and Printables
  • Etsy
  • Sewing Journal

Make it Yourself. Yes You Can!

  • Sewing Projects
  • Tips and Techniques
  • Embroidery
  • Other Crafts
    • Crochet
    • Felting
    • Jewellery
    • Wreaths
  • Christmas

Autumn Granny Square Pattern

September 18, 2020 · Leave a Comment

Autumn Granny Square Pattern

Out of all the seasons, I think I like autumn the most, although I have a hard time choosing my favourite! There’s definitely something to be said for cooler days, crisp air and golden sunshine. In England, our autumns are not as beautiful as they are in North America or in parts of Europe, but I love them anyway.

So with September swinging round again, I had an overwhelming desire to make something autumnal.

I have a couple of blankets on the go, plus a couple of others in the unfinished projects pile. They will probably get finished eventually, but in the meantime I really wanted to start another one!

Crocheting something in autumn colours felt like it would scratch that itch. Granny squares are wonderful for all kinds of reasons, not least because if you get bored you can always turn the squares into something else that doesn’t need so many, like a cushion or a hot water bottle cover.

Having a rummage in the wool basket unearthed some yarn left over from another project (actually it was this one!). The yarn is Paintbox Simply Aran in Soft Fudge, Vanilla Cream and Red Wine.

autumn granny square pattern

The granny square features a flower, which I worked in cream, but you could try it using other colours and see how it looks! Also changing the three colours of yarn that you use, you could use the same square to make a blanket for a different season.

autumn granny square pattern

Instructions For Making the Autumn Granny Square

You Will Need

Yarn in 3 colours
A crochet hook that is the correct size for the weight of yarn you are using. I used aran weight with a 5mm crochet hook.

Making The Autumn Granny Square

Please note that as I am English, I have used British crochet terms!

Make 4 chains and join with a slip stitch to make a ring.

autumn granny square pattern

Round 1: make 3 chains, then *work 1 treble into the ring, then 1 chain.* Repeat from the * 6 more times. Join with a slip stitch. Break off the yarn.

autumn granny square pattern

Round 2: Join colour 2 in a chain space.

Make 3 chains, then yarn over the hook, put the hook into the chain space, yarn over the hook again, pull through the chain space.

Yarn over hook again, then pull through 2 loops. Yarn over the hook, hook into the same chain space a second time, yarn over the hook, pull through the chain space.

Yarn over hook, pull through 2 loops. Yarn over the hook again and pull through the remaining loops.

autumn granny square pattern

This forms the first cluster.

The remaining 7 clusters are worked as follows: yarn over hook, into chain space, yarn over hook, pull through the chain space. Yarn over hook, pull through 2 loops. Yarn over hook, into ring, yarn over hook, pull it through ring. Yarn over hook, pull though 2 loops. Yarn over hook, into ring a third time, yarn over hook, pull it through the ring. Yarn over hook, pull through 2 loops. Yarn over hook once more, pull through remaining loops.

autumn granny square pattern

After each cluster, work 2 chains.

Join with a slip stitch. At the end of the round, break off the yarn.

autumn granny square pattern

Round 3: Join colour 1 into a chain space. Make 2 chains, then into the same chain space, 2 double crochets and 1 chain.

autumn granny square pattern

Into the next chain space, work 3 trebles, 2 chains, 3 trebles, 1 chain.

autumn granny square pattern

*Into the following chain space, work 3 double crochets and 1 chain.
Into the next chain space, 3 trebles, 2 chains, 3 trebles, 1 chain.*

Repeat from the * twice more. Join with a slip stitch and break off the yarn.

autumn granny square pattern

Round 4: Join colour 3 in a chain space immediately after a corner. In the same chain space, work 3 chains, 2 trebles, 1 chain.

autumn granny square pattern

Into the next space, 3 trebles, 1 chain.

Into the corner space, work 3 trebles, 2 chains, 3 trebles, 1 chain.

autumn granny square pattern

*Now work 3 trebles and 1 chain into each of the next 2 spaces, then 3 trebles, 2 chains, 3 trebles, 1 chain into the space at the corner.*

Repeat from the * twice more.

Join with a slip stitch. Break off the yarn and weave in the ends.

autumn granny square pattern

If you don’t want to make a blanket with your granny squares, I have a Pinterest board devoted to granny square projects which you can find here.

You might also like this tutorial showing how to make squares for a fusion quilt.

Share this:

  • Click to email this to a friend (Opens in new window)
  • Click to share on Pinterest (Opens in new window)
  • Click to share on Facebook (Opens in new window)
  • Click to share on Twitter (Opens in new window)

Filed In: Blog, Crochet / Tagged: how to, scrap project

How to Sew a Purse With a Clasp Frame

March 3, 2017 · 16 Comments

How to Sew a Purse With a Clasp Frame

Over the last few weeks I’ve been working on a piece of embroidery, and I needed a quick and easy project where I could use it.

Having the attention span of a goldfish means that longer projects tend not to get finished. A little purse with a clasp frame was just the thing as they are easy and quick to make, and it would show off the embroidery perfectly!

The instructions below show how to do the embroidery, then how to make the purse, including drafting the pattern.

There’s a separate tutorial showing how to sew in the frame, and I’ve included a link once we get to that stage.

If you want to make the little purse without the embroidery, you can just skip the embroidery part!how to sew in a purse with a clasp frame

How to Sew a Purse With a Clasp Frame

You Will Need

Fabric for outer and lining, interfacing, a small purse clasp frame (affiliate link), embroidery thread and needle, an embroidery hoop (optional), usual sewing supplies.

Embroidering the Purse Front

As it’s a small thing, it’s probably easiest to do the embroidery first before cutting out. That way you’ll have something to hold onto, and it will be big enough for your embroidery hoop if you are using one.

If you want to use my design, you can download it for free here.how to sew a purse with a clasp frame

The stitches I have used are lazy daisy stitch, woven wheel stitch, stem stitch, fern stitch and French knots. If you are unsure of how to sew these stitches, each link will take you to a tutorial for that stitch. If you’ve never tried them don’t be put off! Just have a practice first on a scrap bit of fabric.

Drafting the Pattern

Your purse will need to be the right size and shape for your purse frame. The easiest way to ensure this is to make your own pattern.

1. Take your clasp frame, a piece of paper and a pencil.

2. Draw around the top of the frame. Mark where the top of the hinges are.

3. For the rest of the purse, you can make it whatever shape you like! To check that both sides are the same, draw one half, then fold it in half and trace it onto the other half.how to sew a purse with a clasp frame

If you are embroidering it first, you will need to make sure that your purse is big enough to accommodate the embroidery, including a 1 cm seam allowance.

4. Draw around your purse shape, this time adding an extra cm. This is your pattern piece!how to sew a purse with a clasp frame

Cutting Out

Using your purse shape, cut 2 pieces from the outer fabric, including the embroidery, 2 pieces from the lining and 2 pieces from interfacing.how to sew a purse with a clasp frame

Sewing Up

1. Place one of the purse pieces on top of an interfacing piece with the right side up. Take the other outer piece and place that on top of the outer piece so that the right sides are together. Place the other piece of interfacing on top.

2. Take the clasp frame and line the top of the bobbles up with the top edge of the purse. Check that it is centred and that the distance all the way round the top between the clasp and the purse pieces is roughly the same.

3. Using pins, mark where the top of the hinges are on the purse pieces.how to sew a purse with a clasp frame

4. Sew the bottom of the purse outer between the pins. Repeat for the lining.how to sew a purse with a clasp frame

5. Pop the purse lining inside the outer so that the right sides are together. Pin the lining to the outer. Leaving an opening on one side, sew the lining to the outer.how to sew a purse with a clasp framehow to sew a purse with a clasp frame

6. Turn the purse the right way out. Slip stitch the opening.how to sew a purse with a clasp frame

To attach the purse frame, you will need to find the centre of the top edge of your purse and the centre hole on the purse frame. Starting at the centre, sew the purse frame to the purse. When you get to the hinge, go back to the centre and sew the other side. Repeat for the other half of the purse frame. There’s a detailed tutorial showing how to do this here.how to sew a purse with a clasp framehow to sew in a purse frame how to sew a purse with a clasp frame

I have some kits for this purse for sale on Etsy. They include everything you need, with the same fabric that I used and the embroidery design already printed onto the fabric. If you would like to take a look, they are here.how to sew a purse with a clasp frame

If you liked this tutorial showing how to sew a purse with a clasp frame, you might also like this tutorial for an embroidered daisy pouch.how to sew a pouch with a zip embroidered daisy pouch purse

Linking up here.

how to sew a purse with a clasp frame

Share this:

  • Click to email this to a friend (Opens in new window)
  • Click to share on Pinterest (Opens in new window)
  • Click to share on Facebook (Opens in new window)
  • Click to share on Twitter (Opens in new window)

Filed In: Blog, Sewing Projects / Tagged: clasp frame, easy, embroidery, how to, purse, scrap project

DIY Diary Pen Holder Scrap Project

February 3, 2017 · 8 Comments

DIY Diary Pen Holder

This post contains affiliate links.

One of the things I’ve found with having 4 kids is that I’ve had to abandon all my natural inclinations to be scatty and force myself to become organised instead.

As I have a tendency to forget things, I need write everything down. The best place I’ve found to do this is in a diary.

I’ve tried various things and the best thing I have found for this is a Moleskine diary.

It’s nothing fancy. There’s not a box on each page to write down what we’re having for dinner, or different coloured areas to write down what the boys have going on in one place and what I’ve got going on in another.

What there is however is lots of space to write stuff.

I can squeeze in a nice long to do list and I can colour code things with different pens if I want to. Anything important that I’ll probably forget I write up in the space near the date.

The only problem is there’s nowhere to keep a pen!

Last year I made a cover for my diary that had a pen holder, but this year my diary is purple and I don’t want to cover it up!

So instead I made a pen holder.

Apart from the elastic, I was able to use odds and ends of things I had already.diy diary pen holder

How to Make a DIY Diary Pen Holder

You Will Need

Elastic, fabric scraps, lace, buttons, bias binding, anything else you’d like to decorate it with.

Cutting Out

You will need to cut 2 pieces of fabric the same size as the spine of your diary, plus extra for the seam allowance.

You’ll also need 2 pieces for the pocket, the same width as as the pieces above, but shorter.

For my Moleskine diary, I cut 2 pieces 4 cm x 23 cm and the pocket pieces are 6 cm x 14 cm.diy diary pen holder

You could use little scraps and join them together so that when joined they are the right size. I sewed a piece of purple gingham to the plain purple for the pocket outer, then checked that it was the same size as the lining piece.

Sewing Up

1. Assemble your pocket pieces.diy diary pen holder

2. With the right sides together, join the top edges of the pocket with bias binding. You could use ribbon or a scrap of fabric if you prefer.diy diary pen holderdiy diary pen holder

3. Using a long stitch, sew 2 rows along the bottom of the pocket and gather. You might prefer to do this by hand.diy diary pen holder

4. Thread a small piece of elastic through the bias binding on the pocket. Take the spine outer piece and place the pocket on the top so that the bottom edges are aligned. Put the other spine piece over the top face down. Pin, then sew along the long edges leaving the bottom and the top free.

5. Turn it the right way out. One way to turn a tube of fabric the right way out is to tie a piece of string to a safety pin. Attach the safety pin to one end of the tube with the string is running through the centre. Pull on the string and it will turn the right way out.diy diary pen holder

Even doing this, I found it tricky! It’s probably easiest to attach the safety pin to the pocket end.

Alternatively you could sew along one long edge, then fold the other long edges inwards and sew them together.

6. Cut a piece of elastic long enough to go round your diary from one end of the pen holder to the other. Fold one of the short edges of the diary pen holder inwards and tuck one end of the elastic inside. Pin, then sew. Do the same with the other end of the pen holder and the elastic.diy diary pen holder

7. Decorate your diy diary pen holder with buttons, ribbon, and scraps of lace.

I sewed some lace to hide the join with the elastic. The little flowers were left over from some earrings I made and I sewed a tiny bead to the centre.diy diary pen holder

Now I’ll always have a pen!diy diary pen holderdiy diary pen holder

Linking up here.

diy diary pen holder

Share this:

  • Click to email this to a friend (Opens in new window)
  • Click to share on Pinterest (Opens in new window)
  • Click to share on Facebook (Opens in new window)
  • Click to share on Twitter (Opens in new window)

Filed In: Blog, Sewing Projects / Tagged: accessories, craft fair, diary, gift, how to, scrap project

How to Sew Storage Boxes

January 26, 2017 · 8 Comments

How to Sew Storage Boxes

Storage boxes are always useful.

I have made a number of fabric storage boxes over the last few years, and I have usually managed to find a use for them within a few days of making them.

They’re great for using up fat quarter packs bought on impulse, and if you don’t mind the sides being different, they can be a good way to use bits left over from other projects.

The only problem is that when you sew storage boxes from fabric, even if you use interfacing, they do tend to be a bit squashy. Squashy is fine, and it’s not too bad when the boxes are small, but if you want to sew storage boxes that are bigger, this can cause some problems.

In the past, I’ve covered cardboard boxes in fabric by gluing it on. These boxes retained their sturdiness, but the glue stank and it wasn’t sewing!

Another option is to sew in cardboard inserts, but it would involve unpicking seams if the cardboard needed replacing. Also you couldn’t wash it, unless you unpicked it and removed the cardboard first.

So I had an idea to sew storage boxes with pockets so that the cardboard is easy to remove.how to sew storage boxes

These boxes are bigger than ones I have made in the past. I actually used an old, smallish nappy box that’s currently holding outgrown clothes as a guide!

The pockets have their openings at the bottom so that the cardboard is not visible, and a button prevents the cardboard from falling out.

I was able to use fabric I already had and cardboard from boxes containing internet shopping.

Instructions

You Will Need

Fabric (cotton or polycotton is a good choice) for the outer and the lining
Cardboard
4 buttons
Strong thread or elastic to make the button loops

Cutting Out

For the outer, cut 2 side pieces 38 cm x 28 cm, 2 end pieces 25 cm x 28 cm and a bottom piece 27 cm x 40 cm.

For the lining, cut 2 side pieces 38 cm x 28 cm, 2 end pieces 25 cm x 28 cm and a bottom piece 25 cm x 38 cm.

From strong cardboard, cut 2 side pieces 35 cm x 25 cm, 2 end pieces 22 cm x 25 cm and a bottom piece 22 cm x 35 cm.

I didn’t bother with interfacing as the the cardboard would give it all the sturdiness it needed. However if you are using fabric that frays a lot, you might want to use some fusible interfacing.

Sewing Up

1. Take one of the outer side pieces and one of the lining side pieces. With the right sides together, sew them together along one of the short edges. If you are using a directional print, you will need to make sure that you are joining along the top edges. Press the seams open.how to sew storage boxes

Repeat for the other side pieces and the end pieces.

2. Join the side and end pieces to the bottom lining piece with the right sides together. When sewing each seam, leave about a cm at each end. This will make sewing the sides much easier!how to sew storage boxes

3. Take the bottom outer piece and hem it all the way round.how to sew storage boxes

4. Pin the bottom piece to the bottom section of the lining, on the wrong side so that it covers the seam. Sew around three of the edges, keeping close to the edge.how to sew storage boxes

4. Sew up the sides. In order to ensure that the seams along the top edge of the basket  match, start at the seam where the lining joins the outer (the seam you sewed first). Sew downwards to join the lining sections, then go back to where you started to sew together the outer sections.

5. Hem the raw edge all the way round.

6. Fold the outer section over the lining. The wrong sides of the outer sides and the lining sides should be together, and it should be starting to look vaguely like a box. Pin the sides at the edges. Sew, keeping close to the side seams.how to sew storage boxes

7. Make 4 loops from either elastic or strong thread. Sew the loops to the bottom outer. Try not to sew through the lining as well or you’ll have issues in a minute with your cardboard inserts!

8. Sew a button onto each side outer, at the bottom and in the middle, next to where you sewed the loops.how to sew storage boxes

9. Insert the cardboard and button it up.how to sew storage boxes

If the cardboard gets damaged, or if you need to wash your box, you can just remove the cardboard!how to sew storage boxeshow to sew storage boxeshow to sew storage boxeshow to sew storage boxes

If you like to sew storage boxes, you’ll probably like these tutorials too.

Nesting Fabric Storage Boxeshow to make nesting fabric storage boxes sew storage boxes

Round Fabric Basketssew storage boxes

Burlap Basketsew storage boxes

Quick and Easy Fabric Basketsew storage boxes

how to sew storage boxes

Share this:

  • Click to email this to a friend (Opens in new window)
  • Click to share on Pinterest (Opens in new window)
  • Click to share on Facebook (Opens in new window)
  • Click to share on Twitter (Opens in new window)

Filed In: Blog, Sewing Projects / Tagged: children, decor, fabric boxes, how to, scrap project, storage

A Super Easy Pattern Weights Tutorial

June 28, 2016 · 41 Comments

A Pattern Weights Tutorial

Whenever I make clothes for myself, whether I use a commercial pattern or a pattern that I made myself, it’s the cutting out stage that always takes longest.

Since I started using a rotary cutter, the process has got quicker than when I was using scissors, but it still takes a while.

This is where pattern weights can be very useful!

Pattern weights remove the need for pins. You simply lay the pattern pieces over the fabric, pop your pattern weights on top, grab your rotary cutter and away you go!

Pattern weights can be whatever you like. Rocks, metal rings or little bean bags, it doesn’t matter. They just have to be heavy enough to hold the pattern pieces steady while you cut them out.

This is not an idea that I have dreamt up myself. It’s something else I have learnt from The Great British Sewing Bee.

It’s obvious that the contestants need to maximise their time. If they can save time in the cutting out stage without compromising the finish of their thing, then they’ll have more time to spend making sure that their sewing is up to scratch.

Although I am not in a competition I’m all in favour of saving time. So I decided to make some pattern weights to speed up the process!how to make pattern weights tutorial

How to Make Pattern Weights

You Will Need

Scraps of fabric, rice, barley or something similar (uncooked!), usual sewing supplies.

Cutting Out

For my pattern weights, I used a rectangle 18 cm x 9 cm. You can make yours whatever size you like, but to get that nice triangular shape, the rectangle you use will need to be roughly the same size as 2 squares joined together.how to make pattern weights tutorial

Cut 1 rectangle for each pattern weight.

Sewing Up

1. Fold 1 of the rectangles in half so that the right sides are together. Sew along the bottom and the side. Trim the seams.how to make pattern weights tutorial

2. Turn it out and fill with rice. Be careful not to overfill it. The rice will need to be able to move about and overfilling will also make it difficult to sew up. About 2 thirds full is probably about right.how to make pattern weights tutorial

3. Fold the raw edge over so that it is inside and press with your finger.how to make pattern weights tutorial

4. Pin the top of the pattern weight so that the side seam is in the middle. By doing this, the top edge will run at right angles to the bottom edge.how to make pattern weights tutorial

5. Slip stitch the opening.how to make pattern weights tutorial

You now have 1 pattern weight! How many you make is up to you. I made 9.how to make pattern weights tutorialhow to make pattern weights tutorialhow to make pattern weights tutorial

Tips

If you don’t have any rice, you could use barley, dried peas or dried lentils.
If you are short on time, batching will make the whole process quicker.
Have a rummage through your fabric scraps. They’re a great way to use up odds and ends of lovely things that are too small to do much with, but that you don’t want to throw away!
If you need somewhere to keep your pattern weights, you could make a little box or a bowl. The smallest of these fabric boxes would probably about the right size!

storage boxes gridOr you could make a burlap bowl.burlap bowl squareOr you could crochet a bowl.crocheted bowl thumbnail

Linking up here.

Share this:

  • Click to email this to a friend (Opens in new window)
  • Click to share on Pinterest (Opens in new window)
  • Click to share on Facebook (Opens in new window)
  • Click to share on Twitter (Opens in new window)

Filed In: Blog, Sewing Projects / Tagged: craft fair, easy, gift, quick project, scrap project

I'm Anna and I live in rural Norfolk in the UK. My mum taught me how to use a sewing machine when I was 10 and I haven't looked back! I love making all sorts of things and I hope you find inspiration here.

Join the list

Join the mailing list to receive updates, useful and interesting links and free pages from the Sewing Journal.

My New Ebook

things to male and do in the autumn

Bunting Makes Everything Better Tote Bag

Featured Kit

The Sewing Journal

My Kits and Patterns on Etsy

Shop the Christmas Shop at Sew and So


Join the List

Join the mailing list to receive updates, useful and interesting links and free pages from the Sewing Journal.

Privacy Policy

For information about cookies and Tea and a Sewing Machine's privacy policy, please click here.

Instagram

Instagram Widget by SnapWidget


UK Sewing Blogs

Theme by 17th Avenue · Powered by WordPress & Genesis

loading Cancel
Post was not sent - check your email addresses!
Email check failed, please try again
Sorry, your blog cannot share posts by email.
We use cookies to ensure that we give you the best experience on our website. If you continue to use this site we will assume that you are happy with it.Ok