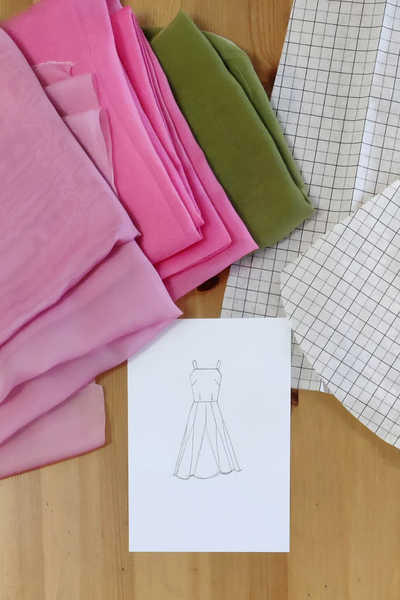
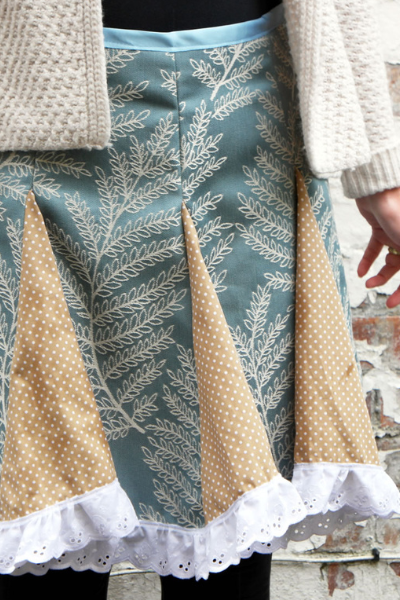
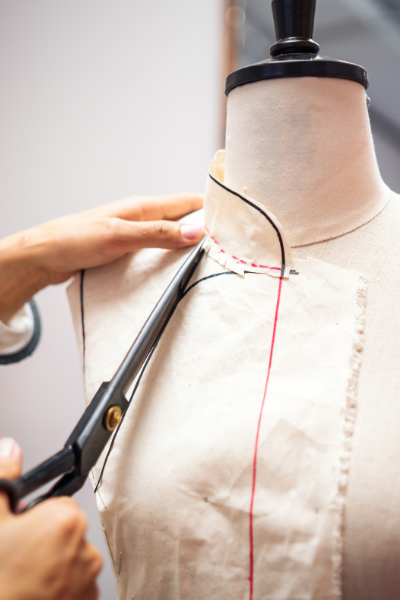
• Home
  • About
  • Blog
  • Ebooks and Printables
  • Etsy
  • Sewing Journal

Make it Yourself. Yes You Can!

  • Sewing Projects
  • Tips and Techniques
  • Embroidery
  • Other Crafts
    • Crochet
    • Felting
    • Jewellery
    • Wreaths
  • Christmas

DIY Spanish Style Skirt

July 19, 2020 · 2 Comments

DIY Spanish Style Skirt

So last time I showed how to draft a skirt pattern from your own measurements, in preparation to make a Spanish style skirt from the dress Nicole made on The Great British Sewing Bee. The post is here if you missed it.

If you don’t want to make your own pattern, you might have a pattern already that you can use.

To make a Spanish style skirt, we’ll need to make some modifications to the pattern we drafted, and the same modifications will apply to a commercial pattern. If you prefer to use a pattern you have already, just make sure that it’s for a straightish skirt.

We’ll need to adjust the length and the shape of the front hem and there are a couple more pattern pieces we need to make, then we can start sewing.

diy spanish style skirt

Modifying the Pattern

One of the things that makes a Spanish style skirt what it is are the ruffles. This skirt has 2 ruffles, each one made from a circle and joined onto the skirt with an extra section.

Because the ruffles are going to add to the length of the skirt, we’ll need to make the skirt shorter.

Each ruffle will be about 10 cm. There are going to be 2 of them and they will overlap by about 3 cm. They’ll be joined by an extra piece of fabric.

So you’ll need to make the skirt 17 cm shorter (unless you really want it to be longer, in which case leave it!).

The easiest way to do this is to cut 17 cm off the bottom edge of both pieces.

The other thing you’ll need to do is change the shape of the hemline at the front.

Find centre front on the pattern piece and measure up 14 cm from the bottom. Using a French curve (or another curved edge like a dinner plate if you don’t have one), draw a curved line from the centre downwards to the edge of the skirt pattern. It will look less weird if the line is straight for a little way, then curves to meet the bottom of the side.

diy spanish style skirt

Additional Pattern Pieces

There are 3 additional pattern pieces we need to make for the Spanish style skirt: facings (because I forgot when I was drafting the skirt!), the ruffles and the pieces to join the ruffles to the rest of the skirt.

To make the facings, take one of your pattern pieces. Pin the dart.

diy spanish style skirt

Take a new piece of pattern paper and trace from the waist line down to about 5 cm. Do this with your other pattern piece too. Make sure you label them!

diy spanish style skirt

To make the ruffles, we’re going to use a circle. As far as I remember, Nicole said that each of her ruffles were 2 circles joined together. I’m not going to do that here! 1 circle for each ruffle should be plenty. The pattern piece will be a quarter of a circle.

Cut a piece of pattern paper 60 cm square. From 1 corner, measure 60 cm across from one side of the paper to the other.

Now measure down 46 cm from the same corner. Measure across the paper in the same way. This will give you a chunk of a quarter circle 14 cm wide.

diy spanish style skirt

The third extra piece is the section that will go between the ruffles. Obviously we don’t want to loose the shape of the hem here.

For the back, draw a rectangle the same width as the skirt and 14 cm high.

For the front, trace the shape of the hem. Measure 14 cm down, then draw the hemline again.

diy spanish style skirt

Sewing the Skirt

We’re going to assemble the skirt first, then the ruffles, then join the ruffles to the skirt.

When assembling the skirt, my advice is to leave trimming the seams until you’ve checked that it fits! Even if you are using a pattern drafted from your own measurements, it’s best to be on the safe side.

Pin, then sew the darts on the front section and both the back pieces. Press the darts away from the centre.

Sew the centre back seam. You’ll need to put a zip in, and if you have a preferred way to do this then by all means do that! My way involves sewing the seam completely, then dealing with the zip afterwards. Trim the seam and press it open.

Sew in the zip. The way I do this works best with invisible zips, although I have done this with ordinary zips too. Pin the zip face down over the seam on the wrong side. Tack it in place, checking that the teeth of the zip are aligned with the seam. Sew the zip to the skirt. Now unpick the seam to expose the teeth. More detailed instructions can be found here.

diy spanish style skirt

Sew the side seams. Try the skirt on and check that the skirt fits. If it’s all ok, trim the seams and the darts and press.

If you haven’t cut out your facings, do that now. The front one can be cut on the fold, and the back ones need to be cut out on folded fabric so that you have 2.

Use some fusible interfacing to prevent them from fraying. Join the facings at the side seams.

With the wrong sides together, sew the facings to the waist of the skirt.

diy spanish style skirt

Understitch the facings.

diy spanish style skirt

Find where the darts are on the skirt and cut the facings in the same place. You might also like to hand stitch them to the side seams and the dart seams, just into the seam allowance to stop them from popping up and being annoying!

Making the Ruffles

Nicole used 2 circles for each ruffle on her Spanish dress. I decided to use one circle because I wasn’t sure whether I had enough fabric and 4 circles would require a lot of hemming!

Cut 8 quarter circles. I used odds and ends of things that I had in my fabric hoard. If you’re doing this too, you’ll need to piece them together to make the quarter circles.

To do this, take your pattern piece and pin bits of fabric to it until the pattern piece is covered. Make sure that the pieces of fabric overlap.

diy spanish style skirt

Turn the pattern piece over and cut away the extra fabric.

diy spanish style skirt

Turn it back over and trim down the overlapping areas, leaving enough for a seam.

diy spanish style skirt

Sew the quarter circles together so that you have 2 complete circles.

Hem the bottom edge of each circle with bias binding, or you might prefer to use a rolled hem foot if you have one. I used bias binding. If you need instructions for doing this, there’s a tutorial here.

To gather the ruffles, sew 2 rows of stitches along the top edge of each circles. Make sure that the lines of stitches don’t cross each other!

Gather the ruffles by pulling the stitches from one end. Usually when gathering you would knot the threads at one end and pull from the other. As you’ll have quite a lot of fabric to gather, you might like to get halfway along from one end, then gather the other half from the other end.

Keep going until the ruffles are the same size as the bottom of the skirt.

Assembling the Skirt

Take the extra skirt pieces that you drafted from the bottom of the skirt and sew them together at the side seams.

Take one of the ruffles. Pin, then sew it to the bottom edge.

diy spanish style skirt

Take the other ruffle and saandwich it between the bottom of the skirt and the top of the extra piece. Pin it, then sew.

diy spanish style skirt

Trim off all the stray threads and your Spanish style skirt is ready to wear!

diy spanish style skirt

Share this:

  • Click to email this to a friend (Opens in new window)
  • Click to share on Pinterest (Opens in new window)
  • Click to share on Facebook (Opens in new window)
  • Click to share on Twitter (Opens in new window)

Filed In: Blog, Sewing Projects / Tagged: sewing clothes without a pattern

Winter Circle Skirt Tutorial

November 24, 2018 · 4 Comments

Winter Circle Skirt Tutorial

winter circle skirt tutorial

After successfully managing to lose some weight, I’ve ended up with a wardrobe full of clothes that don’t fit, and the perfect excuse to make some new clothes for myself!

Over the summer I made several new things, and by the end of August, I could manage a week of pretty vintage style dresses and skirts.

Unfortunately, the end of summer meant putting the pretty things away and going back into things that were decidedly baggy and, in some cases, actually falling off.

So I’m now in the process of making some winter outfits for myself. I now have a lovely blue dress with appliqued flowers on it, and a couple of weeks ago I made myself a winter circle skirt.

I love circle skirts and the last one I made was from a duvet cover! This one I’ve made from some lovely wool plaid as cotton duvet covers aren’t warm enough for winter!

Circle skirts are fab, and here’s why:

They’re easy to make. Although there is a zip which I know might give some of you the heebie jeebies, there is an easy way to put them in. If you’re still terrified, you could use a button or ties instead.

They are quick to make. Once you’ve made one or two, you’ll be able to knock one out in an evening easily. You could even make several at once as there’s nothing especially complicated about them and apart from the waistband, the bits are all the same.

Fitting is easy. As long as it fits around your middle and it’s the length you want, you don’t need to worry! And if it turns out to be too long or too short, that’s easy to fix. Either cut a bit off or add an extra bit of fabric, a frill or some broderie anglaise.

They look lovely on most people, regardless of body shape. There’s no gathering, so no extra bulk around areas you might not want to draw attention to.

They’re lovely and swirly to wear, and if you’re in a foofy kind of mood, you could wear a petticoat or add some circles of net underneath.

They’re the kind of thing that will work equally well whatever fabric you use. Personally I’d avoid stripes and big prints, but I can imagine them working if you match the patterns. I’ve made them in cotton prints, jersey, plain fabric, duvet covers, taffeta, chiffon, tulle and now wool plaid.

You can wear pretty much anything with them! A t shirt, cardigan, blouse, jumper, or a vest will all go.

So given that I love circle skirts and that I knew I could make one in the limited time I had, a winter circle skirt was an obvious choice!diy winter circle skirt tutorial

How to Make a Winter Circle Skirt

You Will Need:

Warm fabric for the skirt, like a wool blend. Depending on your measurements and on the width of the fabric, you might need a couple of metres, or it might be 3 or 4. So check your measurements first!

Fabric for the lining

A 20 cm zip

Bias binding

1. Take Your Measurements

First of all you’ll need to measure your waist and decide how long you want the skirt to be.

When measuring yourself, let the tape measure rest gently where the skirt will sit. Don’t be tempted to pull it too tight! We’d all like those numbers to be a bit smaller, but being able to breathe is more important!

Jot down your waist measurement, then add 10 cm for seam allowance and ease. If you are planning on cutting 2 half circles instead of 4 quarter circles, you’ll only need to add 6 cm.

When it comes to length, 62 cm is a good length for most people. A skirt of this length will come to just below your knee if you are of average height. If you are either very tall or very small, or if you want a skirt that is longer or shorter, you’ll need to measure yourself.

The easiest way to do this is to dangle the tape measure upside down. When the the end is where you’d want the hem to be, make a note of the number at your waist.

2. Working Out the Squares

You’re going to be cutting the skirt pieces out from squares, so the next job is to work out how big the squares need to be.

You already have some of the information because you’ll have worked out how long you want the skirt to be in the previous step. What you need to work out now is the distance from your waist to what will be the centre of the circle.

The easiest way to do this is to take your waist measurement plus the extra cm for seams and ease, and divide it by 3. Then divide the answer by 2.

Add this to your desired skirt length and this will tell you how big the square will need to be.

3. Cutting Out

The Skirt

Now you can cut the bits out! If you prefer, you can make a pattern piece which might make things a bit quicker if you decide to make another winter circle skirt. I don’t usually bother, partly because I know I’ll forget where I put it!

Cut 4 squares of fabric with each side being the same length as your desired skirt length plus waist divided by 3 divided by 2.

If you are fairly slim, you might be able to cut out half a circle by folding the fabric in half widthways.

The thing to remember is that for your winter circle skirt to hang properly, the grain needs to be running up and down the centre front and back.

Choose which corner will be the top of your skirt. Using pins and a tape measure, start at one side and mark off your desired skirt length plus waist divided by 3 divided by 2. Measure across the skirt to the other side, keeping one end of the tape measure at the top corner.

diy winter circle skirt tutorial

Go back to the top corner and one side, and this time mark off your waist measurement divided by 3 divided by 2.

Now cut out where you have pinned. You should have what looks like a quarter of a doughnut.

diy winter circle skirt tutorial

You’ll need 4 of these!

With cotton fabric, it’s possible to cut out all 4 quarter circles together, but if you’ve chosen something thicker for your winter circle skirt, it’s probably safer to cut them out 2 at a time.

The Lining

Cut the lining out in the same way. Just make your overall length 10 cm shorter.

diy winter circle skirt tutorial

Cutting Out the Waistband

Cut a piece of fabric the same length as your waist plus a bit extra, and 10 cm wide. You might have to cut 2 pieces and join them.

4. Sewing the Skirt Pieces

If you’ve ended up with 4 quarters, sew the front and back sections. If you cut 2 half circles, you can skip this step!

Take 2 of the quarters and pin them, right sides together, along one of the straight edges. These straight edges should have the grain running up and down.

Sew, then trim the seam. Press it open.

Repeat with the other 2 pieces.

5. Sewing the Side Seams

If you have some safety pins handy, you might like to use those instead of pins. This is a tip from Julie of Sum of Their Stories and it definitely beats jabbing yourself with a pin!

Pin one of the side seams near the waist. Put the skirt round you and pin the other side. You might need to adjust the pins a bit so that the seams on each side are the same.

On one side, mark where you have pinned with a pencil or tailors’ chalk, then unpin it. Take the skirt off and repin the side seams. Sew both seams. Trim and press the seams open.

6. Making the Lining

If your lining sections are in quarters, sew them together to get a front piece and a back piece.

Pin the front and back sections together, using the skirt as a guide for the side seams. Sew the seams, trim and press.

7. Installing the Zip

Sewing the zip to your winter circle skirt is much easier if you sew the lining to the skirt first!

Make sure that the side seams are matched up, then sew the lining to the skirt a cm (1/4 inch) or so from the waist. You can do this either by hand or on the sewing machine.

I decided to sew the zip on top of the lining because it’s easiest. If you’d like a neater finish, you could sandwich the zip between the lining and the skirt instead.

Using the zip as a guide, unpick some of the side seam of the lining.

Pin the lining to the skirt at the bottom of the bit you unpicked. Check that the unpicked bit of side seam of the lining is matched up with the side seam of the skirt.

Now pin the zip over the unpicked lining seam and the skirt seam. Tack the zip in place, checking that the teeth of the zip are over the seam.

Sew the zip. This is easiest with a zip foot, but you can still do this if you don’t have one.diy winter circle skirt tutorial

Now unpick the part of the skirt seam that’s covering the teeth of the zip.

diy winter circle skirt tutorial When sewing the zip, it’s easiest to start some way down from the zip pull. When you’ve unpicked the seam, move the zip pull down into the bit you’ve sewn already, then sew the top of the zip.

8. Making the Waistband

If you need to join the pieces of your waistband, do that now.

Fold the waistband in half lengthways and press. Your finger will probably do! If not then use the iron.

Open it out, then fold the long raw edges into the centre. Fold it in half lengthways again and press, with your finger or with the iron.

Unfold the waistband. Pin one of the long edges to the waist of the skirt on the wrong side. The waistband needs to be face down, so that once you have sewn it to the wrong side, you can fold it over the raw edges using the creases you pressed into the waistband earlier.diy winter circle skirt tutorial

Sew the waistband to the skirt, keeping close to the folded edge. Leave a couple of cm either side of the zip.

Now fold the waistband over to waist of the skirt. Tuck the raw edge of the waistband underneath so that all the messy bits are enclosed.

Topstitch around the waistband.
diy winter circle skirt tutorial

When you get to the zip, tuck the ends in and sew.

diy winter circle skirt tutorial

9. Finish the Hems

The easiest way to finish the hem on your winter circle skirt is with bias binding.

As it’s going to take quite a lot, it’s best to leave it on the roll. Starting somewhere inconspicuous (A side seam is a good place), pin one end of the bias binding to the skirt on the right side, so that the right sides are together.

Sew the bias binding to the skirt, keeping close to the folded edge.

When you get back to where you started, overlap the ends of the bias binding by a cm or two and sew over them.

Fold the bias binding over so that it’s all on the underneath of the skirt. Press it, then sew the bias binding to the wrong side of the skirt, keeping close to the other folded edge.

Finish the hem on the lining in the same way.

Trim away any stray threads, run the iron over it and your winter circle skirt is ready to wear!

diy winter circle skirt tutorial

diy winter circle skirt tutorial

Share this:

  • Click to email this to a friend (Opens in new window)
  • Click to share on Pinterest (Opens in new window)
  • Click to share on Facebook (Opens in new window)
  • Click to share on Twitter (Opens in new window)

Filed In: Blog, Sewing Projects / Tagged: beginner, circle skirt, easy, how to, sewing clothes without a pattern

Halter Neck Dress Without a Pattern: Drafting the Pattern

September 3, 2018 · 2 Comments

Halter Neck Dress Without a Pattern: Drafting the Pattern

halter neck dress without  pattern drafting the pattern

Having a wardrobe full of clothes that are too big has been the perfect excuse to make new things for myself!

When the weather’s warm enough, I love my vintage style dresses. It’s not easy to find these in the shops, so the obvious answer is to make my own.

I successfully turned my cherry blossom dress into a sundress, and having seen a halter neck dress on Pinterest that I rather liked, I decided to have a go at making one, using the cherry blossom dress as a starting point.

To help with designing the dress, I used the printables from my newest ebook, Designing and Making a Dress From Scratch. You can find out more about the ebook here.

The printables helped me to collect ideas, design the dress and work out how I was going to make it, step by step.

I wrote a post about designing a halter neck dress using the ebook’s printables which you can read here.

Now that I’ve worked it all out, the next step is to make the pattern pieces!

If you haven’t drafted pattern pieces before, it might seem daunting, but it’s perfectly possible, especially if you’ve made clothes for yourself before from patterns.

Making things from patterns will have given you an idea of how the pieces ought to look.

Even if you haven’t don’t worry, because in the rest of the post I’m going to show you how to draft the pieces for a halter neck dress.

Drafting Pattern Pieces For a Halter Neck Dresshalter neck dress without  pattern drafting the pattern

You Will Need

Tape measure
Pencil
Big bits of paper (pattern paper is ideal. This is an affiliate link).
Long ruler
Scissors
Pins
A French curve is useful, but you could use a plate instead.

Taking Measurements

For detailed instructions about taking measurements, you might like to read this post here.

Basically, don’t measure yourself over a bulky jumper, try to make sure that the tape measure is straight and don’t pull it too tight!

You will need to measure:
Across your collar bone
From one shoulder to the other
Chest under your armpits
Bust
Waist, where the tape measure rests comfortably.
From the top of your shoulder to your waist
From the top of your shoulder to under your armpit.
The top of your shoulder to where you took your bust measurement.
The top of your shoulder to where you want the top of the dress to be.
Your waist to just below your knee.

Drafting the Bodice

I’ve used the same strategy here as I did for the vintage style sundress. I started off by making a pattern piece in the same way that I did for the Cherry Blossom Dress Sewalong, then adapted it by changing the neckline and removing the shoulders.

Unlike the Cherry Blossom dress and the vintage style sundress, this has buttons down the front. So the bodice front is in 2 sections with button bands and no zip.

This will affect the order in which the dress has to be sewn together, but we’ll come to that later!

Drafting the Bodice Front

Start off with a large piece of pattern paper.

It will need to be about 10 cm (4 inches) longer and wider than your longest and widest measurements.

Draw a vertical line the same length as the distance from the top of your shoulder near your neck to your waist. This will be the centre line of the bodice. When you cut out your fabric, it will be this line that goes on the fold.

On this line, mark off the distance from your shoulder to your armpit and from your shoulder to bust.halter neck dress without  pattern drafting the pattern

At the top of the vertical line, draw another line at right angles to it the same length as half the distance across your collarbone.You only need half the measurement because you’re drawing half of the bodice front.halter neck dress without  pattern drafting the pattern

A couple of cm (about an inch) below and using the measurement across your shoulders divided by 2, draw another line below the first horizontal line.

For the next horizontal line, find where you marked your shoulder to armpit measurement. Draw a horizontal line the same length as your chest measurement divided by 4.

Now find where you marked your shoulder to bust measurement. Draw another horizontal line the same length as your bust measurement divided by 4.halter neck dress without  pattern drafting the pattern

From the bottom end of the first vertical line, draw a horizontal line the same length as a quarter of your waist measurement, plus 2 cm (3/4 inch). The extra cm are to make allowances for the waist darts. We’ll come onto those in a minute!

Now join the lines up! To get the curve of the armhole, you might like to use a French curve. If you don’t have a French curve, you can use a plate instead.halter neck dress without  pattern drafting the pattern

halter neck dress without  pattern drafting the pattern

To draw the neckline, measure down about 15 cm (6 inches) from the top of the centre line. Using a French curve, join from here to the far end of the collarbone line.

To position the side darts, find the bust line and mark a couple of cm (3/4 inch) either side. Join these marks to a point about 8 cm (3 inches) along the bust line.

You will need to check this on yourself or on your dress form to determine whether the darts are in the right place, so pin the darts on your pattern piece and hold it onto yourself. If they’re not right, adjust them.

You might need to make them wider or narrower, shorter or longer, or adjust the position a little bit.

To add darts at the bottom of the bodice, find the halfway point on the piece you have made. I found that for this dress, they needed to be a bit longer than on my other dresses, They will need to be about 12 cm (5 inches) long and 2 cm (3/4 inch) wide in total, so 1 cm (3/8 inch) either side of the line. Check it on yourself to get them in the correct place.

Now add a 2 cm (3/4 inch) seam allowance to the bottom, the side and the centre.

Adapting Your Bodice Pattern Piece For the Halter Neck Dress

You can either use this pattern piece and adapt it for the vintage style sundress, or if you prefer, draw round it and put the original to one side. 

Find the horizontal line you drew for your chest measurement. Between your chest measurement and your waist, the pattern piece will need to have a straight edge. This is because this is where you’ll be joining the front to the back and if it’s curved you’ll end up with weird bumps.

On the centre line, mark where you would like the top centre of the bodice to be, plus a couple of cm (3/4 inch) for the seam allowance. The best way to do this is to hold the pattern piece against yourself or your dress form and draw it on.

Draw a line from where you marked your chest measurement at the side to where you marked the top of the bodice on the other side. From the chest side, it will need to be curved, then slope gently downwards.halter neck dress without  pattern drafting the pattern

You could use a French curve for this, or a plate if you don’t have one.

Don’t forget to add the darts and a seam allowance if you’re making a copy!halter neck dress without  pattern drafting the pattern

Cut it out.

Drafting the Bodice Back

Draw round the adapted bodice front onto another piece of pattern paper.

Find point where you drew the chest line. Draw a straight, horizontal line across the pattern piece.halter neck dress without  pattern drafting the pattern

Cut it out.halter neck dress without  pattern drafting the pattern

Working Out the Skirt Measurements

The skirt of the halter neck dress is made up of 4 quarter circles with the middle cut out, like a doughnut.

To work out the size of square you need, you will need the length of the skirt, plus the distance from the edge of the doughnut hole to centre.

To do this, you will need pi. If maths isn’t your thing, don’t panic!

Pi is the relationship between the distance around the edge of a circle and the distance across it, passing through the centre. The distance around the edge is roughly 3 times the distance round the middle. We only need to know from the edge to the centre, not right the way across, but this is easy to work out as we can just halve it.

It’s easiest to do this on a calculator. There’s probably one on your phone, or if you Google calculator, it will bring one up.

To calculate the dimensions of the skirt and how much fabric you need, take your waist measurement and add 10 cm (4 inches) for seams and ease.

Divide it by pi, then divide this answer by 2. Jot this down somewhere as you will need it in a minute.

Now add this number to your desired skirt length.

This new number tells you how long the sides of the squares of fabric need to be. 

For the lining, you can use the same measurements. Just make the skirt 10 cm (4 inches) shorter.

Now you’re ready to cut out the bodice and skirt pieces of your halter neck dress!

As this is a different style of dress to the ones I usually make, I made a toile for the bodice. I was glad I did, because I discovered that I needed to adjust the side seams and make the darts a bit longer. I’d recommend making a toile if you have time and some spare fabric.

The next post will take you through sewing the halter neck dress together.

Share this:

  • Click to email this to a friend (Opens in new window)
  • Click to share on Pinterest (Opens in new window)
  • Click to share on Facebook (Opens in new window)
  • Click to share on Twitter (Opens in new window)

Filed In: Sewing Projects / Tagged: dressmaking, sewing clothes without a pattern, vintage style dresses

Vintage Style Sundress Without a Pattern

June 23, 2018 · 2 Comments

Vintage Style Sundress Without a Pattern

Here’s a tutorial for my new favourite dress!

The idea for this vintage style sundress had been cooking away for a while, and after the sewalong was a good time to make it as I had the bodice pattern piece I’d made to hand.

Like my other dresses, the skirt is a circle and the bodice is made from 2 pieces. There’s a zip at the side and the shoulder straps are each made from one piece.

If you took part in the sewalong you’ll be able to use your pattern pieces and modify them a bit.

This vintage style sundress is lined. If you don’t usually make things with linings, there’s no need to panic! It just means making a second version of the dress out of lining fabric.vintage style sundress without a pattern

How to Make a Vintage Style Sundress Without a Pattern

You Will Need

Fabric and Habby

4-5 m of cotton or polycotton fabric. 4 m is enough for a UK size 16.
4-5 m of lining fabric.
A 20 cm zip
7 m of bias binding
Matching thread

Other Things You’ll Need
Sewing machine
Pins in a pin cushion
Needle
Fabric scissors
Seam ripper
Pattern paper
Tape measure
Pencil
Tailors’ chalk or a vanishing ink fabric pen
A long ruler
A French curve or a plate
A calculator
Rotary cutter and cutting mat (optional)

Before You Start

Before starting your vintage style sundress, you’ll need to take your measurements.

If you took part in the Cherry Blossom Dress Sewalong and you still have the pattern pieces you can skip this bit.

To help with the measurements you can download a free printable here. I’d recommend using the printable as some of the measurements will need to be divided by 2 or by 4 when you draft the bodice, and the printable will help to prevent muddles and confusion later on!

This is where you’ll need to measure:

Across your collar bone
From one shoulder to the other
Chest under your armpits
Bust
Waist, where the tape measure rests comfortably.
From the top of your shoulder to your waist
From the top of your shoulder to under your armpit.
From the top of your shoulder to where you took your bust measurement.
From the top of your shoulder to where you want the top of the dress to be.
From your waist to just below your knee.

There are some tips about taking measurements here.

Drafting the Bodice

The bodice of the vintage style sundress is in 2 sections. There are darts in the front section to give it some shape, and there’s a zip in the side seam.

The bodice is drafted in the same way as for my other dresses, then we’ll adapt it for the vintage style sundress.

If you still have your bodice pattern pieces from the Cherry Blossom Dress sewalong, you can use those. If not, you’ll need to draft the bodice front and back sections.

Drafting the Bodice Front

Start off with a large piece of pattern paper.

It will need to be about 10 cm (4 inches) longer and wider than your longest and widest measurements.

Draw a vertical line the same length as the distance from the top of your shoulder near your neck to your waist. This will be the centre line of the bodice. When you cut out your fabric, it will be this line that goes on the fold.

On this line, mark off the distance from your shoulder to your armpit and from your shoulder to bust.

At the top of the vertical line, draw another line at right angles to it the same length as half the distance across your collarbone.You only need half the measurement because you’re drawing half of the bodice front.vintage style sundress without a pattern cherry blossom dress sewalong drafting bodice

A couple of cm (about an inch) below and using the measurement across your shoulders divided by 2, draw another line below the first horizontal line.vintage style sundress without a pattern cherry blossom dress sewalong drafting bodice

For the next horizontal line, find where you marked your shoulder to armpit measurement. Draw a horizontal line the same length as your chest measurement divided by 4.

Now find where you marked your shoulder to bust measurement. Draw another horizontal line the same length as your bust measurement divided by 4.

From the bottom end of the first vertical line, draw a horizontal line the same length as a quarter of your waist measurement, plus 2 cm (3/4 inch). The extra cm are to make allowances for the waist darts. We’ll come onto those in a minute!vintage style sundress without a pattern cherry blossom dress sewalong drafting bodice

Now join the lines up! To get the curve of the armhole, you might like to use a French curve. If you don’t have a French curve, you can use a plate instead.vintage style sundress without a pattern cherry blossom dress sewalong drafting bodice

To draw the neckline, measure down about 15 cm (6 inches) from the top of the centre line. Using a French curve, join from here to the far end of the collarbone line.vintage style sundress without a pattern cherry blossom dress sewalong drafting bodice

To position the side darts, find the bust line and mark a couple of cm (3/4 inch) either side. Join these marks to a point about 8 cm (3 inches) along the bust line.

You will need to check this on yourself or on your dress form to determine whether the darts are in the right place, so pin the darts on your pattern piece and hold it onto yourself. If they’re not right, adjust them.

You might need to make them wider or narrower, shorter or longer, or adjust the position a little bit.

To add darts at the bottom of the bodice, find the halfway point on the piece you have made.They will need to be about 10 cm (4 inches) long and 2 cm (3/4 inch) wide in total, so 1 cm (3/8 inch) either side of the line. Check it on yourself to get them in the correct place.

Now add a 2 cm (3/4 inch) seam allowance to the bottom, the side and the shoulder edges.vintage style sundress without a pattern cherry blossom dress sewalong drafting bodice

Adapting Your Bodice Pattern Piece For the Vintage Style Sundress

***Cherry Blossom Dress Sewalong people can jump back in here!***

You can either use this pattern piece and adapt it for the vintage style sundress, or if you prefer, draw round it and put the original to one side. 

Find the halfway point at the bottom of the shoulder.

From the bottom of the neckline, draw a straight line to the point at the bottom of the shoulder. Now draw another line from this point to the chest line.vintage style sundress without a pattern

Using a French curve (or a plate), make the pointy bit curved.

Don’t forget to add the darts!vintage style sundress without a pattern

Cut it out.

Drafting the Bodice Back

Draw round the adapted bodice front onto another piece of pattern paper.vintage style sundress without a pattern

Find point where the chest line meets the armhole. Draw a straight, horizontal line across the pattern piece.vintage style sundress without a pattern

Cut it out.

Working Out the Skirt Measurements

The skirt of the vintage style sundress is made up of 4 quarter circles with the middle cut out, like a doughnut.

To work out the size of square you need, you will need the length of the skirt, plus the distance from the edge of the doughnut hole to centre.

To do this, you will need pi. If maths isn’t your thing, don’t panic!

Pi is the relationship between the distance around the edge of a circle and the distance across it, passing through the centre. The distance around the edge is roughly 3 times the distance round the middle. We only need to know from the edge to the centre, not right the way across, but this is easy to work out as we can just halve it.

It’s easiest to do this on a calculator. There’s probably one on your phone, or if you Google calculator, it will bring one up.

To calculate the dimensions of the skirt and how much fabric you need, take your waist measurement and add 10 cm (4 inches) for seams and ease.

Divide it by pi, then divide this answer by 2. Jot this down somewhere as you will need it in a minute.

Now add this number to your desired skirt length.

This new number tells you how long the sides of the squares of fabric need to be. 

Cutting Out

Cutting Out the Bodice Pieces

You’ll need to cut one bodice front and one bodice back each from the dress fabric and the lining fabric.

Cut them out on folded fabric with the grain running up and down the centre.

Remember to transfer the darts to both the main fabric and the lining.

Cutting Out the Straps

From the dress fabric, cut 2 rectangles 10 cm x 50 cm.  It’s best to check your measurements first. If this will make the straps either massively too long or too small, adjust the length.

Cutting Out the Skirt

You will need 4 squares of fabric long enough for the total quarter circle, plus a bit extra.

Cut your 4 squares of fabric. Decide where the top is on each piece.If you’re cutting out more than one at a time, make sure that the pieces are all the same way up.

If you are using fabric with a directional print, you’ll need to have 2 pieces with the right side up, and 2 pieces with the right side down.

Find the number you added to your desired skirt length. This number is the distance from the edge of the inside of the doughnut to the centre. Measure this amount from the top corner down the side, then repeat for the other side.

Now take your tape measure. By holding one end of the tape measure to the top corner and moving the other end across the fabric, measure this amount across from one side to the other, marking as you go. I used pins, but you could use tailors’ chalk or a fabric pen.vintage style sundress without a pattern

Now take the total of this number plus your desired skirt length. From the same corner, measure down this amount on either side. Mark off this same distance all the way across as you did in the previous step.vintage style sundress without a pattern
Now cut where you have pinned. I used a rotary cutter for this. You should have 4 quarter circles with another smaller quarter circle cut out of the top.vintage style sundress without a pattern

You’ll need to cut the lining in the same way, except that the skirt pieces will need to be about 10 cm (4 inches) shorter.

Sewing Up

1. Sew the darts. There’s a tutorial showing how to do this here.

vintage style sundress without a pattern

2. Sew the skirt sections.

Take 2 of the skirt pieces, one of the pieces cut right side down, and the other one of the pieces cut right side up.

Pin 2 of the straight edges together. To ensure that the skirt of the dress hangs well, check that the edges you are pinning are both on the grain.

If you can’t remember which of the straight edges is on the grain, gently pull the fabric, first one way, then the other. The way that stretches least is the grain.

Sew the centre seam, then press.

You’ll need to do this with the other 2 skirt sections and the lining.

3. Sew the skirt to the bodice.

Take one skirt section and one bodice piece.

Find the centre of the waist edge of the bodice by folding it in half. You might want to mark it with a pin, or you could just press it with your finger.

Match the centre seam of the skirt to the centre of the bodice and pin. Then working outwards from the centre, pin the skirt to the bodice.

Sew the skirt to the bodice, taking care that the waist darts in the bodice are facing outwards. Then sew the seam and press it downwards.vintage style sundress without a pattern

Repeat with the other bodice and skirt sections, and the lining.

4. Sew the dress front and back together.

Put the dress pieces together so that the right sides are on the inside. Pin one of the side seams, just the bodice, no need to worry about the skirt at the moment.

Slip the dress on and pin the bodice on the other side. Don’t worry about pinning the skirt, as long as you pin the waist. You might need to adjust the seams so that they are the same width.

On one side, mark where you have pinned with tailors’ chalk, a pencil or fabric pen. Unpin the dress, take it off, then repin where you marked.

Sew the side seams. Start at the waist and sew the bodice, then go back to waist and sew the skirt.vintage style sundress without a pattern

Using the seams on the dress as a guide, repeat with the lining.

Press the seams open.

5. Sew the straps.

Take one of the strap pieces. Fold it in half lengthways so that the wrong side is outwards. Sew along the open long edge.

Turn the strap the correct way out.

Make sure that the seam is in the centre, then press the strap.

Repeat with the other strap.vintage style sundress without a pattern

6. Attach the lining.

Lay the dress out, right side out, so that the bodice is flat. Pin the shoulder straps to the back of the bodice. The outer edges of the straps need to be aligned with where the straight edge of the bodice front ends.vintage style sundress without a pattern

Slip the dress inside the lining so that the right sides are together. Pin the lining to the top of the dress.vintage style sundress without a pattern

Sew all the way around. Trim the seams and turn the dress the right way out.vintage style sundress without a pattern

7. Sew in the zip.

Decide on which side you’d like the zip to be. For right handed people, the left side is usually most comfortable. If you’re left handed, you might prefer the zip on the right hand side.

Put the zip over the seam and mark the top and bottom of the zip with pins. There’s no need to go right up to the top edge of the bodice, but make sure that the bottom of the zip extends past the waist.

Unpick the lining between the pins.

Pin the zip over the seam. Tack, then sew in place. vintage style sundress without a pattern Unpick the seam to expose the teeth of the zip.

There’s a detailed tutorial showing how to sew in an invisible zip here.

8. Attach the straps at the front.

Unpick the seam between the at the top of the dress between the dress and the lining. at the edge of the straight bit at the front. There’s no need to unpick the whole thing, just the width of the straps.

Slip the straps in between the lining and the bodice. Pin the straps.

Now pop the dress on and adjust the straps so that they are the right length.

Sew up the seam. If you find this too fiddly with the sewing machine, you could sew them by hand instead.

9. Finish the hems with bias binding.

The hem of the vintage style sundress is finished with bias binding because hemming a circle can be tricky!

Unroll some of the bias binding. Open it out and pin one edge to the edge of the skirt, right sides together. Don’t worry about pinning it all the way round, just at the start will do.

Sew the bias binding to the skirt, keeping close to the folded edge. When you get back to where you started, overlap the ends by a couple of cm (an inch).vintage style sundress without a pattern

Press the seam towards the skirt, then fold the bias binding underneath and press it again.

Sew the bias binding to the bottom of the skirt, keeping close to the other folded edge.vintage style sundress without a pattern

There’s a more detailed tutorial showing how to do this here.

Do the same with the lining.

All that’s left to do now is to run the iron over your vintage style sundress and wait for some sunshine!vintage style sundress without a pattern

vintage style sundress without a pattern

PS To make the skirt of your vintage style sundress stick out a bit, you might want to wear it with a foofy petticoat. I got mine from Amazon here (affiliate link).

Share this:

  • Click to email this to a friend (Opens in new window)
  • Click to share on Pinterest (Opens in new window)
  • Click to share on Facebook (Opens in new window)
  • Click to share on Twitter (Opens in new window)

Filed In: Blog, Sewing Projects / Tagged: how to, sewing clothes without a pattern

Easy Tulle Circle Skirt

June 16, 2018 · 2 Comments

Easy Tulle Circle Skirt

One of the nice things about getting older is that I’m so much comfier in my own skin.

I’m also much comfier in things I Iike wearing. I know what I like and I’m not bothered about what other people think!

Being in the happy situation that I’ve lost 3 stone over the last year and nothing fits anymore, I’ve got the perfect excuse to sew things for myself!

Back in the autumn I made this tulle skirt. It’s now too big and I also had a mishap with a candle, not to mention some issues with the handles on the kitchen cupboards.

There’s nothing like dressing up in a foofy skirt when you’re not doing anything special, so it was time to make a new one!

Although there are lots of layers in this easy tulle circle skirt, they can all be attached to the waistband at the same time, and the only layer that needs hemming is the lining.

If you are fairly slim, or if you don’t mind the skirt being short (ie above the knee), you’ll be able to cut complete circles from the tulle. Otherwise you’ll need to cut half circles and sew them together.

Ready to feel like a 4 year old at a birthday party? Here we go!easy tulle circle skirt

How to Make an Easy Tulle Circle Skirt

You Will Need

2 metres of lining fabric 150 cm (59 inches) wide

Several metres of tulle. I got 4 layers out of 6 m, but it will depend on your dimensions.

Enough waistband elastic to go round your middle

Bias binding for hemming the lining, at least 5 m.

Usual sewing supplies

Before You Start

You’ll need to measure your waist, round your hips and waist to knee (or however long you want the skirt to be.

There are tips about taking measurements here!

Take your hips measurement and divide it by pi. Don’t worry too much about this! It’s 3.14 something and it’s basically the relationship between the distance around the outside of a circle (ie your hips measurement) and the distance across the circle passing through the centre.

Most calculators have a pi button, but you could just divide by 3 instead.

This is the maths that you need to do:

Hips divided pi (or 3).

Desired skirt length x 2.

Add these numbers together. This will tell you how big the square of fabric needs to be in total.

When you’ve divided your hips measurement by pi, you’ll need to divide that answer by 2.

Hopefully you’ll be able to cut complete circles out of your tulle.

If not, you’ll need to cut half circles instead and sew them together.

Cutting Out

When you bought the tulle, it was probably already folded in half length ways.

It will be easiest to cut out if you fold it into squares.

So keep it folded in half, then fold the short end over to make a triangle. easy tulle circle skirtMark where the edge of the triangle is. When you open this out, it will give you a square. Fold the square over. Mark where the short edge is and cut.easy tulle circle skirt

Keep going like this until you run out of tulle!

You can cut the lining in the same way.

Now take one of the squares of tulle. Keep it folded and identify the centre corner. From this corner, measure down the same distance as your hips divided by pi divided by 2. Mark it with a pin, then measure across the corner to the other side.easy tulle circle skirt

Now measure the total length of your folded piece of tulle down one side.

If you’re making a shorter skirt, if you are small or if you’re making it for a child, measure down from the top corner the same distance as your hip measurement divided by pi then divided by 2, plus your desired skirt length.

Measure this amount across the square to the other side, marking with pins as you go.easy tulle circle skirt

easy tulle circle skirt

Cut the bottom edge.easy tulle circle skirt

Now you can use this as a template to cut the other pieces.

When you’ve cut the bottom edge, cut the top corner. You could do this at the same time as cutting the bottom, it’s just easier to line up the pieces when the top corner is still there.

The lining can be cut in the same way, but it will need to be a bit shorter. Cut an extra 10 cm (4 inches) or so off the bottom edge.easy tulle circle skirt

You have one more thing to cut now and that’s the elastic! Cut a piece that will go comfortably around your waist without being too tight, plus enough extra to sew the ends together.

Sewing the Skirt

Now you’re ready to sew your easy tulle circle skirt!

If you need to sew side seams, do this now so that you have complete circles of tulle and lining.

Hem the lining. This is easiest to do with bias binding. There’s a tutorial for the method I used here.

Lay the lining out right side up. Put the tulle layers on top of this and line up the circle in the middle.

Pin the layers together, then tack them. When you’re doing this, keep checking that you have all the layers.easy tulle circle skirt

On the edge of the centre circle, mark off quarters. This is to make thing easier when you attach the tulle.

Sew the ends of the elastic together. I like to enclose the raw edges to minimise fraying. You might need to do this by hand if your sewing machine protests.easy tulle circle skirt

With pins mark quarters on the waistband like you did with the skirt.

Now you can sew the skirt to the waistband!

To do this, you’ll need the elastic at the bottom, then the tulle with the lining uppermost.

Choose a zigzag stitch on your sewing machine. This will allow everything to stretch so that you can get in and out of your skirt!

As you sew, stretch the elastic so that you can match the quarters of the waistband with the quarters of the skirt. You’ll need to use both hands for this.easy tulle circle skirt

Trim away any stray threads and you’re ready to wear your easy tulle circle skirt to a party, or just for the school run and removing limescale from the loo like I did the other day!easy tulle circle skirt

easy tulle circle skirt

Share this:

  • Click to email this to a friend (Opens in new window)
  • Click to share on Pinterest (Opens in new window)
  • Click to share on Facebook (Opens in new window)
  • Click to share on Twitter (Opens in new window)

Filed In: Blog, Sewing Projects / Tagged: beginners, gift, how to, sewing clothes without a pattern, Skirt

  • 1
  • 2
  • 3
  • 4
  • Previous Entries
I'm Anna and I live in rural Norfolk in the UK. My mum taught me how to use a sewing machine when I was 10 and I haven't looked back! I love making all sorts of things and I hope you find inspiration here.

Join the list

Join the mailing list to receive updates, useful and interesting links and free pages from the Sewing Journal.

My New Ebook

things to male and do in the autumn

Bunting Makes Everything Better Tote Bag

Featured Kit

The Sewing Journal

My Kits and Patterns on Etsy

Shop the Christmas Shop at Sew and So


Join the List

Join the mailing list to receive updates, useful and interesting links and free pages from the Sewing Journal.

Privacy Policy

For information about cookies and Tea and a Sewing Machine's privacy policy, please click here.

Instagram

Instagram Widget by SnapWidget


UK Sewing Blogs

Theme by 17th Avenue · Powered by WordPress & Genesis

loading Cancel
Post was not sent - check your email addresses!
Email check failed, please try again
Sorry, your blog cannot share posts by email.
We use cookies to ensure that we give you the best experience on our website. If you continue to use this site we will assume that you are happy with it.Ok