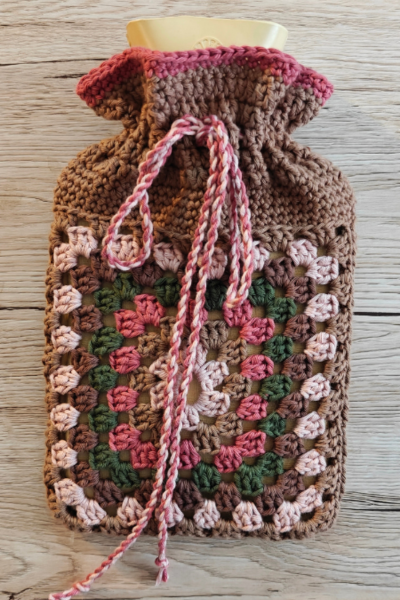
• Home
  • About
  • Blog
  • Ebooks and Printables
  • Etsy
  • Sewing Journal

Make it Yourself. Yes You Can!

  • Sewing Projects
  • Tips and Techniques
  • Embroidery
  • Other Crafts
    • Crochet
    • Felting
    • Jewellery
    • Wreaths
  • Christmas

Things To Make And Do In The Autumn

October 11, 2020 · 2 Comments

things to male and do in the autumn

If you’ve been here before, you’ll probably know that I love autumn.

I actually have a hard time choosing between the seasons! Lots of people like the summer best. It’s nice not having to wear a coat and people’s gardens smell nice and you can go to the seaside, but there’s a lot to be said for coming home as it’s getting dark, putting the lamps on and lighting the fire.

Here in England, warm sunny weather often persists into September. Even in early October, the afternoons are sometimes warm enough to not need a coat. I should say though that this has not been the case this year and so far October has been mostly wet!

In the last 3 years, we’ve also managed a trip to North America in October, so I’ve been able to enjoy beautiful foliage that we don’t really get here.

There are plenty of other things to like about autumn too! Here are some of my favourites.

things to make and do in the autumn

Apples. I remember as a child my dad being very particular about the apples he ate in the autumn. They had to be russets. I’ve no idea why! We’ve lost the seasonal thing with fruit and veg a bit, so it’s nice to remember that we get apples in the autumn. I put them in cake, make apple crisps (my boys love these!) and chop them up and put them in porridge.

Blackberry picking. My boys and I do this every year. This year I’ve discovered that other berries are edible too! We’ve collected whitebeam berries, hawthorn and rosehips (leaving plenty for the birds of course!), and turned them into hedgerow jelly.

Pumpkin spice. In cake, pancakes, coffee, warm milk. It’s the smell and taste of autumn.

Going to the woods. I like doing this in all seasons, but especially in the autumn. A flask of hot chocolate and a muffin makes it even better, especially if it’s cold.

Making the most of being at home. This is something most of us have got quite good at over the last few months! Autumn offers us lamps, blankets, candles if you don’t have a fire and a chance to work on projects we haven’t got round to finishing yet.

Christmas. Still some way off, like a twinkly village at the other end of the valley, it feels alright to think about Christmas once the colder weather sets in. Vague plans about where the Christmas tree might go, and when to make the Christmas puddings are enough to make us feel warm and fuzzy but not enough to stress us out.

So as a celebration of autumn, I have written an ebook! I’ve given it the title Things To Make And Do In The Autumn. Perfect for the autumn loving homebody, it’s full of ideas of things you can do to make the most of autumn.

Sections include things to do at home, in the garden and in the kitchen, things you can do for yourself and things to do to start getting ready for Christmas that don’t feel too Christmassy. There are recipes, craft ideas and patterns and templates are included.

I’ve designed it in such away that it feels like a treat! I’ve made title pages with beautiful images, and the other pages have autumn themed backgrounds. It’s the kind of thing that you could read on a tablet, in an armchair with a mug of tea or coffee or sweet apple cider.

I had a lot of fun putting this together and I hope you’ll like it! You can find out more here.

Share this:

  • Click to email this to a friend (Opens in new window)
  • Click to share on Pinterest (Opens in new window)
  • Click to share on Facebook (Opens in new window)
  • Click to share on Twitter (Opens in new window)

Filed In: Blog, Other Stuff / Tagged: autumn, ebook

Year Of Bunting Challenges: October’s Nature Themed Bunting

October 12, 2019 · Leave a Comment

nature themed bunting

Year Of Bunting Challenges: October’s Nature Themed Bunting

Despite declaring back in January that 2019 was to be the Year of Bunting, I have managed to fall off my own bunting bandwagon.

Julie and Hazel in particular have joined in almost every month, so with a combination their enthusiasm and the Flylady’s, “You’re not behind. Just jump in where you are,” I’ve leapt back onto the bunting bandwagon with some nature themed bunting.

An Instagram/ Pinterest thing that I’ve adopted is decorating my dresser for the seasons. Probably like most other people, I look at other people’s gorgeous houses in internetland, then look at my own tatty, messy house with lego everywhere and cat food stains on the kitchen floor in despair!

But anyone can have a pretty dresser! Mine cost £25 at a junk shop. After we’d bought it, I installed it in the kitchen and there it stayed for a long time, a horrible shade of orange and barely visible under a pile of post.

But it’s amazing what a bit of a tidy up, some paint and some new handles will do! And it’s been years since the post situation has been as bad as it was, because I like being able to see my nice dresser.

It’s a perfect blank canvas for some seasonally themed bunting and some other bits and pieces.

nature themed bunting

The inspiration for the bunting came from this. I liked how some of the flags were layered. I had all the fabric already (bunting’s great for using up scraps of things!), and I can’t walk through a wood without picking up pine cones and things, so I had those too.

So here are some instructions if you want to make some nature themed bunting yourself. Although I used autumn colours and pine cones, you could always use different fabric, and pompoms or silk flowers.

Instructions For Making Autumn Bunting

You Will Need

october nature themed bunting

Bits of fabric
Pine cones
Twine, string or bakers’ twine
Paper, pencil and a ruler

Making the Templates

You’ll need to decide how big you’d like your flags to be. As I was making bunting for my dresser, I needed them to be quite small.

You can either make your own or you can download these templates that I made for another bunting project. Please note that I do ask for an email address, and if you want to know why, you can find out here.

To make the first template, draw a horizontal line 8 cm long. Mark the half way point, then draw a vertical line from this point 9 cm long. Join the end of this line to the ends of the horizontal line.

I made a second template in the same way, just a little bit smaller. This one was 7 cm x 8 cm.

Being unable to make my mind up, I cut out 10 larger flags and 3 smaller ones, then decided once I could see how they would look.

october nature themed bunting

Sewing the Bunting

How I finish the bunting depends on what kind of thing I’m doing. Quite often I don’t finish the raw edges of the triangles, and this is what I did here. The cotton won’t fray very much and the other flags were cut from felt, which won’t fray at all!

You might choose to hem your flags, in which case you’ll need to do that first.

Next, decide which flags will have 2 layers, and which order they will go in.

october nature themed bunting

Take one of the flags (or pairs of flags) and fold the top edge behind. Pin it, then sew. You’ll need to get your twine through here, so bear this in mind when you are sewing!

Repeat for the other flags.

Making Loops For the Pine Cones

If you turn the pine cone upside down, you’ll see where the little leaf like things are no longer separated.

Take a piece of twine and pull it through between 2 of the leaf things, then between 2 on the opposite side. Pull the twine and it in a knot.

october nature themed bunting

Assembling the Bunting

Thread the bunting and the pine cones onto the twine. You might like to tie some loops at the ends for hanging.

october nature themed bunting

Now it’s all done! Find a place to hang it and enjoy your October bunting!

october nature themed bunting
nature themed bunting
october nature themed bunting

Share this:

  • Click to email this to a friend (Opens in new window)
  • Click to share on Pinterest (Opens in new window)
  • Click to share on Facebook (Opens in new window)
  • Click to share on Twitter (Opens in new window)

Filed In: Blog, Sewing Projects / Tagged: autumn, bunting, october

Easy To Sew Pumpkins Tutorial

November 3, 2017 · Leave a Comment

Easy To Sew Pumpkins Tutorial

I’ve gone a little bit pumpkin mad this autumn.

Having returned from a trip to New England recently, I can see why pumpkins mean autumn for lots of people.

I actually don’t like eating them very much (although pumpkin spice latte is delicious!), but I love the orange and their lovely squashy shape! My boys dismissed my suggestion of having pumpkin shaped cushions as weird, so I’ve restricted myself to making small ones.

The weather’s turned colder now and winter’s on its way. So here’s one last pumpkin tutorial before they go away and we get ready for the next thing!easy to sew fabric pumpkins

How to Make Easy To Sew Pumpkins

You Will Need

Fabric scraps in pumpkin colours (I got this bag of remnants from Ebay. This is an affiliate link), strong thread or sewing thread doubled, a needle, ribbon, rice or barley or nut shells, polyester filling.easy to sew pumpkins

How To Make

1. Draw round a bowl onto the wrong side of the fabric. For smaller pumpkins you could use something smaller than a bowl, and for larger pumpkins use something larger. You could use a plate, or for much bigger pumpkins, a bucket.easy to sew pumpkins

2. Using strong thread, sew a running stitch along the circle than you’ve drawn. Don’t knot the ends!easy to sew pumpkins

3. Pull the thread to gather the stitches. Once you have a bowl shape, put your filling in.easy to sew pumpkins

4. Pull the threads some more so that there is a small hole at the the top. Push some polyester filling in through the hole. This is to give the pumpkin a round and squishy shape.

5. Pull the thread tight and wrap it around the top of the pumpkin a few times. Tie the ends of the thread.easy to sew pumpkins

6. If the top is very bulky, trim some of the bulk away. Then wrap ribbon around it tightly to make a stalk. Tie the ribbon tightly.easy to sew pumpkins I think I’ll make some large ones next year whatever my boys say!easy to sew fabric pumpkinseasy to sew fabric pumpkins

Share this:

  • Click to email this to a friend (Opens in new window)
  • Click to share on Pinterest (Opens in new window)
  • Click to share on Facebook (Opens in new window)
  • Click to share on Twitter (Opens in new window)

Filed In: Blog, Sewing Projects / Tagged: autumn, decor, gift, how to, pumpkins

How to Make a Needle Felted Pumpkin

October 20, 2017 · 6 Comments

How to Make a Needle Felted Pumpkin

There’s something about autumn that makes me want to leave the sewing machine alone a little bit and reach for some woolly crafts.

I discovered wet felting a few years ago, and if you’re looking for a new craft to try, I’d recommend it!. The wool rovings are lovely to work with and it’s quite easy to get pleasing results, even if you generally don’t consider yourself to be artistic.

Needle felting has been on my list of things to try. I’ve never used wet felting it to make something solid, only pictures, and to be honest, I didn’t fancy clearing up all the mess and the water afterwards!

With wet felting, it’s the warm water, soap and rubbing that makes the fibres felt together.

With needle felting, the needle has barbs on it that catch the fibres, so the felting occurs that way.

It took me an hour or so to make a pumpkin, although the process could be speeded up with one of those pen things that allows you to use more than one needle.

Here’s how to make a needle felted pumpkin!how to make a needle felted pumpkin

Instructions For Making a Needle Felted Pumpkin

I’ve included some affiliate links.

You Will Need

Wool roving in autumn colours (including green), felting needle, foam mat. If you don’t have a foam mat, you could use a washing up sponge instead.

Making the Pumpkins

1. Pull off some of the roving. This is easier to do if your hands are further apart. Pull the fibres apart until it’s fluffy.

2. Roll the roving into a ball.how to make a needle felted pumpkin

3. Start jabbing the ball with the needle. Make sure you stab it all over so that it felts evenly. Just mind your fingers because stabbing yourself hurts!

As the fibres start to felt, you can shape it by poking the needle in diagonally. After a few minutes it will start to firm up. Keep going until you have a ball. It should be quite firm on the outside with no wispy bits, but still squishy.how to make a needle felted pumpkinhow to make a needle felted pumpkinhow to make a needle felted pumpkinhow to make a needle felted pumpkin

4. To make the pumpkin shape, stab in a line from the north pole of your ball down to the south. Go over this a few times. Repeat on the opposite side. Keep going like this until your ball is divided up into little segments like a satsuma (or a pumpkin!).how to make a needle felted pumpkinhow to make a needle felted pumpkin

5. To make the stalk, pull off some green roving and fluff it it up like you did for the pumpkin. Roll it into a sausage and start poking it with the needle.how to make a needle felted pumpkinhow to make a needle felted pumpkin

6. Keep rolling it over and poking it with the needle. Leave one end fluffy and free. When it’s firm, fold the top over and felt it to the rest of the stalk.how to make a needle felted pumpkinhow to make a needle felted pumpkin

7. Take the fluffy end and spread the fibres out. Position the stalk on the top of the pumpkin and using the needle, felt the stalk to the pumpkin.how to make a needle felted pumpkinhow to make a needle felted pumpkinhow to make a needle felted pumpkin

Tips

To mix colours, pull the fibres apart. Put them together and keep pulling until the colours are mixed.

You can add other fibres to the outside of the pumpkin once it starts to hold its shape. Just remember that the gold stuff and the silk fibres won’t felt, so you’ll have to put a tiny bit of roving over the top, then felt it.

Remember that the felting process makes stuff smaller!

Have fun! It doesn’t matter if the pumpkins aren’t a perfect shape, because the real ones aren’t either.how to make a needle felted pumpkinhow to make a needle felted pumpkinhow to make a needle felted pumpkin

Share this:

  • Click to email this to a friend (Opens in new window)
  • Click to share on Pinterest (Opens in new window)
  • Click to share on Facebook (Opens in new window)
  • Click to share on Twitter (Opens in new window)

Filed In: Blog, Felting, Other Crafts / Tagged: autumn, decor, felting, how to, needle felting, pumpkins

DIY Autumn Flower Arrangement

September 29, 2017 · 3 Comments

DIY Autumn Flower Arrangement

One of the positive things I’ve discovered about getting older is that I’m much comfier in my own skin.

Among the things I have realised are that it’s fine to be a home loving introvert with anti social tendencies and preferring the colder months to summer is not a crime against humanity, the weather or anything else.

And I have discovered that out there in internetland, there are a whole lot of other people like me!

So for all you autumn loving, introvert homebodies, here is a diy flower arrangement for you!

It’s very easy. If you’ve not tried anything like this before, don’t be put off!

My tips are: odd numbers are best, keep it simple and fill up the gaps with greenery or small stuff, but don’t overdo it.

Ready?easy diy autumn flower arrangement

How To Make an Autumn Flower Arrangement

You Will Need

Oasis flower foam, something to put the arrangement in (I was sent these drawers by Oasis Home and Hobby along with the flower foam), 3 sunflowers, 9 orange chrysanthemums, greenery with berries.

I bought the sunflowers and the chrysanthemums from the supermarket and for the greenery with the berries, I raided the hedgerows for hawthorn, which grows in abundance round here.easy diy autumn flower arrangement

Before You Start

Cut the oasis block down to size and pop it in the sink to soak. It’s ready when it sinks. This won’t take very long providing it’s a fairly small piece and not a whole block! Mine was ready within about half an hour.

Cut the stems of the flowers. If you’re using the same drawer thing for your arrangement as I did, the sunflowers need to be about 20 cm high, the chrysanthemums about 12 -15 cm and the greenery/ berries about 10 cm.

If you’re using something different for your autumn flower arrangement, you’ll need to check against your container. Generally, the stems of the main flowers need to 1 1/2 times the height of the vase or container.

Making the Arrangement

1. Pop the oasis block into the container, then push one of the sunflowers into the oasis, in the centre but nearer to the front than the back. Push the other 2 sunflowers in on either side, closer to the sides and front of the arrangement.easy diy autumn flower arrangement

2. Now add the chrysanthemums. Arrange them around the sunflowers so that they are evenly spaced. Put one each in the front corners, between the sunflowers and the rest around the back.easy diy autumn flower arrangement

easy diy autumn flower arrangement

3. Fill in the spaces with the greenery and berries. easy diy autumn flower arrangementeasy diy autumn flower arrangementeasy diy autumn flower arrangement

Of course it won’t be absolutely symmetrical and that’s part of the charm! But aim for a balance by using pieces of a similar size.easy diy autumn flower arrangement

Now all you need to do is decide where to put your autumn flower arrangement!easy diy autumn flower arrangementeasy diy autumn flower arrangementeasy diy autumn flower arrangement

Share this:

  • Click to email this to a friend (Opens in new window)
  • Click to share on Pinterest (Opens in new window)
  • Click to share on Facebook (Opens in new window)
  • Click to share on Twitter (Opens in new window)

Filed In: Blog, Other Crafts / Tagged: autumn, flower arrangement, how to

  • 1
  • 2
  • 3
  • Previous Entries
I'm Anna and I live in rural Norfolk in the UK. My mum taught me how to use a sewing machine when I was 10 and I haven't looked back! I love making all sorts of things and I hope you find inspiration here.

Join the list

Join the mailing list to receive updates, useful and interesting links and free pages from the Sewing Journal.

My New Ebook

things to male and do in the autumn

Bunting Makes Everything Better Tote Bag

Featured Kit

The Sewing Journal

My Kits and Patterns on Etsy

Shop the Christmas Shop at Sew and So


Join the List

Join the mailing list to receive updates, useful and interesting links and free pages from the Sewing Journal.

Privacy Policy

For information about cookies and Tea and a Sewing Machine's privacy policy, please click here.

Instagram

Instagram Widget by SnapWidget


UK Sewing Blogs

Theme by 17th Avenue · Powered by WordPress & Genesis

loading Cancel
Post was not sent - check your email addresses!
Email check failed, please try again
Sorry, your blog cannot share posts by email.