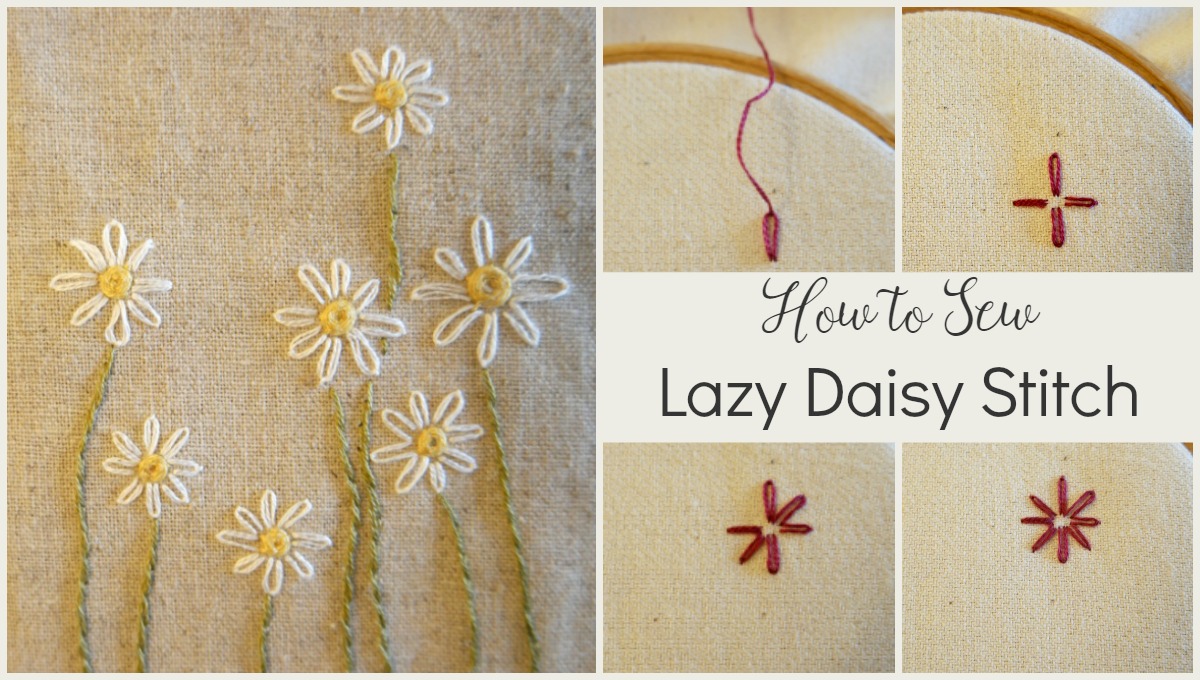
• Home
  • About
  • Blog
  • Ebooks and Printables
  • Etsy
  • Sewing Journal

Make it Yourself. Yes You Can!

  • Sewing Projects
  • Tips and Techniques
  • Embroidery
  • Other Crafts
    • Crochet
    • Felting
    • Jewellery
    • Wreaths
  • Christmas

A Spring Wreath Tutorial

March 19, 2015 · 16 Comments

It’s wreath time again!spring wreath tutorial

It’s only been a couple of months since I last replaced the wreath on our door, but signs of spring are definitely here.

I hadn’t decided what to do, maybe tidy up last year’s spring wreath (you can read about that here!), but at our church a couple of weeks ago they were wanting to get rid of a huge pile of silk flowers. By the time I got over there, they had been raided! But I still managed to find these lovely pink ones and some fake greenery.spring wreath tutorial

I retrieved my willow wreath from the cupboard, very glad that I had not glued on the flowers for my summer wreath (you can read about that one here!) and had just pushed them through the twigs instead.

Once I had removed the summery flowers, I was all set!spring wreath tutorial

Here’s how I made it in case you would also like to!

How to Make a Spring Wreath

You Will Need: SIlk flowers and buds, plastic greenery, a willow wreath.

1. Separate the flowers and buds from the main stems, leaving about 5-8 cm of stem.spring wreath tutorial

2. Start attaching the flowers to the wreath by pushing the stems through between the twigs. Start with one type and try to space them out evenly.spring wreath tutorial

3. Add the buds. As I had 5,I put 2 near the bottom, one at the top and the other two in the middle on opposite sides. I alternated putting them on the inside and outside edge of the wreath.spring wreath tutorial

4. For my bits of greenery, as they had wire in them, I bent them round a little bit so that they would follow the curve of the wreath. spring wreath tutorialThen I put one at the top and the other two on either side.spring wreath tutorial

5. I had planned to put a bow in the gap at the bottom, but when I looked in my box of ribbons I didn’t have anything wide enough and the bows I made just looked wrong! So instead I took some of the little white flowers I’d used on the summer wreath, twisted some florists’ wire around them then tucked the ends of the wire into the willow.spring wreath tutorial

Here it is hanging on my door!spring wreath tutorialspring wreath tutorialspring wreath tutorial


Share this:

  • Click to email this to a friend (Opens in new window)
  • Click to share on Pinterest (Opens in new window)
  • Click to share on Facebook (Opens in new window)
  • Click to share on Twitter (Opens in new window)

Filed In: Sewing Projects / Tagged: decor, flowers, how to, wreath

How To Crochet a Leaf

February 16, 2015 · 2 Comments

I have been crocheting a lot of flowers recently. I have plans for them. I’m not just making them because I like flowers and I think they are nice, although if I didn’t think that I wouldn’t make them!

Flowers need leaves. At least the ones I have been making do! These leaves are very easy to make and are the correct size to work with the flowers.

They are made by crocheting 2 rows to form the centre, then the rest of the leaf is made by crocheting right the way round.crocheted leaf

If you would like a text only version of the pattern for easy printing, you can download it here! crocheted leaf

How to Crochet a Leaf

1. 14 chcrocheted leaf tutorial

2. Ss into 2nd ch from hook, then ss to end.crocheted leaf tutorial

3. 1 ch, then into the back of each stitch:

1 ss into each of the next 4 stitches,

crocheted leaf tutorial

Into the back of the stitch

crocheted leaf tutorial

1 dc into each of the next 3 stitches,crocheted leaf tutorial

1 tr into each of the next 3 stitches,crocheted leaf tutorial

1 dc into each of the next 2 stitches,crocheted leaf tutorial

1 ss into the next stitch,crocheted leaf tutorial

2 chains, then ss into 2nd chain from hook (this forms the point of the leaf).crocheted leaf tutorialcrocheted leaf tutorial

You should be half way round! Now back down the other side:

1 ss into next stitch,crocheted leaf tutorial

1 dc into each of the next 2 stitches,crocheted leaf tutorial

1 tr into each of the next 3 stitches,crocheted leaf tutorial

1 dc into each of the next 3 stitches,crocheted leaf tutorial

1 ss into each of the next  stitches.crocheted leaf tutorial

Fasten off and weave in ends.crocheted leaf tutorialcrocheted leaf tutorial

If you want to make some flowers to go with your leaves, have a look at my crocheted flower tutorials here:

A Crocheted Flower Hair Bobblecrocheted hair bobble

A Crocheted Flower with Pointed Petalscrocheted flower

A Crocheted Flower with Lacy Petalscrocheted flower

Another Crocheted Flower Tutorialcrocheted flower

Share this:

  • Click to email this to a friend (Opens in new window)
  • Click to share on Pinterest (Opens in new window)
  • Click to share on Facebook (Opens in new window)
  • Click to share on Twitter (Opens in new window)

Filed In: Crochet, Other Crafts / Tagged: decor, flowers, how to, spring

Crocheted Lace Flowers

May 1, 2014 · 2 Comments

crocheted lace flowersI’ve been crocheting for years but it’s only very recently that I bought a set of crochet hooks. Usually I either manage with the hooks I have (I’ve got three) or I have to go into town to visit the craft shop to get one. All I can say is i can’t believe that I’ve managed so long without a complete set! There are 12 of them, from tiny to very chunky. I’ve got plans for the chunkies but it is becoming less and less scarf weather. If I was knitting a scarf I would need to start now to have it finished by the autumn but I find crochet much quicker and I hopefully won’t have need of a nice warm scarf in June.

I have some thread that Husband bought me from either Aldi or Lidl, and as I was looking at my shiny new hooks, i decided to try the tiniest hook with this thread. I don’t really know what the thread is actually for, it’s too thick for ordinary sewing, it’s on a disc thing rather than a spool but it’s not like embroidery floss either. Maybe its purpose is to be used to crochet pretty little lacy things.crocheted lace flowers

I have made some crocheted lace flowers using the pattern that I posted about previously. It crocheted lace flowerswas a bit fiddly and the first one I made ended up with 7 petals. I’m not sure how that happened! Also energy saving light bulbs might be good for the planet but they’re not great for seeing by, which didn’t help as all the spaces in the tiny flowers were also tiny.crocheted lace flowers


I’m pleased with the results though. I might turn some of them into jewellery or I could sew them onto something, a top or a wristband or something. I’ve also got plans to experiment with edgings. We could end up with quite a lot of frilly stuff!


crocheted lace flowers


Share this:

  • Click to email this to a friend (Opens in new window)
  • Click to share on Pinterest (Opens in new window)
  • Click to share on Facebook (Opens in new window)
  • Click to share on Twitter (Opens in new window)

Filed In: Crochet, Other Crafts / Tagged: Crochet, flowers

  • Newer Entries
  • 1
  • 2
I'm Anna and I live in rural Norfolk in the UK. My mum taught me how to use a sewing machine when I was 10 and I haven't looked back! I love making all sorts of things and I hope you find inspiration here.

Join the list

Join the mailing list to receive updates, useful and interesting links and free pages from the Sewing Journal.

My New Ebook

things to male and do in the autumn

Bunting Makes Everything Better Tote Bag

Featured Kit

The Sewing Journal

My Kits and Patterns on Etsy

Shop the Christmas Shop at Sew and So


Join the List

Join the mailing list to receive updates, useful and interesting links and free pages from the Sewing Journal.

Privacy Policy

For information about cookies and Tea and a Sewing Machine's privacy policy, please click here.

Instagram

Instagram Widget by SnapWidget


UK Sewing Blogs

Theme by 17th Avenue · Powered by WordPress & Genesis

loading Cancel
Post was not sent - check your email addresses!
Email check failed, please try again
Sorry, your blog cannot share posts by email.