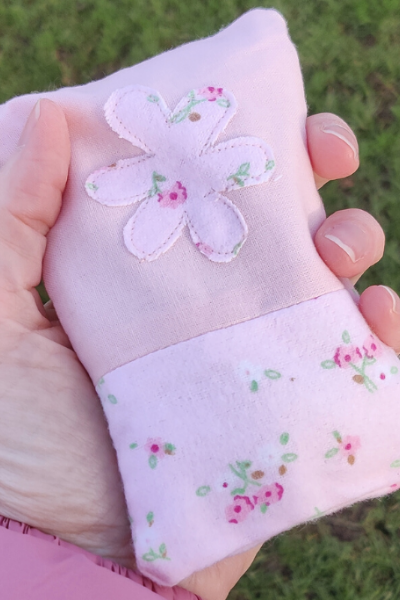
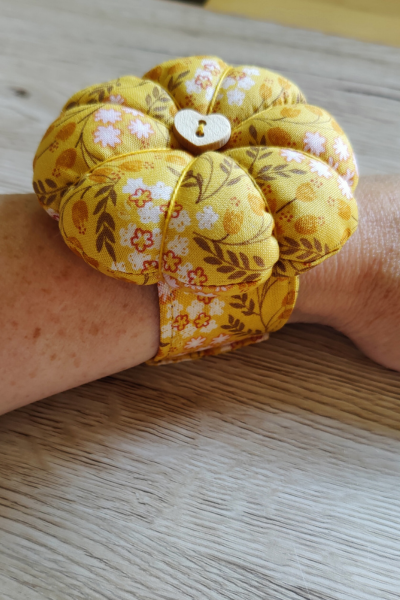
• Home
  • About
  • Blog
  • Ebooks and Printables
  • Etsy
  • Sewing Journal

Make it Yourself. Yes You Can!

  • Sewing Projects
  • Tips and Techniques
  • Embroidery
  • Other Crafts
    • Crochet
    • Felting
    • Jewellery
    • Wreaths
  • Christmas

Pinwheel Purse Scrap Project

January 22, 2021 · Leave a Comment

Pinwheel Purse Scrap Project

Those of us who are inclined to be messy often jump on the “Let’s Get Organised” bandwagon in January, and in my house, this year is no exception.

One of the things earmarked for sorting out is the fabric mountain behind the bedroom door.

It has got so bad that there could even be a dragon living in it and I wouldn’t know.

The worst thing is when it collapses and then nobody can get in or out!

So I’ve decided that most of it has to go.

I’ve so far sorted through about half of it, and over half of that is destined to go.

The bigger bits will be listed in my Etsy shop as remnants or fat quarters depending on their size, and some of the smaller bits will become craft kits.

pinwheel purse scrap project

Over the last couple of weeks I’ve been working on the first of what will hopefully be several new kits.

This one is a little pinwheel purse that has a pinwheel quilt block on the front. The fabric is included along with a zip, pattern pieces and instructions.

If you have some left over fabric, you might like to make one yourself! Otherwise the kits I have for sale can be found here.

pinwheel purse craft kit

Pinwheel Purse Instructions

You Will Need

Scraps of fabric. I used 5 different fabrics. If you have about a fat quarter in total, that should be enough.

A 10 cm (4 inch) zip

A smallish piece of interfacing

Usual sewing supplies

Cutting Out

I’ve allowed a 1 cm (1/4 inch) seam allowance.

For the lining, cut 2 pieces 12 cm x 12 cm.

Cut another piece the same size for the back of the purse outer, and 2 pieces of interfacing.

For the purse front, the easiest thing to do is to use the pattern which you can download for free at the bottom of the post.

Instructions

Assembling the Pinwheel Block

pinwheel purse scrap project

The pinwheel is made up of 4 identical squares, each with one large triangle and two smaller triangles.

pinwheel purse scrap project

To assemble the pinwheel, each square is made separately, then the squares are sewn together.

I batched the tasks for efficiency, but how you do them is up to you!

Take 2 of the smaller triangles, 1 from each fabric.

Pin, then sew them together. The right angle needs to be on the right and the lighter coloured fabric at the top.

pinwheel purse scrap project

Trim the seam and press it open.

pinwheel purse scrap project

Take one of the larger triangles and place it on top of the smaller ones so that the right sides are together and the long edges are aligned.

pinwheel purse scrap project

Pin, then sew along the long edge. Trim the seam and press.

pinwheel purse scrap project

Make the other three squares in the same way.

Arrange the squares so that they form a larger square. Rotate them so that they resemble the picture below. 

pinwheel purse scrap project

Now join two of the squares together.

Do the same with the other two. 

Trim the seams and press them.

pinwheel purse scrap project

Sew the 2 sections together. I forgot to take a photo of this step!

Don’t worry if the pieces don’t match up exactly. Just try to ensure as far as possible that the seams in the centre of the square are aligned, because that bit will be most noticeable if it is off.

Join the shorter border pieces to the top and bottom.

Now join the longer border pieces to the sides.

Trim and press the seams.

pinwheel purse scrap project

Assembling the Purse

Take one of the interfacing pieces and place the purse front on top of it.

Lay the zip face down with the top edge matched up with the top edge of the purse front and the zipper on the left.

pinwheel purse scrap project

Now put one of the lining pieces on top with the right side facing down.

pinwheel purse scrap project

Pin, then sew, keeping close to the teeth of the zip.

Press the purse pieces away from the zip.

Take the purse back and place it on top of the other piece of interfacing.

Line up the free edge of the zip with the top of the purse back. The zipper will be on the left this time. Put the other lining piece on top face down. Pin all of it together, then sew. Press the outer and the lining away from the zip.

Top stitch along the seam on both sides, keeping close to the edge.

pinwheel purse scrap project

Open the zip. Don’t skip this part! If you don’t open the zip, you’ll have a frustrating time with the unpicker later!

Rearrange your purse so that the lining pieces are together on one side of the zip and the outer/ interfacing pieces are together on the other side.

At the sides, push the zip towards the lining and the seams towards the outer.

Pin the sides and the bottom edges.

Open the zip. Don’t skip this part! If you don’t open the zip, you’ll have a frustrating time with the unpicker later!  Rearrange your purse so that the lining pieces are together on one side of the zip and the outer/ interfacing pieces are together on the other side.

Sew the side seams and the bottom edge of the outer. When you sew the bottom edge of the lining, leave a gap.

pinwheel purse scrap project

Trim the seams.

Now push the outer through the open zip, followed by the lining, and it should be the right way out! If it’s a bit crumpled, run the iron over it.

Slip stitch the opening in the lining.

Now your pinwheel purse is finished!

pinwheel purse scrap project

If you’d like the templates for the pinwheel purse front, please fill in the form below. Please note that your email address will be added to the Tea and a Sewing Machine email list. You can find out more about why I do this here, and you can unsubscribe at any time.

Share this:

  • Click to email this to a friend (Opens in new window)
  • Click to share on Pinterest (Opens in new window)
  • Click to share on Facebook (Opens in new window)
  • Click to share on Twitter (Opens in new window)

Filed In: Blog, Sewing Projects / Tagged: craft fair, craft kit, gift, how to, purse, quilt block, scrap project

Boxy Pouch Tutorial

May 7, 2020 · 2 Comments

boxy pouch tutorial

This post contains affiliate links.

Creativity is an odd thing sometimes. Usually I have lots of ideas, but this hasn’t been the case as much recently.

Alan Turing apparently had his best ideas in the bath, and I suspect there’s something in feeling relaxed that helps ideas to flow.

The current global situation is enough to make anybody feel the opposite of relaxed, so I suppose it’s not really a surprise that I haven’t felt as creative as I often do.

Anyway, last week I had an overwhelming urge to make something pretty. The fabric pile behind the bedroom door yielded a little piece of Tilda fabric, and some plain pink cotton. I also found an old bag that I’d kept, thinking that I could use the zips for something (the whole of the front panel is zips; it’s a weird bag). Last week that bag finally came into its own and I used one of the zips!

boxy pouch tutorial

The size of the boxy pouch was decided by the length of the zip. And, as a word of warning, if you use a zip that doesn’t have things at the ends to stop the zipper thing coming off, pull it slowly! It’s tricky to get it back on once it’s come off.

I used boxed corners on the ends to make the boxy shape, and I added ribbon tabs to make it easier when pulling the zip open and closed.

boxy pouch tutorial

Instructions For Making a Boxy Pouch

You Will Need

Cotton fabric for the outer and the lining. You could use the same fabric or a plain cotton with a contrasting print. I used a little bit of a print with some plain for the outer, and the same plain for the lining. If you are new to sewing you’ll find it easier to use one whole piece for the outer.

Interfacing. I like to use a medium weight sew in interfacing because it gives it some weight and just enough squodginess, but you can use what you have. Even lightweight interfacing will make a difference.

A zip. The zip I used was 26 cm long.

Ribbon or similar for the tabs (optional)

A zip foot (optional)

Cutting Out

Cut 2 pieces of outer fabric 26 cm x 18 cm, 2 pieces of interfacing 26 cm x 18 cm and 2 pieces of lining fabric 26 cm x 18 cm.

To make the outer from 2 different fabrics, cut 2 pieces 26 cm x 10 cm and join them along the long edge.

The finished boxy pouch measures 27 cm x 8 cm x 7 cm.

If you want to make a pouch that’s a different size but has the same proportions, the long edge needs to be the same length as the zip, and the short edge needs to be 2/3 the length of the long edge.

Cut 2 pieces of ribbon 5 cm in length.

Sewing the Boxy Pouch

If you are joining pieces to make the outer, do that first.

Take one one of the lining pieces and lay it down with the right side upwards. Position the zip on top of the lining, also face up, with the edge of the zip aligned with one of the long edges of the lining.

boxy pouch tutorial

On top of this, place one of the outer pieces with right side down on top of the zip, and a piece of interfacing on top of the fabric. Make sure that the long edges are lined up and the zip is inside.

boxy pouch tutorial
boxy pouch tutorial

Pin it together, then sew along the long edge, leaving about a cm at either end. This is much easier to do if you have a zip foot, but it’s still possible if you don’t have one.

Fold the lining and the outer the right way out away from the zip. It’s a good idea to run the iron over it at this stage. As you are doing this, check that you have pulled the outer and the lining away from the zip. Otherwise you’ll end up catching things in the zip (guess how I know!).

Leaving a cm free at either end, top stitch the lining and the outer, keeping close to the folded edge.

Repeat these steps to attach the other lining piece, outer and interfacing to the other side of the zip.

boxy pouch tutorial
boxy pouch tutorial

With the right sides together, sew the other long edge of the outer with the interfacing.

Repeat with the lining, but this time leave an opening.

Trim the seams.

boxy pouch tutorial

Now open the zip a little way. This is very important! When you turn the box pouch out, it will need to go through the zip opening as well as through the gap in the lining, so make sure you open it enough!

Squash the lining and the outer so that the seams you have just sewn are aligned with the zip. Pin the short edges of the lining, then pin the outer and interfacing.

boxy pouch tutorial

This is where it will make a difference if you remembered to leave a cm or so free at each end. If you didn’t do this, don’t panic! Just unpick a few stitches.

If you want your box pouch to have tabs, take a piece of ribbon, fold it in half and slip the folded edge inside the seam. Pin it in place, then do the same on the opposite side.

Sew the sides of the lining, catching the zip in the seam each time.

boxy pouch tutorial

Repeat with the outer and the interfacing, again catching the zip in the seams. Trim the seams.

boxy pouch tutorial

Making the Boxed Corners

Find the half way point between one of the corners and the bottom seam. Mark it with a pin.

boxy pouch tutorial

Press from the corner with your finger to crease the fabric. Now open out the corner and match the crease to the side seam. Pin the corner where you marked the half way point.

boxy pouch tutorial
boxy pouch tutorial

This is a bit fiddly and you might have to put your hand in through the gap in the lining to get the crease and the seam lined up.

Do the same with the rest of the corners of the lining, and with the outer.

If you would like a more detailed tutorial showing how to make boxed corners, there’s one here. Please note though that these were boxed corners for a bag and although the process is the same, it was less fiddly!

Sew across the corners at right angles to the seam. Cut the corners off. Trim away all the threads.

boxy pouch tutorial

Finishing the Pouch

It’s time to turn it out! This is where I’m really hoping that you remembered to open the zip!

If you didn’t, unpick the side seam of the outer a little bit, open the zip a few cm, then resew the seam.

Push the corners of the pouch out. Handstitch the opening in the lining.

Now all you have to do is decide what to use your boxy pouch for! I think I might keep the pens I like to use for drawing in mine!

boxy pouch tutorial
boxy pouch tutorial
boxy pouch tutorial

Share this:

  • Click to email this to a friend (Opens in new window)
  • Click to share on Pinterest (Opens in new window)
  • Click to share on Facebook (Opens in new window)
  • Click to share on Twitter (Opens in new window)

Filed In: Blog, Sewing Projects / Tagged: beginner, craft fair, gift, how to, puch, purse

DIY Rainbow Bunting

April 17, 2020 · 2 Comments

diy rainbow bunting

Ooh lockdown! We’re now into the fifth week of this in the UK and it goes without saying that it is an odd time.

I know we’re safe here, tucked up at home. Our house is on the small side, but it’s not that small. Not in comparison to families living in tiny flats with no garden, or those living in temporary accommodation, who would take their children to the park to burn off some energy and enjoy the sunshine but they can’t do that now because of lockdown.

We like being at home. The boys are rarely bored. They’re like their mum! They also don’t get much sympathy if they complain of boredom! Their rooms are stuffed full of toys and books and they’re allowed to do all the creative stuff they like (unless they want to get the paint out 5 minutes before dinner!). I can always find something to do, whether it’s sewing or painting, reading, playing a board game or doing lego with the boys, or the endless domestic jobs that come with having a large family.

But then I look at the news, or step outside for some government sanctioned exercise and I remember why. I remember why the roads are quiet, why the air smells cleaner and why I can hear the birds singing. I remember why there are not hoards of youngsters walking past my house twice a day. When I check the news, or Facebook, I remember. And it’s weird and scary, and I’m not sure what to do with it.

There’s an expectation that we should be making the most of this time. The FlyLady (I usually love her, but she misses the mark sometimes) keeps telling me that I need to get my house sorted out before things go back to normal. Other people are telling me that this is a great time to get a kitchen table enterprise off the ground. Or I could read all the books I should have but haven’t, or I could learn some new skills that would launch me into some dizzy heights in the World of Work (I left my job as a teacher seven years ago when I had my 4th child and never went back).

The problem is that it’s not a holiday. It’s not a sabbatical where we’ve got time specifically to gain a new skill or extra qualifications. Nobody knows how long things will need to continue like this, or how things will pan out.

So I look at my pile of fabric behind the bedroom door, then walk away from it. I vaguely think about painting then don’t do any, or think about the DIY that needs doing, or the mess in the utility room that I could sort out, and reach for the kettle.

All around me everybody is collecting handcream for medical staff at our nearest hospital, sewing scrubs, sewing other stuff, taking care of DIY, helping out their elderly neighbours, growing stuff, still going out to work because they are key workers and posting it all on Facebook. And I’m not.

I have read a bit more than normal, and I can now play 5 tunes on the banjo. But I don’t feel that I have masses more time than I usually do. My time is mostly eaten up by the things I normally do to take care of my family. And I don’t feel especially energised or creative or inspired. It’s all making me feel tired and a little bit anxious.

But I wanted to do something. Round here people have been making rainbows and sticking them in their windows.

My boys are not up for drawing rainbows, so I made some rainbow bunting instead. I often have bunting hanging off the front of my house, partly because it’s cheerful and partly to distract from the peeling paint on the upstairs windowsills.

Rummaging in my fabric hoard behind the bedroom door, it wasn’t too hard to find bits of fabric in all colours of the rainbow! I’ve used up all my grey bias binding, and I only had pink or beige left in enough quantity.

I made it in the same way that I made this, except that I only cut one flag from each piece of fabric. The post also has step photos if you need them.

Instructions For DIY Rainbow Bunting

You Will Need

Cotton or polycotton fabric in rainbow colours. You could use plain or prints, or a combination of both.
Bias binding in a neutral colour. How much depends on how long you want the bunting to be. You’ll probably need at least 2-3 metres.
Bunting template. You can make your own or you can have these in exchange for an email address.

Making Your Own Template

I made a new template for my diy rainbow bunting. The main reason for this is that I don’t use yellow fabric very often and I only had a little bit of the yellow gingham and the orangey yellow cotton, so I needed the template to be slightly smaller.

It’s easy to do if you also want to make your own!

Take a piece of paper and fold it in half lengthways. Choose a point somewhere on the fold and draw a line from there to the top corner.

Cut along the line and open it out. You should have a triangle. It might take some experimenting to get a triangle that has dimensions you like.

If you need to take into account the size of the bits of fabric you have, start there. I worked out how wide the flag could be, trimmed the paper then made the triangle.

Cutting Out

Using your template, cut 1 flag from each colour. If you’re making masses of diy rainbow bunting, you could cut 2 or 3 (or more!) from each colour.

Odd numbers usually look better, but the more flags you have, the less noticeable it will be if you have an even number. My bunting has 11 flags.

diy rainbow bunting

Sewing Your DIY Rainbow Bunting

Decide on the order for your flags. To do this, lay them all out and rearrange them until you like the order they are in.

Now put them in a pile, wrong side up, starting with the red end. This will make it easier to sew as the flags will be at the free end of the sewing machine, and your flags will go red to purple from left to right.

Take one end of your bias binding and fold it in half lengthways. Don’t worry about doing the whole lot at the moment. You can fold more as you go.

Sew along the bias binding a little way, so that you have enough to tie one end of your bunting to something.

Slip the first flag (purple, wrong side up) into the folded bias binding. Sew along the bias binding, catching the flag in between the folded bias binding.

Then slip the next flag in and keep sewing.

You’ll have to stop every so often to fold more of the bias binding in half. I do this while sitting at the sewing machine.

Keep going like this until you’ve attached all the flags to the bias binding.

Sew a bit more of the bias binding so that you have enough to tie the other end of your diy rainbow bunting. You could measure, or you could guess! Just don’t cut the bias binding before you’re sure that you have enough to tie the other end!

diy rainbow bunting

Share this:

  • Click to email this to a friend (Opens in new window)
  • Click to share on Pinterest (Opens in new window)
  • Click to share on Facebook (Opens in new window)
  • Click to share on Twitter (Opens in new window)

Filed In: Blog, Sewing Projects / Tagged: gift

Bunting Tote Bag Tutorial

March 29, 2019 · Leave a Comment

bunting tote bag tutorial

Bunting Tote Bag Tutorial

This is a post I actually wrote 3 years ago when a new law was introduced in the UK that required shops to charge for plastic bags.

I’m recycling it because it fits in nicely with the Year of Bunting!

For making the bunting tote bag, I’d recommend using a strong fabric, like a heavy weight cotton. The canvas I used was left over from some curtains I’d made, and the appliqued bunting from scraps of cotton from dresses and other things.

If you don’t have any canvas, you might have an old tablecloth or some curtains you could use.

If you’d rather use a lighter cotton or polycotton fabric, you could line it to make it stronger, or just decide to use it to carry bread and flowers instead of potatoes and gallons of milk!

The bunting tote bag has boxed corners, which means that depending on what you put it, it should stand up.

bunting tote bag tutorial

How to Make a Bunting Tote Bag

1. Cut a rectangle of fabric. Good dimensions would be the same width as a Lidl bag (or other bag for life) and twice as long, plus seam allowance. Mine measured at 48 cm x 120 cm.

If you are using fabric with a directional print, cut 2 rectangles and sew them together.

2. If you do not have an overwhelming urge to cover everything in bunting, you can skip this bit and go straight to Step 3.

shopping bag tutorial

To make the bunting, cut a rectangle 9 cm x 10 cm. Fold in half lengthways. Cut diagonally from the folded corner to the corner opposite. Use this triangle to cut 5 triangles. Position them onto the fabric, allowing for seams. Pin in place, then applique them to the fabric. Sew a piece on of ribbon so that it covers the tops of the triangles.

shopping bag tutorial

3. With the right sides together, pin the side seams then sew them up. Trim the seams. Finish the seams with zigzags, or an overcasting stitch if you don’t have an overlocker. This could be the difference between getting all of your shopping home and the bag breaking and veg and milk and stuff ending up all over the road!

shopping bag tutorial

4. To make the boxed corners, press firmly on the fold at the bottom. Squash one of the corners flat so that the seam is aligned with the fold at the bottom. Measure up 6 cm from the corner. Pin. Sew across the corner. Cut the corner off. For more detailed instructions for making boxed corners, visit this tutorial here.

5. Hem the top of the bag.

shopping bag tutorial

6. To make the handles, cut 2 pieces of fabric 40 cm long and 10 cm wide. Fold in half lengthways. Then fold the outer edges into the middle. Fold in half and pin. Sew. I like to sew along both edges so that it looks symmetrical. Repeat for the other handle.

shopping bag tutorial

7. Sew the handles to the bag. You will need to sew them on in a few places to ensure that they stay on when the bag is full of shopping.

shopping bag tutorial

Now all you have to do is remember to take it with you when you go shopping!

Tips

Heavy weight fabric will be strongest, but other fabrics can be made stronger by adding a lining.

Ripstop will make good bags that are both strong and waterproof.

You could make bunting tote bags in different sizes.

Decorate them as you like to jazz them up.

If you will be carrying your shopping a long way, add some wadding to the handles and quilt them to make them more comfortable.

They make great last minute Christmas gifts and are a good way of using up fabric that you don’t know what to do with!

Share this:

  • Click to email this to a friend (Opens in new window)
  • Click to share on Pinterest (Opens in new window)
  • Click to share on Facebook (Opens in new window)
  • Click to share on Twitter (Opens in new window)

Filed In: Blog, Sewing Projects / Tagged: beginner, bunting, craft fair, easy, gift, how to

Year of Bunting Pincushion Tutorial With Mini Bunting

February 22, 2019 · 1 Comment

Year of Bunting Pincushion Tutorial With Mini Bunting

year of bunting pincushion tutorial with mini bunting

I’ve got a thing about pincushions.

It’s partly because I associate them with a simpler time, when milk lived in jugs with beaded crocheted covers and everybody ate boiled eggs, toast and cake for tea.

It’s also because when it comes to making pincushions, the possibilities are endless. And it’s fine to have a few!

My favourite pincushion is this one that I can wear on my wrist. That way I don’t lose it in the mess that always seems to accompany making things!

I have others as well, including these that I made last year while my concentration was taking a holiday.

I even have a Pinterest board devoted to pincushions!

The Year of Bunting needs a bunting pincushion, so I’ve made these.

year of bunting pincushion tutorial with mini bunting

The bunting pincushions are made from white felt with appliqued cotton circles on the top and bottom and bunting on the side. The button on the top actually runs through to another smaller button on the bottom. This allows the pincushion to sit on a flat surface without wobbling about to much!

For some bunting fun, I made some tiny bunting from diamond shaped pieces of cotton and bakers’ twine. The bunting is strung across the pincushion by some pretty flower headed pins.

year of bunting pincushion tutorial with mini bunting

I filled the bunting pincushions with polyester filling recycled from an old pillow.

You might prefer to fill yours with wire wool or emery, so that your pins are sharpened when you stick them into your pincushion. There’s a tutorial for making a pincushion with emery here.

I’ve got some kits for sale here and here on Etsy if you want to make some like mine but you can’t be doing with faffing about finding everything.

How To Make a Bunting Pincushion With Mini Bunting

You Will Need

Felt
Scraps of cotton fabric
Filling for your pincushion (polyester filling, emery or wire wool)
2 buttons
Bakers’ twine
Longer than normal pins

Or you can buy a kit here.

Cutting Out

From the felt, cut 2 circles and a long rectangle. The rectangle needs to be as longs as the distance around the circle.

When I was learning about pi at school, I’d never have guessed that I would use it as much as I do!

It doesn’t matter an awful lot if you can’t remember anything about it! The only thing you need to remember is that the distance around the outside edge of a circle is about 3 times the distance across the circle passing through the centre.

So your rectangle needs to be 3 times longer than the straight edge of your circle if you fold it in half, plus a bit extra.

You’ll also need to cut 2 smaller circles from cotton fabric. I used jam jars for the circles.

For the appliqued bunting, cut 5 tiny triangles from the same fabric you used for your smaller circles. For the bunting that’s strung between the pins, cut 5 diamonds from the same cotton.

Assembling Your Bunting Pincushion

  1. Applique the cotton circles to the felt circles.
    year of bunting pincushion tutorial with mini bunting
  2. Applique the bunting flags to the side of the pincushion. To do this, I sewed the sides of the flags, then sewed across the top a couple of times. I sewed past the end of the flags by a cm or so.
    year of bunting pincushion tutorial with mini bunting
  3. Sew one of the circles to the side. The official way to do this is probably to sew the side into a circle, then to sew the circle. The problem with doing it this way is that the circles have to be exactly the same size! The way I did it was to start with one end of the rectangle and sew it all the way round the circle. I then sewed the rest of it so that it overlapped.
    year of bunting pincushion tutorial with mini bunting
  4. You might like to hand sew the seam of the side piece, although it might be fine to leave it if you are in a hurry.
  5. Sew the other circle to the side, leaving a gap.Fill the pincushion then sew up the opening.
    year of bunting pincushion tutorial with mini bunting
  6. Cut a length of thread and tie it to the button that you’re planning on putting on the bottom of your pincushion. With a needle, pass the thread through the pincushion in through the other button. Take the needle back through the button and the pincushion to the button at the bottom. Pull the thread, then tie it off.
    year of bunting pincushion tutorial with mini bunting
  7. Making the tiny bunting proved to be fiddly! I tried a number of ways and this is the one that proved to be easiest. Take one of the cotton diamonds and fold it over the bakers’ twine. Sew a couple of stitches in the centre of the flag to hold both halves together.
  8. Push a pin through the bakers’ twine at one end of the bunting. Do the same at the other end. Push the pins into the top of the pincushion.
    year of bunting pincushion tutorial with mini bunting
year of bunting pincushion tutorial with mini bunting

Share this:

  • Click to email this to a friend (Opens in new window)
  • Click to share on Pinterest (Opens in new window)
  • Click to share on Facebook (Opens in new window)
  • Click to share on Twitter (Opens in new window)

Filed In: Blog, Sewing Projects / Tagged: beginners, craft fair, gift, how to, pincushion

  • 1
  • 2
  • 3
  • …
  • 11
  • Previous Entries
I'm Anna and I live in rural Norfolk in the UK. My mum taught me how to use a sewing machine when I was 10 and I haven't looked back! I love making all sorts of things and I hope you find inspiration here.

Join the list

Join the mailing list to receive updates, useful and interesting links and free pages from the Sewing Journal.

My New Ebook

things to male and do in the autumn

Bunting Makes Everything Better Tote Bag

Featured Kit

The Sewing Journal

My Kits and Patterns on Etsy

Shop the Christmas Shop at Sew and So


Join the List

Join the mailing list to receive updates, useful and interesting links and free pages from the Sewing Journal.

Privacy Policy

For information about cookies and Tea and a Sewing Machine's privacy policy, please click here.

Instagram

Instagram Widget by SnapWidget


UK Sewing Blogs

Theme by 17th Avenue · Powered by WordPress & Genesis

loading Cancel
Post was not sent - check your email addresses!
Email check failed, please try again
Sorry, your blog cannot share posts by email.