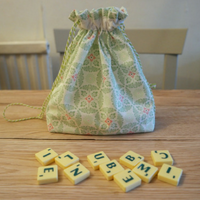
Easy Drawstring Bag With Enclosed Seams
Easy Drawstring Bag With Enclosed Seams My friend Wendy recently asked me to make her a little bag. She and her husband Danny play Scrabble, and they need a bag to keep the Scrabble tiles in. It also needed to be big enough to get a hand in…