• Home
  • About
  • Blog
  • Ebooks and Printables
  • Etsy
  • Sewing Journal

Make it Yourself. Yes You Can!

  • Sewing Projects
  • Tips and Techniques
  • Embroidery
  • Other Crafts
    • Crochet
    • Felting
    • Jewellery
    • Wreaths
  • Christmas

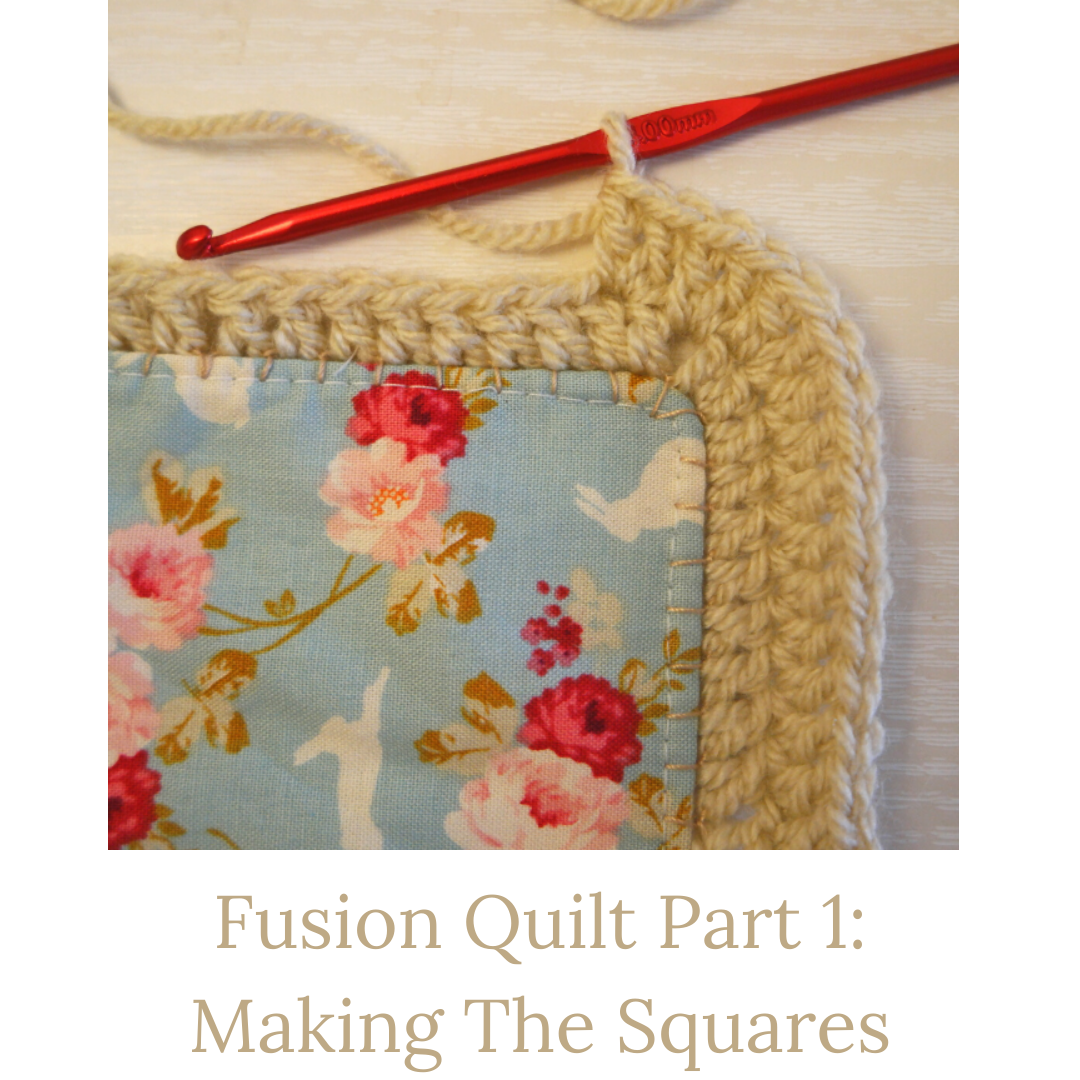
Fusion Quilt Part 1: Making The Squares

May 15, 2020 · 7 Comments

fusion quilt

One of the things that I’ve had on a Pinterest board for a long time is this.

It’s a fusion quilt, which basically means that you make quilt squares then crochet them together, so it fuses sewing with crochet.

Every time this quilt pops up again, or when I see it there on my Pinterest board, I’m reminded of how pretty it is and how much I like it!

I’m not one for making quilts. I’ve only ever made one pram sized quilt when my eldest was a baby, although I’ve started a few!

A fusion quilt is different. Because you make the squares, then crochet them together, I think there’s enough variety to prevent boredom from setting in. Also the crochet part is the sort of thing that can be worked on for a few minutes at a time.

So this week, still having a desire to make pretty things, I started making my own fusion quilt!

I should say that the original on Pinterest doesn’t have a tutorial with it, and I’m not trying to copy it but make my own version.

Another raid on the fabric pile behind the bedroom door turned up some pretty fabric in colours I wanted to use, and some fleece fabric for the back of the squares. I also found some yarn for crocheting the squares together.

Obviously I couldn’t crochet straight into the fabric squares, and sewing fabric with yarn was going to cause some problems, so I used embroidery thread to edge the squares in blanket stitch. I was then able to crochet into the embroidered stitches.

making a fusion quilt

Making The Squares

You Will Need

Cotton fabric. This is a good project for using up bits left over from other things. If you don’t have enough to make a whole square, you could make quarter squares and sew them together.

Something to back the squares with. I used fleece fabric. Quilt batting would also work, but you would probably need to make extra cotton squares for the back too.

Embroidery thread. Something like cotton perle is better that the stranded sort.

Yarn and a crochet hook. A neutral colour is probably best, but you can use what you like! I used a beige colour in DK with a 4 mm hook. A lighter yarn would probably achieve a lacier look.

Cutting Out The Squares

One of the advantages of this kind of quilt is that you can make the squares quite large if you want to. It’s great if you tend to get bored with longer projects as you’ll be able to finish your fusion quilt more quickly!

I cut my squares 12 cm x 12 cm (4 3/4″ x 4 3/4″).

If you wanted to make some quarter squares to make larger squares of this size, you would need to cut them 7 cm x 7 cm (2 3/4″ x 2 3/4″).

The backing needs to be the same size.

How many squares is up to you, but bear in mind that they will need to make a rectangle. 24 is a good number to start with. You can always add more later.

Sewing The Squares

Take one cotton square and one backing square.

With the right sides together, sew round the edge leaving a gap for turning out.

Trim the seams and cut off the corners.

Turn out and pin the opening.

Using a long stitch on your sewing machine, top stitch around the edge of the square.

I forgot to take photos of this stage, but I made the squares in the same way as these reusable cloths. There are some step photos in this post if you need them.

Blanket Stitching The Edges

The blanket stitches allow you to have something to work the crochet stitches into.

To sew blanket stitch, sew a loop so that the loop is on the front of the square.

making a fusion quilt part 1

Then pass the needle through the loop from the back to the front. Pull it taut. The top of the stitch should sit on the edge of the square.

making a fusion quilt part 1

Now make another loop by passing the needle through from the front of the square to the back.

Take the needle through this loop, from back to front and pull it taut. Keep doing this until you get to a corner.

I used the top stitches as a guide to get them all about the same size. This also means that if you are finding it difficult to get the needle through the fabric, you can reuse the holes made already by your sewing machine.

Corners

This might not be the proper way of doing corners, but it’s the way I did them!

When you get near a corner, make the next loop directly underneath the corner.

making a fusion quilt part 1

Pass the needle through and pull it so that the end of the stitch is at the corner.

making a fusion quilt part 1

Now make the next loop by passing the needle front to back in the same place.

Pull the thread through again so that the end of this stitch is on the next side of the square and about the same length as the previous stitch.

making a fusion quilt part 1

Then continue until you get to the next corner.

making a fusion quilt part 1

Keep going until you’ve got all the way round. When you get to the last stitch, thread the needle through the loop of the first one and tie the ends.

If you are particular about things being very neat and accurate, you’ll want to make sure that you have the same number of stitches on each side of the square.

I haven’t done that. I’m not too worried about the joins at the corners looking messy because I have a plan for those!

Crocheting Round The Edges Of The Square

Please note that being English, I use English crochet terms!

Round 1

Into one of the blanket stitches, join the yarn and make 3 ch.

making a fusion quilt part 1

Tr into the next stitch, and subsequent stitches until you get to the corner.

making a fusion quilt part 1

Into the 1st of the 2 corner stitches, tr twice.

making a fusion quilt part 1

Then 1 ch, and 2 tr into the next stitch.

making a fusion quilt part 1

1 tr into each of the following stitches until you get the next corner. Crochet round each of the corners in the same way.

When you get back to where you started, join it with a ss.

making a fusion quilt part 1

Round 2

3 ch, then tr into each stitch until you get the the corner.

When you get to the first of the 2 trebles crocheted into one stitch, crochet 2 trebles into the space between them. Then 2 tr into the ch sp, then 2 tr into the next 2 tr.

making a fusion quilt part 1

Continue with 1 tr into each stitch until you get to the next corner. Work each of the corners in the same way as the first one.

When you get back to the start, join with a ss and tie off the ends.

making a fusion quilt part 1

So far I’ve completed 3 squares, with another 2 ready to crochet.

As I have the attention span of a gerbil, it is possible that I won’t finish my fusion quilt! But I feel good about this and I’m hoping to get it done over the next 2-3 weeks, and , so watch this space!

Share this:

  • Click to email this to a friend (Opens in new window)
  • Click to share on Pinterest (Opens in new window)
  • Click to share on Facebook (Opens in new window)
  • Click to share on Twitter (Opens in new window)

Filed In: Blog, Crochet, Sewing Projects / Tagged: how to, quilt

How to Sew a Log Cabin Quilt Block

January 27, 2018 · 2 Comments

How to Sew a Log Cabin Quilt Block

I’ve been planning to make quilts for my boys for ages, and before Christmas I finally got my act together and started on the first one.

Having the attention span of a gnat (I’m really starting to think I might have an adult version of ADD!), it’s necessary to keep things as simple as possible or the quilt will end up on the pile of unfinished projects.

So instead of making dozens of tiny blocks, I’m making 12 big ones.

Not wanting to mess it up, I planned out what I was going to do before Christmas. If you’d like to read about planning a quilt, you can find that post here.

As well as using large blocks, I’m also planning to back it with fleece and not actually quilt it all. I know this is cheating! But in the end, I want Dominic to have his quilt and I also want to keep my sanity.

Now all the bits are cut out and I’m ready to start sewing!how to sew a log cabin quilt block

Log Cabin Quilt Block

The log cabin quilt block I’m using is made up 13 pieces, 7 different pieces in total.how to plan a patchwork quilt how to sew a log cabin quilt block

During the planning stage, I worked out how many of each piece I would need. Pieces 1 and 2 are the same, as are 3 and 4, 5 and 6, 7 and 8, 9 and 10, 11 and 12.

So that’s 6 different sized pieces, plus the 13th.

For those 6 pieces, I cut 24 of each, and 12 of the 13th piece.

Here’s a table showing the sizes for each piece and how many you need.how to plan a patchwork quilt how to sew a log cabin quilt block

Sewing the Log Cabin Quilt Block

To sew the log cabin quilt block, you start in the centre and work outwards.

Pieces 1 and 2 are the same size, so take 2 of the smallest bits and sew them together. Trim the seams and press them open.how to sew a log cabin quilt block

Then along the lower long edge, sew one of the second size. Then sew the other piece this size at right angles to it.how to sew a log cabin quilt block how to sew a log cabin quilt block

Pieces 5 and 6 are the 3rd size up. Sew one of these along the opposite long edge to piece 3, and the other one to the side opposite piece 4.how to sew a log cabin quilt block how to sew a log cabin quilt block

Keep going like this so that you’re making up your block in a clockwise direction. You could go anti clockwise if you prefer, but it will look better if you don’t change your mind half way through!how to sew a log cabin quilt block how to sew a log cabin quilt block how to sew a log cabin quilt block how to sew a log cabin quilt block how to sew a log cabin quilt block how to sew a log cabin quilt block how to sew a log cabin quilt block

Remember to trim and press seams as you go. And if you find that the pieces aren’t quite the right size, you can trim them down. Just be aware that the blocks will be easier to sew together if they’re the same size!

The next post will be showing how to sew the log cabin quilt blocks together and sewing the backing.


Share this:

  • Click to email this to a friend (Opens in new window)
  • Click to share on Pinterest (Opens in new window)
  • Click to share on Facebook (Opens in new window)
  • Click to share on Twitter (Opens in new window)

Filed In: Blog, Sewing Projects / Tagged: children, decor, gift, home, how to, quilt

How To Plan a Patchwork Quilt

December 9, 2017 · 5 Comments

How To Plan a Patchwork Quilt

One of the things that has been on my sewing to do list for several years is to make quilts for my boys.

My boys like wrapping themselves up in blankets when they’re at home, especially in the evening when they’re watching Canada’s Worst Driver or Mythbusters. I also like the idea of them having something special to take with them when they eventually leave home.

The problem with any kind of big project is that it can seem so big, it never gets started! Even the idea of breaking things down into bite sized chunks can be overwhelming because they are just so many chunks!

A traditional patchwork quilt made up of lots of little squares definitely falls into this category!

So if I’m going to make quilts for my boys, I’m going to make things as easy as possible.

I have a standard sewing machine, not a quilting one, and I also have the attention span of a gnat (although it’s improved a bit), and a pile of unfinished projects to prove it!

I don’t want the quilts to end up on that pile! So I’ve opted for large blocks and I’m going to back it with fleece fabric and not actually quilt it at all. I know this is cheating! This is not my idea. It is one I have shamelessly stolen from Sara at Creative Jewish Mom. You can the quilt she made here.

Anyway, I’ve got the fabric, and before reaching for the scissors and making a dreadful mess of everything, I’ve planned out what I’m going to do. This way, I know exactly how many blocks I need to make and how wide the strips need to be before I start cutting.

Here’s how to plan a patchwork quiltl!how to plan a patchwork quilt

How To Plan a Log Cabin Quilt

1. Once you’ve decided on a quilt block, the next decision to make is how big you want the quilt to be. I wanted mine to be a little bit wider than a single duvet and about the same length. A vague idea is all you need here, as the actual finished dimensions will depend on the size of the blocks.

A single duvet is 135 cm by 200 cm, so I was aiming for about 150 cm x 200 cm.

2. The next thing to decide is how many blocks you want the quilt to have. I decided to make big blocks, as that would be less work, easier, quicker, and I’d be more likely to finish it!

I decided to make my quilt 3 blocks by 4, with the option of a border if the measurements required it.

3. The next part is tricky, as this involves figuring out how big each block needs to be. So that it doesn’t get horribly complicated later on, the actual dimensions of each block need to be determined by the size and shape of the pieces that make them up. This where keeping things simple is really going to help!

The quilt block I’ve chosen for my patchwork quilt is a simple log cabin. All the rectangles are the same width, and there are 7 rectangles going across and 7 going up and down. So the easiest thing is to start with a number divisible by 7. A square 49 cm x 49 cm would result in quilt without borders measuring 147 cm x 196 cm. That’s close enough for me!how to plan a patchwork quilt

4. The next task is to work out exactly how big the pieces need to be. You can do this either by drawing it out on a large sheet of paper, or by working it out. Don’t forget to add a seam allowance!

With the log cabin block, the 1st 2 pieces are squares, so they would need to be 7 cm x 7 cm. Adding a 1 cm seam allowance all the way round makes them 9 cm x 9 cm.

Pieces 3 and 4 need to be 7 cm wide and the same length as the first to pieces combined, so 7 cm x 14 cm. A seam allowance makes them 9 cm x 16 cm.

Pieces 5 and 6 need to be 7 cm wide, then as long as three sections, so 21 cm. With the seam allowance, 9 cm x 23.

You get the idea! Here’s a table with the measurements of each section.how to plan a patchwork quilt

5. With the pattern pieces made, identify how many of each piece you will need. Decide how many you will cut from each fabric.

6. Now cut the bits out!

Now that the planning’s done and the bits are prepped, you can get sewing your patchwork quilt!

The next post will show how to sew the log cabin quilt block.

Share this:

  • Click to email this to a friend (Opens in new window)
  • Click to share on Pinterest (Opens in new window)
  • Click to share on Facebook (Opens in new window)
  • Click to share on Twitter (Opens in new window)

Filed In: Blog, Sewing Projects / Tagged: children, decor, how to, quilt, sewing for boys

I'm Anna and I live in rural Norfolk in the UK. My mum taught me how to use a sewing machine when I was 10 and I haven't looked back! I love making all sorts of things and I hope you find inspiration here.

Join the list

Join the mailing list to receive updates, useful and interesting links and free pages from the Sewing Journal.

My New Ebook

things to male and do in the autumn

Bunting Makes Everything Better Tote Bag

Featured Kit

The Sewing Journal

My Kits and Patterns on Etsy

Shop the Christmas Shop at Sew and So


Join the List

Join the mailing list to receive updates, useful and interesting links and free pages from the Sewing Journal.

Privacy Policy

For information about cookies and Tea and a Sewing Machine's privacy policy, please click here.

Instagram

Instagram Widget by SnapWidget


UK Sewing Blogs

Theme by 17th Avenue · Powered by WordPress & Genesis

loading Cancel
Post was not sent - check your email addresses!
Email check failed, please try again
Sorry, your blog cannot share posts by email.
We use cookies to ensure that we give you the best experience on our website. If you continue to use this site we will assume that you are happy with it.Ok