• Home
  • About
  • Blog
  • Ebooks and Printables
  • Etsy
  • Sewing Journal

Make it Yourself. Yes You Can!

  • Sewing Projects
  • Tips and Techniques
  • Embroidery
  • Other Crafts
    • Crochet
    • Felting
    • Jewellery
    • Wreaths
  • Christmas

How To Make a Tied Wreath

July 18, 2019 · 2 Comments

how to make a tied wreath

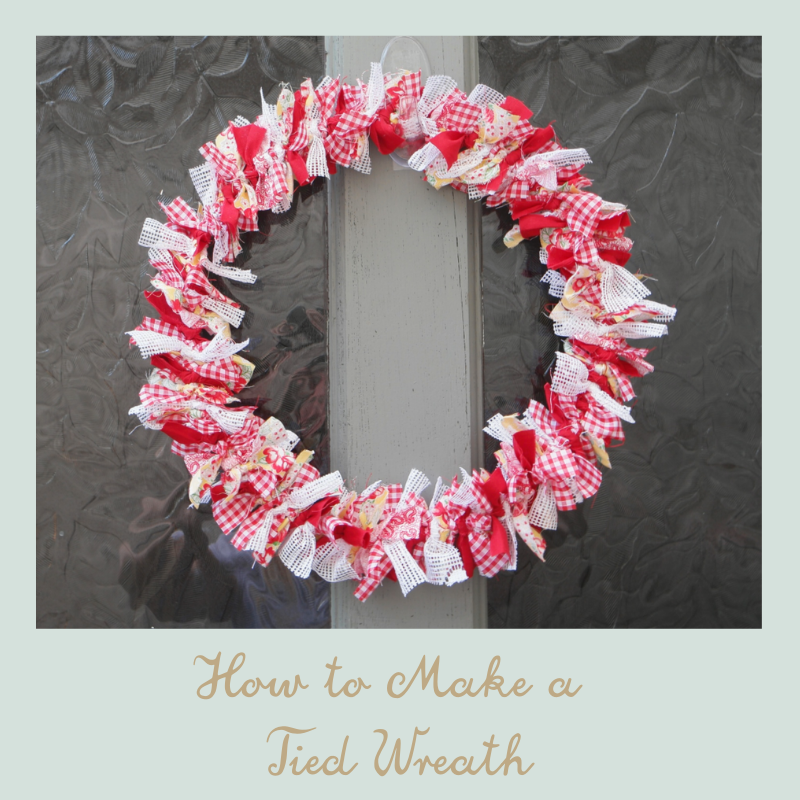
How To Make a Tied Wreath

Last week I decided it was time to make my front door a present in the form of a tied wreath.

A few years ago I made a new wreath for my door every couple of months.

What with everything else that was going on, I’d stopped doing this and my poor door was wearing a wreath that I made 3 years ago!

Making some more bunting to hang off the front of my house, it occurred to me that the bits left over could be cut up to make the pieces for another tied wreath, and I could get two things done at once (almost!).

Here’s the bunting. I made it in the same way that I made this last year. The lacy looking bits are cut from an old net curtain. My funny old house looks so much more cheerful!

instructions for making a tied wreath

And here are the instructions for making the wreath.

Instructions For Making a Tied Wreath

You Will Need

Wire (I used garden wire, but a wire coat hanger would work too)
Strong tape
Scraps of fabric

Instructions

Bend the wire round into a circle about 25 cm in diameter. If the wire you are using is quite thin, wrap in round several times to make it stronger.

Secure the ends with the tape.

making a tied wreath

Cut your fabric scraps into pieces approximately 2 cm by 10 cm (3/4 inch by 4 inches).

Choose one of the prints and tie pieces to the wire, spacing them out evenly.
Just tying them once is enough. I wasn’t fussed about having mine with the different prints all in a certain order, but I did want them spread out a bit.

how to make a tied wreath

Then choose another and tie those on in the gaps.

tied wreath
how to make a tied wreath
making a rag wreath

Repeat until you have some of everything tied on.

If you still have some spaces, fill them in with any remaining pieces.

hand tied wreath

The wreath will look best if the fabric scraps are close together, so budge them up a bit so that you can fill up all the spaces.

Now I have a wreath that matches my bunting!

how to make a tied wreath

You might also like these wreath tutorials:

Autumn Tied Wreath

Spring Wreath

Dried Fruit Wreath

Felt Flower Wreath

I also have a Pinterest board devoted to wreaths which you can find here!

tied wreath

Share this:

  • Click to email this to a friend (Opens in new window)
  • Click to share on Pinterest (Opens in new window)
  • Click to share on Facebook (Opens in new window)
  • Click to share on Twitter (Opens in new window)

Filed In: Blog, Other Crafts, Wreaths / Tagged: how to, tied wreath

Burlap and Lace Wreath

February 9, 2016 · 27 Comments

It’s wreath time again! This time I decided to make a burlap and lace wreath.

Up to this point I have had my Dried Fruit Wreath up on my door. I haven’t been too worried about taking it down because it’s not too Christmassy.

Finally however I have got round to making a new one!

It is a simple tied wreath, similar to the autumn themed one I made.

Here’s how to make one!burlap and lace wreath tied wreath

How to Make a Burlap and Lace Tied Wreath

You Will Need: a wreath form OR a wire coat hanger OR some garden wire, strong tape like Gorilla Tape or electrical tape if you are using wire or a hanger, lace, burlap ribbon, gingham ribbon.

1. If you are using garden wire or a hanger to make your wreath form, you will need to bend it into a circle about 20 cm in diameter. Use the tape to hold it in place.burlap and lace wreath tied wreath

If you are using a coat hanger, you will need to untwist it and cut the hook off. If you don’t have wire cutters, keep bending it back and forth until the wire snaps. It might take a little while but it will happen!

2. Cut your ribbon into lengths of about 10 cm. If you are using burlap fabric instead of ribbon, cut it into strips approximately 10 cm x 2 cm.

3. Starting with the burlap, tie the strips onto the wire. Space them out evenly. I tied mine in clusters of 3 with a single one in between.burlap and lace wreath tied wreathburlap and lace wreath tied wreathburlap and lace wreath tied wreath

4. Then start to fill the spaces in with lace.burlap and lace wreath tied wreathburlap and lace wreath tied wreath

5. Tie on some lengths of gingham ribbon at regular intervals.burlap and lace wreath tied wreathburlap and lace wreath tied wreath

That’s all there is to it! It’s very easy, see?

Obviously with a diameter of 20 cm it is quite a small wreath. You could make a bigger one but you will need more stuff to tie onto it.

burlap and lace wreath tied wreathburlap and lace wreath tied wreathburlap and lace wreath tied wreath

You might also like to take a look at these wreath tutorials:

Autumn Wreathautumn tied wreath burlap and lace tied wreath

Spring Wreathspring wreath tutorial burlap and lace tied wreath

Dried Fruit Wreathdried fruit wreath, citrus wreath, natural christmas burlap and lace tied wreath

Burlap Wreathburlap wreath burlap and lace wreath

Summer Wreathsummer door wreath burlap and lace tied wreath

Christmas Wreathhow to make a christmas wreath using dried fruit to make christmas decorations

This post contains affiliate links.

Share this:

  • Click to email this to a friend (Opens in new window)
  • Click to share on Pinterest (Opens in new window)
  • Click to share on Facebook (Opens in new window)
  • Click to share on Twitter (Opens in new window)

Filed In: Other Crafts, Wreaths / Tagged: burlap, craft fair, decor, home, lace, tied wreath, wreath

I'm Anna and I live in rural Norfolk in the UK. My mum taught me how to use a sewing machine when I was 10 and I haven't looked back! I love making all sorts of things and I hope you find inspiration here.

Join the list

Join the mailing list to receive updates, useful and interesting links and free pages from the Sewing Journal.

My New Ebook

things to male and do in the autumn

Bunting Makes Everything Better Tote Bag

Featured Kit

The Sewing Journal

My Kits and Patterns on Etsy

Shop the Christmas Shop at Sew and So


Join the List

Join the mailing list to receive updates, useful and interesting links and free pages from the Sewing Journal.

Privacy Policy

For information about cookies and Tea and a Sewing Machine's privacy policy, please click here.

Instagram

Instagram Widget by SnapWidget


UK Sewing Blogs

Theme by 17th Avenue · Powered by WordPress & Genesis

loading Cancel
Post was not sent - check your email addresses!
Email check failed, please try again
Sorry, your blog cannot share posts by email.