• Home
  • About
  • Blog
  • Ebooks and Printables
  • Etsy
  • Sewing Journal

Make it Yourself. Yes You Can!

  • Sewing Projects
  • Tips and Techniques
  • Embroidery
  • Other Crafts
    • Crochet
    • Felting
    • Jewellery
    • Wreaths
  • Christmas

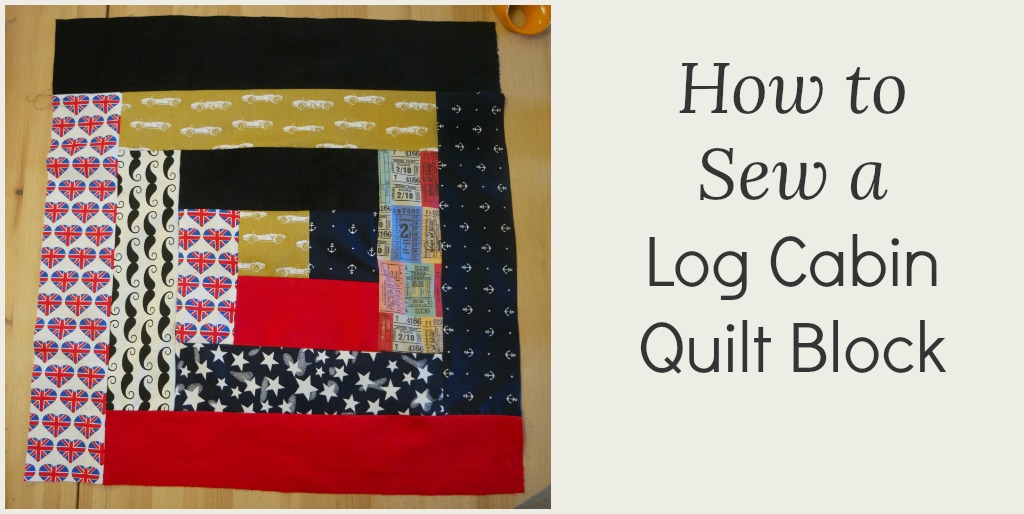
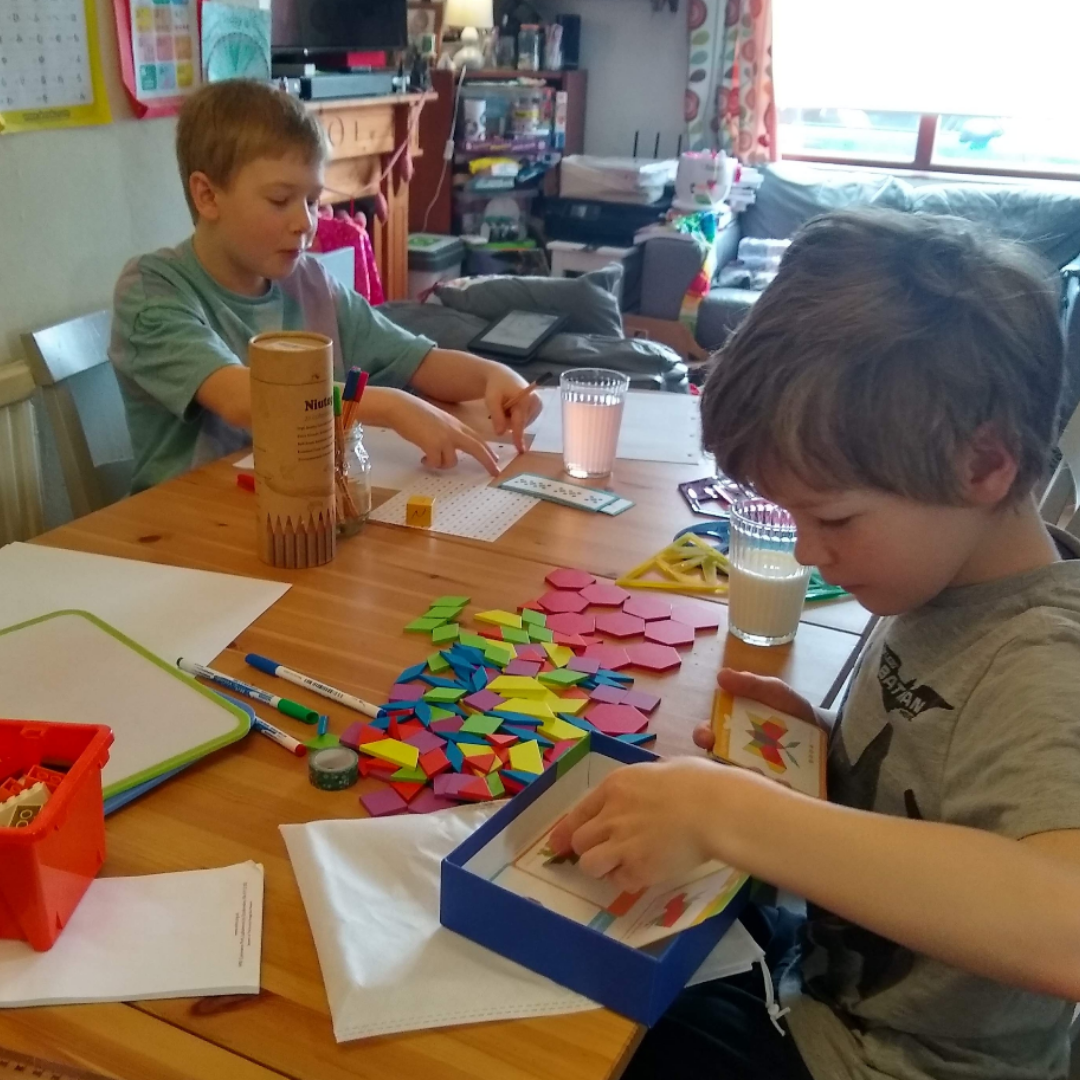
What is Home Education and How Does It Look For Us?

March 29, 2020 · Leave a Comment

What is Home Education and How Does It Look For Us_

It’s time for a random post about something that’s nothing at all to do with sewing or making stuff!

You probably know already that I have 4 boys, and you might also know that I home educate the younger 2. I did have the 2nd one at home last year as well, but he went back to school in September for the start of secondary school.

Some people make the decision to home educate their children when they are babies. It wasn’t like this for us! My boys were all at school when we decided to take them out. Home education isn’t as common in England as it is in the USA, and everybody we knew with school aged kids sent their kids to school.

It was only when the third one, Barnabas, was having problems that we started to think about home education. I’d tried unsuccessfully to get them into a different school. The academy system in England means that lots of schools in one area will be run by the same people, and living in a rural area there wasn’t much choice anyway. Home education was the only other option.

So we removed them in September 2018. Aidan had just started in Year 6, Barnabas was in Year 4 and Cosmo was in Year 1.

It has been the best thing! Barnabas is a different child now, there are no homework battles and I don’t have to do the school run! There are no tests or extra classes. They’re learning all the time so there’s no need!

Aidan went back to school in September 2019 for the start of secondary school, and having a year of home education has done him no harm at all. In fact, he’s coped better than his older brother, probably at least partly because home education gave him the more opportunities to develop as an independent learner.

People often have questions about home education, and never more so than at the moment with most British children being at home instead of at school. Here are some of the questions I get asked all the time!

What is Home Education and How Does It Look For Us_

Do You Have to Follow the National Curriculum?

No, thank goodness!

I don’t rate the English National Curriculum at all. There’s too much emphasis on tests and rote learning, and the expectations put on young children are too high . I don’t believe that it’s providing our children with the skills they will need to thrive in the modern world.

Being able to do what we like means that we can follow our children’s interests, and encourage them to learn things that might actually prove to be useful, like computer programming.

It also means that things don’t have to be taught as discrete subjects, and we can take more of a “whole of life” kind of approach. Subjects often overlap, and things frequently make far more sense if they are seen as part of something larger.

Maps are a good example. I got the maps of Norfolk out last week for some maths. The boys were learning about ratio and proportion at Barnabas’ request, and I wanted them to understand that scales and ratios have a practical application.

I didn’t set them things to do. Maps are interesting and I didn’t want to take any of that away by making it like school! I did make some suggestions, like “Ooh, King’s Lynn! Can you work out how long it would take for us to walk from the bus station to the dentist instead of catching the bus?”

They were happy looking at the maps for about 45 minutes, and in that time we covered not only maths, but English, History, Geography and life skills as well.

What About Phonics?

What is Home Education and How Does It Look For Us_

Mercifully we don’t have to do this either.

I should probably say that I don’t have a problem with phonics. What I have a problem with is phonics being promoted as the only way to learn to read.

I think that reading should start with books! Unfortunately in English schools at the moment, the mechanics of reading are taught so that children can pass a test at the end of Year 1. The pass mark for this test is 80%, and as part of it, children have to read words that are not real words. This is to test that the teachers are teaching phonics exclusively.

After a year at school, Cosmo could barely read. Now, with a little bit of help, he can read easy first chapter books. We’ve done some phonics, word families and sight words, but I suspect that the thing that’s made the biggest difference is that he’s part of a family where reading is normal and he has unlimited access to books.

How On Earth Do You Teach Your Kids When Mine Won’t Do Anything I Tell Them To?

This is a big one.

Lots of us who sail into home education with the idea that it’s going to be like school with us being the teacher find very quickly that that ship is full of holes!

This is particularly true if you have a child for whom school just didn’t work.

Let’s just think for a sec.

If school didn’t work for your child, why would it work if you recreated the same thing at home?

And even if school was, or is, fine, why would you want to make home like school? Maybe we need to make education like home!

It’s also worth remembering that a lot of what goes on a school has more to do with managing large groups of people and government expectations than with education and how children learn.

What is Home Education and How Does It Look For Us_

In home education, we are parents first and foremost, not teachers in the school sense. But our children still learn so much from us!

By the time a child is 5, they can walk, feed themselves and dress themselves. They can use the toilet. They can share and take turns at least sometimes. There are so many things they’ve learnt about the world around them already. And they’ve mastered language, which is a huge thing!

Children are not taught most of these things, but they learn to do them anyway. Cosmo wasn’t taught to do any of them! I didn’t even do toilet training with him because I suspected he’d do it himself when he was ready, which he did.

As they get older, children’s learning still happens all the time, not just in school. Learning happens without classrooms, worksheets, writing, a curriculum, tests or rules. It happens without qualified instructors. It even happens without adults!

So lots of home educating parents see themselves as facilitating their children’s education, rather than running a kind of school from their kitchen table.

Being a facilitator is about providing your children with opportunities for learning rather than actually teaching them.

This can take the form of finding documentaries for them to watch, books that you have already or from the library and materials for them to engage with as they choose. Put them where the child can find them, perhaps draw attention to them, then allow the child to choose. Some things will go down well, other things will not. Sometimes things will take a totally different route to the one you were expecting!

I should probably say at this point that my children don’t have total freedom over what they do. They can learn whatever they like, but they need to have basic skills like reading and writing. In the end, I want them to own their learning. If there’s resistance I find another way and they always have a choice and a say in what they do.

What About Socialisation?

Ask any veteran home educator about this and you will probably met with laughing and maybe some eye rolling!

Think of the most anti social person you know. For me, it’s myself, ha! That anti social person probably went to school.

Now think back to your school days. How many times did our teachers tell us, “You don’t come to school to socialise”?!

Some kids love school and have masses of friends. Some adults have lots of happy memories of having lots of friends.

But this isn’t the case for everybody. School can be a horrible place if you’re sensitive or different.

Some children spend break and lunchtime on their own. Others will be kept in to finish off work and don’t have a chance to play with the other children. Some are bullied. Others are excluded by other children. School is no guarantee of positive interactions with other humans.

For home educated children, there are lots of groups for them to attend. Some of them are structured, others are freer. If the children don’t enjoy a particular group, you can cross it off the list and try another! Unlike school, there’s the freedom to choose.

My boys go to drama classes, forest school, roller skating and another group that’s like mums and tots but with bigger kids. They also do karate and Cubs and Beavers, they meet other kids at the park and when they’re out playing Pokemon Go. One of my boys didn’t really have any friends when he was at school. Now he has lots.

So How Does Home Education Look At My House?

What is Home Education and How Does It Look For Us_

The best thing about home education is that you can do what works best for you and your children. Somebody else’s home education might look very different to ours, and that’s fine! This is what’s working for us at the moment, and it changes and evolves as my boys grow and change.

Monday

On a Monday we’re usually out. The boys attend drama classes in Ely, or we go to forest school. We usually get back home from drama just after 2pm, and the boys will either opt to play, watch a documentary or do stuff on the computer.

Tuesday, Wednesday and Thursday

On Tuesdays, Wednesdays and Thursdays we’re often at home. There are groups on but they’re not every week.

I usually start by reading to them. At the moment we’re enjoying The Secret Garden. I made the decision to read classics because I want to expose them to children’s literature that they might not necessarily pick up and read for themselves. I’ve read them The Railway Children and The Children of Green Knowe, both of which went down a treat! And I’m enjoying revisiting these old friends from my own childhood.

After that we usually do some English and Maths.

With Cosmo, he does a little bit of spelling, handwriting, reading and writing with me. We use the National Geographic levelled readers for reading, but sometimes he’ll read a bit from something else instead. He’s also got a couple of sticker books, and sometimes he’ll read the page to me then do the stickers.

For spelling we use Words Their Way. I was very happy to find an ex library copy on Ebay for £3.75! It focuses on word families rather than phonics and there are lots of suggestions for word sorts and games.

We use Brave Writer for writing. Cosmo has a writing project to do each month. There’s enough flexibility for him to choose what he wants to do. The project for March was a photo journal. Cosmo took some photos and we printed out his favourites. He decided on an order for them and we wrote a caption for each picture. He wrote about half of them himself and I scribed the other half for him. Then we made them into a book.

I wasn’t sure about using a curriculum for writing, but I can’t rate this highly enough. There are samples and other free things to try before committing to anything, and there’s a podcast too. So if you’re on the hunt for something, I’d recommend this!

Barnabas is an avid reader, so getting him to read isn’t a problem! A few weeks ago, he read all 4 of the Mortal Engines books and The Hunger Games in 1 week! And this wasn’t even all he read!

Writing has proved to be an issue. We’re now at a point where he will write if he uses the computer, and I’m in the process of getting him an assessment for dysgraphia. We use a handwriting program called Speed Up which focuses on building up muscles and co-ordination.

Barnabas has a writing project each month too, and he chooses what he wants to write about. He’s currently writing a newspaper report about aliens.

what is home education and how does it look for us

I’ve recently started taking a different approach to Maths. Lots of people have difficulties with Maths, and I’ve been wondering whether it’s because Maths has traditionally be taught as lots of little separate bits of arithmetic. It takes a long time to get to the point of being able to see the bigger picture, by which stage most of us have given up!

So we’re starting with bigger bits of the picture, and I’m calling it Playing With Maths.

We have a theme for the week and we see where it takes us! So far we’ve done paper aeroplanes, patterns, triangles, and ratio and proportion. Areas of Maths covered in this way have included measuring, various kinds of graph, interpreting data, making predictions, number patterns, shapes, algebra, angles, Pythagoras, square numbers and square roots, symmetry, addition and subtraction, fractions, multiplication, ratios in baking and scale in maps and models.

We also do some hands on Science, a poetry teatime (at lunchtime in my house!) and visit the library.

Any time that’s left in the mornings will be filled with other things the boys want to do. They both like making little games in Scratch. Cosmo likes drawing and painting. Barnabas has recently chosen to learn about the Soviet Union, and he’s learnt a little bit of Russian and some Latin. He’s learning to play the piano using an app.

After lunch the boys are free to do what they like. Sometimes we go out for a walk or to the park. They might choose to watch a documentary, do something arty or make something, or play.

Friday

Friday is our grace day. If there’s anything we haven’t managed to do or that needs finishing, we’ll do it on Friday. Otherwise we might go to the library if we haven’t already been that week, or go to a museum. Or we’ll do something arty, or play board games.

At some point this will probably change, but it’s working for us at the moment. My boys are happy and healthy and they’re learning, so that’s good enough.

Some Tips if You’re New To Home Education Or You’re Having To Because the Schools Are Closed

If it’s all going well, that’s great. But if it’s not, if the kids are resistant or the school have stopped sending stuff, here are some suggestions.

Remember that learning doesn’t have to look like school! Younger children learn best through playing. We all learn better by doing rather than being told. We can learn from reading books and also through watching television. Reading and Maths are things we do all the time. Worksheets are not the only way.

Just because something isn’t on the National Curriculum or won’t turn up on a SATs test, it doesn’t mean that it’s not worth learning. If your children what to learn something, then that’s a good enough reason. And if you’re worried about English and Maths, it comes up in everything, even Minecraft!

Lessons in life are useful ones to learn. This includes tidying up, cooking and doing laundry, as well as sticking to a budget and understanding why people pay taxes.

Remember that even at school, children don’t just do English and Maths. Physical exercise is important. Playing with a ball or on some play equipment helps them to develop gross motor skills, strength and co-ordination, as well as wearing them out so that they sleep well.

Art and the arts are valid. Imagine if somebody had told Leonardo Da Vinci that he shouldn’t bother with drawing because times tables are more important! The arts encourage children to develop motor skills, observational skills, language, self expression and fine motor control, not to mention that people can and do earn a living doing these things!

There doesn’t have to be a clear distinction between home and school. The whole of life is learning and if the lines are blurred, that’s fine. Your kids aren’t at school, so lets not make home like school! Lets make ongoing learning and education part of life at home, complete with a snack, a blanket and a favourite pet if it helps things along.

Strewing is one of my favourite things. It basically means leaving things lying about for your children to engage with. This could be books, or little trays with science bits in them, magnetic letters, art materials, anything! It helps if the table is clear apart form the things you want them to do. If it’s yet another thing in the mess they might not notice (guess how I know!).

Another version of strewing is sitting down to do something yourself. Maybe some art things or a microscope that plugs into your phone, or a project of some sort. Your children will probably want to know what you’re doing and will want to join in, especially if you pretend to be a bit precious about it.

Find out what they want to learn! Growing stuff, a foreign language, how a car works, whether Bigfoot really exists and what did actually happen to Amelia Earhart! As I’ve said before, there’s lots of learning in all kinds of things, and it’s much easier for everybody if the children are learning things they want to learn.

Sewing is a fun thing to with children and there’s plenty of maths involved! They might like to make their own trousers, or they could try a drawstring bag from a pillowcase!

Share this:

  • Click to email this to a friend (Opens in new window)
  • Click to share on Pinterest (Opens in new window)
  • Click to share on Facebook (Opens in new window)
  • Click to share on Twitter (Opens in new window)

Filed In: Blog, Other Stuff / Tagged: children

How to Sew a Log Cabin Quilt Block

January 27, 2018 · 2 Comments

How to Sew a Log Cabin Quilt Block

I’ve been planning to make quilts for my boys for ages, and before Christmas I finally got my act together and started on the first one.

Having the attention span of a gnat (I’m really starting to think I might have an adult version of ADD!), it’s necessary to keep things as simple as possible or the quilt will end up on the pile of unfinished projects.

So instead of making dozens of tiny blocks, I’m making 12 big ones.

Not wanting to mess it up, I planned out what I was going to do before Christmas. If you’d like to read about planning a quilt, you can find that post here.

As well as using large blocks, I’m also planning to back it with fleece and not actually quilt it all. I know this is cheating! But in the end, I want Dominic to have his quilt and I also want to keep my sanity.

Now all the bits are cut out and I’m ready to start sewing!how to sew a log cabin quilt block

Log Cabin Quilt Block

The log cabin quilt block I’m using is made up 13 pieces, 7 different pieces in total.how to plan a patchwork quilt how to sew a log cabin quilt block

During the planning stage, I worked out how many of each piece I would need. Pieces 1 and 2 are the same, as are 3 and 4, 5 and 6, 7 and 8, 9 and 10, 11 and 12.

So that’s 6 different sized pieces, plus the 13th.

For those 6 pieces, I cut 24 of each, and 12 of the 13th piece.

Here’s a table showing the sizes for each piece and how many you need.how to plan a patchwork quilt how to sew a log cabin quilt block

Sewing the Log Cabin Quilt Block

To sew the log cabin quilt block, you start in the centre and work outwards.

Pieces 1 and 2 are the same size, so take 2 of the smallest bits and sew them together. Trim the seams and press them open.how to sew a log cabin quilt block

Then along the lower long edge, sew one of the second size. Then sew the other piece this size at right angles to it.how to sew a log cabin quilt block how to sew a log cabin quilt block

Pieces 5 and 6 are the 3rd size up. Sew one of these along the opposite long edge to piece 3, and the other one to the side opposite piece 4.how to sew a log cabin quilt block how to sew a log cabin quilt block

Keep going like this so that you’re making up your block in a clockwise direction. You could go anti clockwise if you prefer, but it will look better if you don’t change your mind half way through!how to sew a log cabin quilt block how to sew a log cabin quilt block how to sew a log cabin quilt block how to sew a log cabin quilt block how to sew a log cabin quilt block how to sew a log cabin quilt block how to sew a log cabin quilt block

Remember to trim and press seams as you go. And if you find that the pieces aren’t quite the right size, you can trim them down. Just be aware that the blocks will be easier to sew together if they’re the same size!

The next post will be showing how to sew the log cabin quilt blocks together and sewing the backing.


Share this:

  • Click to email this to a friend (Opens in new window)
  • Click to share on Pinterest (Opens in new window)
  • Click to share on Facebook (Opens in new window)
  • Click to share on Twitter (Opens in new window)

Filed In: Blog, Sewing Projects / Tagged: children, decor, gift, home, how to, quilt

How To Plan a Patchwork Quilt

December 9, 2017 · 5 Comments

How To Plan a Patchwork Quilt

One of the things that has been on my sewing to do list for several years is to make quilts for my boys.

My boys like wrapping themselves up in blankets when they’re at home, especially in the evening when they’re watching Canada’s Worst Driver or Mythbusters. I also like the idea of them having something special to take with them when they eventually leave home.

The problem with any kind of big project is that it can seem so big, it never gets started! Even the idea of breaking things down into bite sized chunks can be overwhelming because they are just so many chunks!

A traditional patchwork quilt made up of lots of little squares definitely falls into this category!

So if I’m going to make quilts for my boys, I’m going to make things as easy as possible.

I have a standard sewing machine, not a quilting one, and I also have the attention span of a gnat (although it’s improved a bit), and a pile of unfinished projects to prove it!

I don’t want the quilts to end up on that pile! So I’ve opted for large blocks and I’m going to back it with fleece fabric and not actually quilt it at all. I know this is cheating! This is not my idea. It is one I have shamelessly stolen from Sara at Creative Jewish Mom. You can the quilt she made here.

Anyway, I’ve got the fabric, and before reaching for the scissors and making a dreadful mess of everything, I’ve planned out what I’m going to do. This way, I know exactly how many blocks I need to make and how wide the strips need to be before I start cutting.

Here’s how to plan a patchwork quiltl!how to plan a patchwork quilt

How To Plan a Log Cabin Quilt

1. Once you’ve decided on a quilt block, the next decision to make is how big you want the quilt to be. I wanted mine to be a little bit wider than a single duvet and about the same length. A vague idea is all you need here, as the actual finished dimensions will depend on the size of the blocks.

A single duvet is 135 cm by 200 cm, so I was aiming for about 150 cm x 200 cm.

2. The next thing to decide is how many blocks you want the quilt to have. I decided to make big blocks, as that would be less work, easier, quicker, and I’d be more likely to finish it!

I decided to make my quilt 3 blocks by 4, with the option of a border if the measurements required it.

3. The next part is tricky, as this involves figuring out how big each block needs to be. So that it doesn’t get horribly complicated later on, the actual dimensions of each block need to be determined by the size and shape of the pieces that make them up. This where keeping things simple is really going to help!

The quilt block I’ve chosen for my patchwork quilt is a simple log cabin. All the rectangles are the same width, and there are 7 rectangles going across and 7 going up and down. So the easiest thing is to start with a number divisible by 7. A square 49 cm x 49 cm would result in quilt without borders measuring 147 cm x 196 cm. That’s close enough for me!how to plan a patchwork quilt

4. The next task is to work out exactly how big the pieces need to be. You can do this either by drawing it out on a large sheet of paper, or by working it out. Don’t forget to add a seam allowance!

With the log cabin block, the 1st 2 pieces are squares, so they would need to be 7 cm x 7 cm. Adding a 1 cm seam allowance all the way round makes them 9 cm x 9 cm.

Pieces 3 and 4 need to be 7 cm wide and the same length as the first to pieces combined, so 7 cm x 14 cm. A seam allowance makes them 9 cm x 16 cm.

Pieces 5 and 6 need to be 7 cm wide, then as long as three sections, so 21 cm. With the seam allowance, 9 cm x 23.

You get the idea! Here’s a table with the measurements of each section.how to plan a patchwork quilt

5. With the pattern pieces made, identify how many of each piece you will need. Decide how many you will cut from each fabric.

6. Now cut the bits out!

Now that the planning’s done and the bits are prepped, you can get sewing your patchwork quilt!

The next post will show how to sew the log cabin quilt block.

Share this:

  • Click to email this to a friend (Opens in new window)
  • Click to share on Pinterest (Opens in new window)
  • Click to share on Facebook (Opens in new window)
  • Click to share on Twitter (Opens in new window)

Filed In: Blog, Sewing Projects / Tagged: children, decor, how to, quilt, sewing for boys

How to Sew a Bean Bag Chair

September 22, 2017 · 13 Comments

How to Sew a Bean Bag Chair

A little while ago, my boys expressed a need for bean bag chairs.

They like the idea of having somewhere comfy to sit where they can read or chill out that’s not a sofa downstairs or their beds.

There’s one chair upstairs in my big boys’ room, left over from the days of bedtime stories while feeding a baby. The little boys don’t have a chair in their room. There is a toybox with some cushions on it, but that’s disappeared under a pile of books and will probably stay that way until I can get a new bookcase (I need to decide where to put it first, we have a lot of books!).

So I actually like the idea of them having them each having their own bean bag chair that they can put where they like when they want to sit down.

With 4 of them, I wanted to keep things simple. I’d also originally planned to let the boys make them themselves, but we ran out of time in the summer holidays.

The design is very simple and is actually the same shape I used for the pattern weights and the kindle pillow. It’s just bigger! My older 3 could definitely have each made their own bean bag chair if we’d not run out of time.

For the fabric, I used polycotton. Other bean bag tutorials will tell you to use upholstery weight fabric. For these though, lighter fabric is fine. I also didn’t want to have to spend a fortune on fabric! Thankfully Minerva Crafts have lots of polycotton in dozens of colours and designs at £2.99 a metre! This is an affiliate link, but it is also where I bought the fabric.

Here are the instructions for making a bean bag chair!how to sew a bean bag chair

Instructions For Sewing a Bean Bag Chair

You Will Need

1.5 metres polycotton or other fabric, bean bag filling (5 cubic feet is enough for 1), usual sewing supplies.

Making the Bean Bag Chair

1. Take your fabric and cut 1.5 metres. Leave the width as it is.

2. Fold the fabric in half widthways so that the right sides and the selvedges are together. Pin, then sew along the open side and the bottom. Turn it the right way out.how to sew a bean bag chair

3. Fold the raw edges inwards, then pin the top so that the side seam is in the centre and the top edge is at right angles to the bottom edge. Sew about 2 thirds along so that there’s an opening in the top seam.how to sew a bean bag chair how to sew a bean bag chair

4. Pour in the bean bag filling. This will make an almighty mess if you’re not careful and I would not recommend allowing the kids to do this! Don’t overfill it. 3 quarters full is probably enough.

To make things easier, I cut the corner off the bag of beans and taped a cardboard tube to the hole. This made things easier as it’s hard to control where the beans go otherwise!how to sew a bean bag chair

The face is because I wouldn’t let him pour it in!

5. Sew up the rest of the top seam.

Give it a shake and your bean bag chair is finished!how to sew a bean bag chairhow to sew a bean bag chairhow to sew a bean bag chair


how to sew a bean bag chair

Share this:

  • Click to email this to a friend (Opens in new window)
  • Click to share on Pinterest (Opens in new window)
  • Click to share on Facebook (Opens in new window)
  • Click to share on Twitter (Opens in new window)

Filed In: Blog, Sewing Projects / Tagged: children, decor, gift, how to

10 Ways to Get Ready For Christmas Crafts Now

September 19, 2017 · 8 Comments

10 Ways to Get Ready For Christmas Crafts Now

Christmas always sneaks up on me. I know the date never changes, but somehow every year I find it’s the end of November before I’ve even started to think about Christmas crafts and what I might make.

I suspect it might be partly because all 4 of my boys have birthdays in the autumn and I tend not to think about Christmas until the Season of Birthdays is over.

I also don’t like thinking about it too early. I want to feel Christmassy at Christmas. I want to enjoy the cold weather and the twinkly lights. Feeling Christmassy is a hard thing to sustain if you have been doing Christmas crafts since July.

So if you want to get organised for Christmas crafting, here are 10 ideas to help you get ready now before the cold weather arrives without leaving it all to the last minute.10 things to do now to get ready for christmas crafting

10 Things You Can Do Now to Get Ready For Christmas Crafts

1. Start planning. You can write down ideas if you want to or you could just start having a bit of a think.

What is your theme going to be? Red and gold? Blue and white? Natural?

Do you want lots of Scandi style decorations this year? Or things made from nature? Or felt?

Have you got small ones at home who might like to do some Christmas crafts?

Are you planning on making a lot of gifts or will be you be focusing more on making your home feel Christmassy?

Pinterest is great for organising ideas as well as finding them! My Christmas Crafts Pinterest board is here.

2. Start collecting pinecones. Pinecones are great for autumn crafts too, so collecting them doesn’t have to feel too Christmassy.

If there are no pine trees near where you live, plan a day out somewhere that does have them. Even though we live in the country, there are not that many trees near where we live. Thankfully though, there are woods not too far away, so the boys and I will be having a little trip off to the woods at some point over the next month or 2.10 ways to get ready for christmas crafts now

3. Dry citrus fruit slices. I love to do this! Dried fruit can be used to make garlands, tree decorations and wreaths. These can be used to decorate your home nearer the time, and they can be given as gifts too.

Drying fruit is very easy to do! Just slice some citrus fruit thinly and put it in a warm (not hot!) oven for a few hours. Full instructions for doing this can be found here. It’s possible to dry whole fruit as well. I usually stick to clementines as they’re small and take less time to dry.10 ways to get ready for christmas crafts now

4. Plan Christmas crafts for your kids. Also plan when you are going to do them. I always find that things get so busy in the run up to Christmas, we end up not having time to do half the things I wanted to. So decide what you want to do and when you want to do them.

If you have school aged children, it’s nice to have some things planned for them to do as the excitement before the big day is often enough to send everyone loopy. You can arrange them round trips to the woods/ common/ beach to wear them out and keep them busy.

5. Evaluate your Christmas fabric and ribbon situation. If you see something you need while you are out and about, you can buy it. Then when the time comes, you’ll be ready to make stuff without having to brave the Christmas crowds or wait for the postman.

It’s worth mentioning at this point too that shops get their Christmas stock delivered in September, but things like red ribbon, gingham and felt are usually available all year round! So stock up on what you need when you get the chance.http://www.awilson.co.uk/dry-citrus-fruit/

6. Identify where you can obtain greenery. Greenery is so useful for table centrepieces, candle decorations, decorating mantlepieces and for wreaths.

Christmas flowers are usually easy to find, but greenery is often less so. You might have some in the garden, or you might have a neighbour with a laylandii hedge who might let you have some if you ask them. I know several places near me where there is hawthorn growing in the hedgerows. I’ll be down there in a few weeks with my scissors ;).http://www.awilson.co.uk/dry-citrus-fruit/

7. Start collecting jam jars. Homemade jam makes for a great last minute Christmas gift and t’s very easy to make. Just weigh the fruit, chuck it in a pan with the same weight in sugar and a little bit of water and boil it until it starts to set. Pour the jam into sterilised jars. When it has cooled, put the lids on.

Jam tastes better if it is left in the jar for a couple of weeks, so if you can make it a little while in advance, it’s worth doing so.

Jam jars have other uses besides holding jam, which brings me onto…

8. Create a Pinterest board of last minute handmade gifts. Stuff you can put in a jar is great. Sewing kits, brownie ingredients, sweets, bath stuff and natural things to make your house smell nice are all things you can make up yourself and put in a jar. To make the jar pretty, you could tie some ribbon round it or cover the lid with a square of fabric.

If these don’t appeal, a quick search on Pinterest will throw up plenty of other ideas for last minute Christmas gifts you can make. Although the point here is to get ourselves organised, it’s a good idea to have some ideas like this as these will probably be quick and easy things to make if you do find yourself short of time.

9. Dig out stuff you have made or started to make over the last year and decide whether you can give any of it to people as presents. A couple of years ago I had a glut of mug cosies, some of which became presents for my sons’ teachers.

Perhaps you’ve made something that was more about trying out a technique than making something you needed. Or maybe you made lots of covered notebooks just for fun! It’s probably worth having a look at what you’ve made or not quite finished.

And if you want to make more gifts, it’s probably never too early to start., so that’s definitely something to start planning now.

10. Start making a list of anything else you might need. Successful Christmas crafting often needs more than fabric and ribbon alone. So start to consider what else you’ll need.

This could include oasis flower foam, wire for centrepieces, twine, raffia, buttons, glitter, gift bags and tissue paper. There’s probably a whole lot of other stuff too that you’ll think of once you start to make your list!

Having a list prepared well in advance will mean that you can get stuff when you see it. It’s no good sitting down to make a Christmas wreath then realising that you don’t have any bay leaves or florists’ wire!

It also means that you won’t find yourself wandering round the Christmas section of Wilko knowing that you need stuff but not knowing exactly what!

You might be interested to know that there is a Christmas craft planner available as part of the super good value Christmas bundle! You can find out more here.

Share this:

  • Click to email this to a friend (Opens in new window)
  • Click to share on Pinterest (Opens in new window)
  • Click to share on Facebook (Opens in new window)
  • Click to share on Twitter (Opens in new window)

Filed In: Blog, Christmas / Tagged: autumn, children, Christmas, craft fair, crafts, fall, get ready

  • 1
  • 2
  • 3
  • …
  • 11
  • Previous Entries
I'm Anna and I live in rural Norfolk in the UK. My mum taught me how to use a sewing machine when I was 10 and I haven't looked back! I love making all sorts of things and I hope you find inspiration here.

Join the list

Join the mailing list to receive updates, useful and interesting links and free pages from the Sewing Journal.

My New Ebook

things to male and do in the autumn

Bunting Makes Everything Better Tote Bag

Featured Kit

The Sewing Journal

My Kits and Patterns on Etsy

Shop the Christmas Shop at Sew and So


Join the List

Join the mailing list to receive updates, useful and interesting links and free pages from the Sewing Journal.

Privacy Policy

For information about cookies and Tea and a Sewing Machine's privacy policy, please click here.

Instagram

Instagram Widget by SnapWidget


UK Sewing Blogs

Theme by 17th Avenue · Powered by WordPress & Genesis

loading Cancel
Post was not sent - check your email addresses!
Email check failed, please try again
Sorry, your blog cannot share posts by email.
We use cookies to ensure that we give you the best experience on our website. If you continue to use this site we will assume that you are happy with it.Ok