• Home
  • About
  • Blog
  • Ebooks and Printables
  • Etsy
  • Sewing Journal

Make it Yourself. Yes You Can!

  • Sewing Projects
  • Tips and Techniques
  • Embroidery
  • Other Crafts
    • Crochet
    • Felting
    • Jewellery
    • Wreaths
  • Christmas

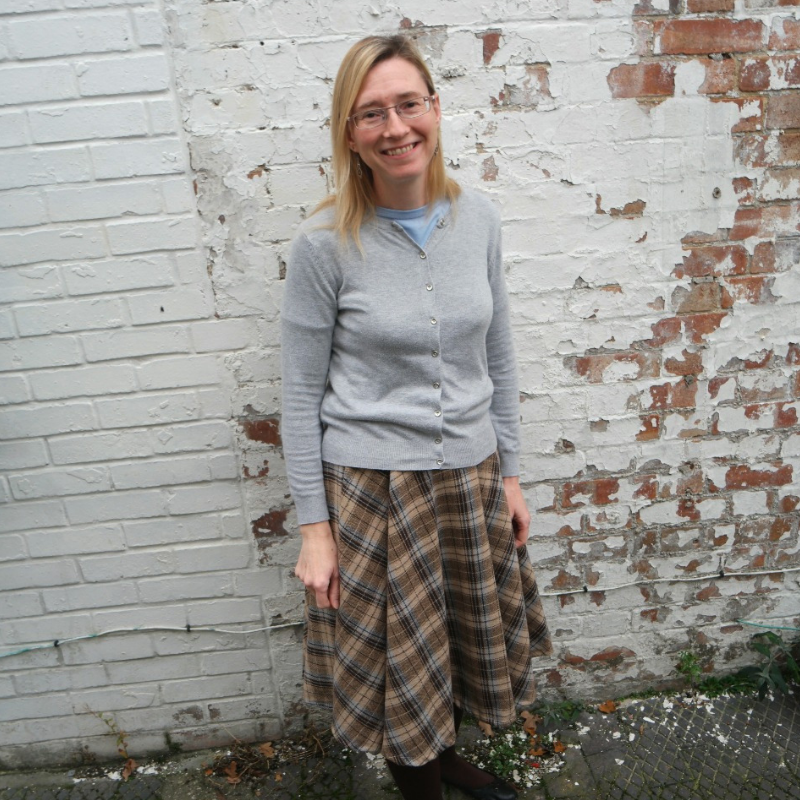
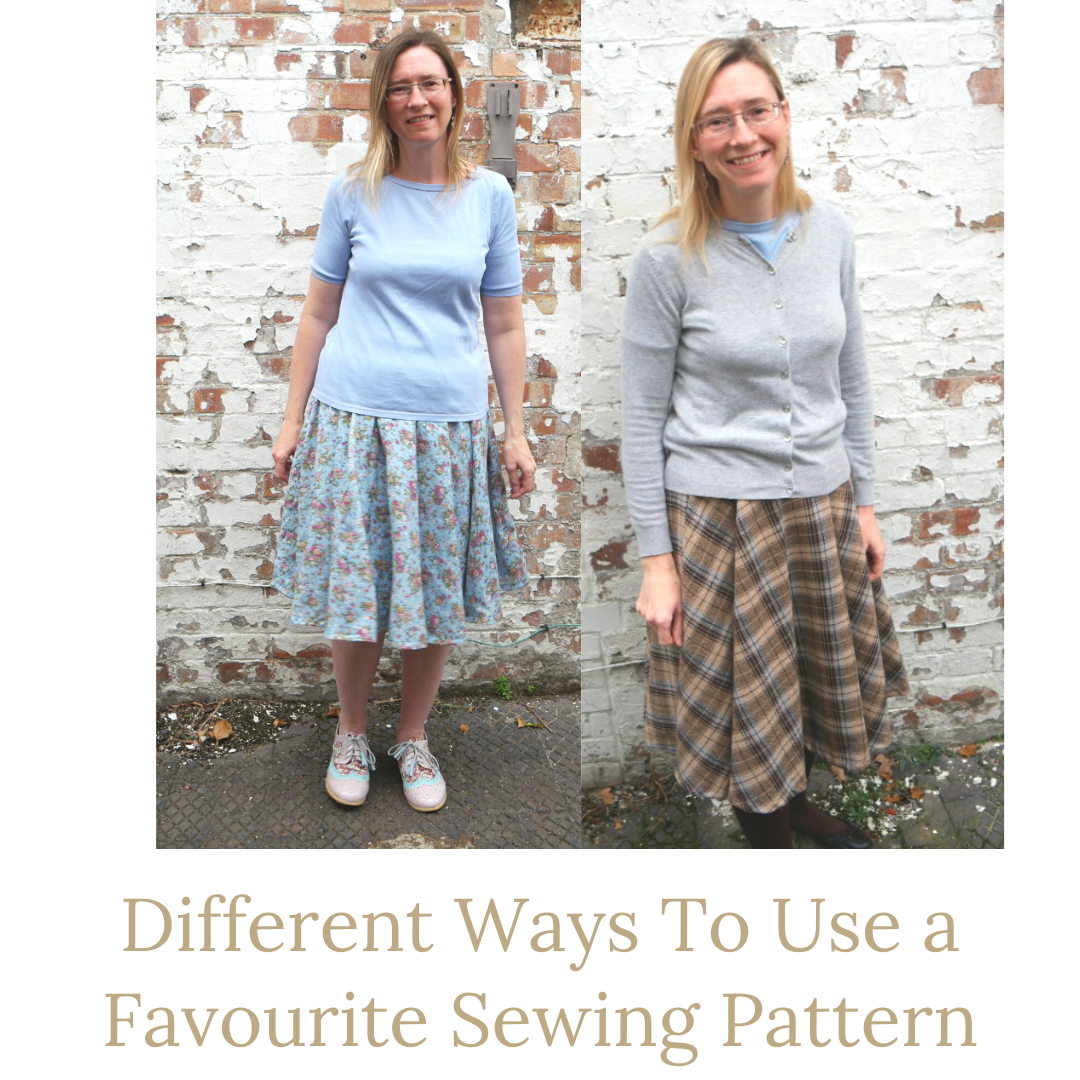
Different Ways To Use a Favourite Sewing Pattern

June 12, 2020 · Leave a Comment

It’s no secret that I love circle skirts! They suit all body shapes, they’re easy to make, and although I mentioned patterns in the title, I never use a pattern to make one!

When I was having a tidy up the other weekend, I found some fabric I’d bought to make another circle skirt. I’d intended to make it for our trip to Japan, then we couldn’t go and I didn’t make the skirt.

But last week I did, and here it is! The lining is flannelette (perfect as April has returned to Norfolk even though it’s June!), and the floaty layer is cotton voile.

I have a lot of circle skirts, in total probably half a dozen, not to mention several dresses that are circle skirts with a bodice added.

It’s tricky when you find something you like to not end up feeling that you’re wearing the same thing all the time. A cotton knee length circle skirt is perfect for summer. But what can you do to vary things a little bit? And what about when the weather gets colder and you still want something pretty and swirly to wear?

Something I’ve found with my pretty skirts is that it’s easy enough to change things up a bit, so that you are wearing things you like that suit you, but not things that all look the same.

The suggestions I’ve made below apply to circle skirts in particular, but most of them could be used with any favourite pattern.

And if you have an idea that I haven’t included, please share it in the comments!

If you haven’t made a circle skirt before and you want to have a look at a tutorial, there’s one here.

Change The Fabric

This is the easiest thing to do if you want to use the same pattern but end up with something that looks different.

Most of my circle skirts are made from cotton print, but I have others made from different fabric too!

You could try:
Wool
Flannelette
Silky fabric or taffeta
Tulle

My favourite winter skirt is this one made from a wool blend. I added a lining so it wouldn’t be itchy.

diy winter circle skirt tutorial

I’ve also got one made from flannelette that I wore in the spring with pink tights and pink shoes. It’s so nice to be able to have a pink day even when it’s chilly out!

The one I made last week can be worn in colder weather too as it has a flannelette lining.

Making a version in a shiny fabric like this one in a silky fabric, or from taffeta can make it look very different and suitable for wearing if you need to get dressed up.

9 tips for sewing with shiny fabric

I’ve made several from tulle, including this pink one which is the envy of 4 year old little girls everywhere I go! I cut 5 circles from tulle, plus one from lining fabric and sewed them to an elastic waistband. The tutorial is here.

diy tulle circle skirt

Even swapping prints for plains or the other way round can make achieve a different look, or by substituting pastels for richer or deeper colours.

Try Adding Some Net or a Foofy Petticoat

I’ve sewn a net layer into a circle skirt made from voile. I also have a foofy petticoat that I wear with my pretty skirts sometimes. It turns them from being normal ish nice to extra nice!

With a pair of heels it can be enough to wear a pretty circle skirt with a foofy petticoat and you’ve got an outfit for a wedding or another special occasion!

Add a Bodice

This is easier than you’d think!

The first time I tried this, I needed something to wear for a wedding and I didn’t have very long. So I had to keep it simple. The bodice was made from 2 pieces, with some darts. I didn’t bother with sleeves. The result was my cherry blossom dress which I have worn a lot! I’ve also made several other versions of the same thing, and it was this style of dress that we made in the sewalong 2 years ago.

cherry blossom dress sewalong finishing the raw edges

Changing an existing pattern drastically can feel scary, especially if you’re doing it all yourself without a pattern. But if you have a look at the clothes in your wardrobe, it’s usually quite easy to figure out how they have been made. You can even take things apart and use them as pattern pieces!

Having a dress form helps as well, but even if you don’t, you can try pinning pits of fabric to yourself and seeing how you can get them into something that looks a dress.

I wrote a post about drafting a bodice here, which describes the same process that I use myself.

Change What Goes On At the Waist

This can give a circle skirt a different kind of look too.

Usually I sew a waistband in this way, or I use elastic.

You could add a bow, a ruffly flower or ties.

Waistbands are often made from the same fabric, but you could use a contrasting fabric, maybe a print with a plain or the other way round.

Add Contrasting Sections

This is one of the things that I haven’t tried yet although I’d like to!

Probably the easiest way to do this with a circle skirt is to swap 2 of the quarters with a different fabric. Or you could cut the quarters in half to make eighths.

Another option would be to cut a chunk out of the top section and add a piece the same size in a contrasting fabric. Or you could do this at the bottom, but you’d need more fabric!

Add Applique

One of these days I’ll make this! It will have huge appliqued flowers at the bottom.

I also started making a Bob Ross dress. I ran out of steam before I’d done the back! It’s a circle skirt with a bodice added, and the whole thing is in the style of a Bob Ross painting.

Change the Shape of the Hemline

The hemline on a circle skirt is obviously a circle, but it’s easy enough to change it.

One option is to make one that’s a square instead.

If you’re concerned about it being too short in some places, you could cut 2 squares and overlap them.

Another possibility would be to cut across front of the hem in a straight line.This would give a hemline that is longer at the back and the sides.

Or you could cut upwards from one side to the other, to give it an asymmetric hem.

Another way to change the hemline is to sew a scalloped hem. To do this, it’s probably best to make a pattern piece for a quarter of the skirt so that you don’t get into a muddle with the curve.

Change the Length

This is another easy way of making something look quite different! You could try anything from from very short to very long, but even changing something from knee length to mid calf, especially if you change the fabric too, can make the same design look very different.

Add Layers

This works best with very light weight fabrics.

To make a tulle skirt, you’ll need several layers, but you could also try layering voile or something else floaty. You could add net or tulle layers, or if you are making one with a square hemline, you could try a couple of layers that overlap at different angles.

How to make a tulle skirt with a hanky hem

Make a Wrap Version

All you need to do for this is add an extra panel so that it will overlap. A couple of buttons will hold them together and you could add extra sections the waistband to make ties.

Add Pockets

I have major issues with the lack of pockets in women’s clothes! But when you make your own, it’s easy enough to add pockets at the side seams.

You could go one step further and add patch pockets. You can use them to add interest as well as somewhere to keep your phone! Try them in a contrasting colour, or applique a design to them.

Change What You Wear With It

A blouse will make it smarter, a t shirt is more relaxed. A foofy petticoat will make it fancier, as will smarter shoes. A cardi and a pair of tights will make it warmer. You could even wear a long sleeved thermal top under your favourite summer t shirt and pair of boots with your summery skirt.

Do you have a favourite pattern? What do you do to change it up?

Share this:

  • Click to email this to a friend (Opens in new window)
  • Click to share on Pinterest (Opens in new window)
  • Click to share on Facebook (Opens in new window)
  • Click to share on Twitter (Opens in new window)

Filed In: Blog, Tips and Techniques / Tagged: circle skirt, favourite pattern, tips

Winter Circle Skirt Tutorial

November 24, 2018 · 4 Comments

Winter Circle Skirt Tutorial

winter circle skirt tutorial

After successfully managing to lose some weight, I’ve ended up with a wardrobe full of clothes that don’t fit, and the perfect excuse to make some new clothes for myself!

Over the summer I made several new things, and by the end of August, I could manage a week of pretty vintage style dresses and skirts.

Unfortunately, the end of summer meant putting the pretty things away and going back into things that were decidedly baggy and, in some cases, actually falling off.

So I’m now in the process of making some winter outfits for myself. I now have a lovely blue dress with appliqued flowers on it, and a couple of weeks ago I made myself a winter circle skirt.

I love circle skirts and the last one I made was from a duvet cover! This one I’ve made from some lovely wool plaid as cotton duvet covers aren’t warm enough for winter!

Circle skirts are fab, and here’s why:

They’re easy to make. Although there is a zip which I know might give some of you the heebie jeebies, there is an easy way to put them in. If you’re still terrified, you could use a button or ties instead.

They are quick to make. Once you’ve made one or two, you’ll be able to knock one out in an evening easily. You could even make several at once as there’s nothing especially complicated about them and apart from the waistband, the bits are all the same.

Fitting is easy. As long as it fits around your middle and it’s the length you want, you don’t need to worry! And if it turns out to be too long or too short, that’s easy to fix. Either cut a bit off or add an extra bit of fabric, a frill or some broderie anglaise.

They look lovely on most people, regardless of body shape. There’s no gathering, so no extra bulk around areas you might not want to draw attention to.

They’re lovely and swirly to wear, and if you’re in a foofy kind of mood, you could wear a petticoat or add some circles of net underneath.

They’re the kind of thing that will work equally well whatever fabric you use. Personally I’d avoid stripes and big prints, but I can imagine them working if you match the patterns. I’ve made them in cotton prints, jersey, plain fabric, duvet covers, taffeta, chiffon, tulle and now wool plaid.

You can wear pretty much anything with them! A t shirt, cardigan, blouse, jumper, or a vest will all go.

So given that I love circle skirts and that I knew I could make one in the limited time I had, a winter circle skirt was an obvious choice!diy winter circle skirt tutorial

How to Make a Winter Circle Skirt

You Will Need:

Warm fabric for the skirt, like a wool blend. Depending on your measurements and on the width of the fabric, you might need a couple of metres, or it might be 3 or 4. So check your measurements first!

Fabric for the lining

A 20 cm zip

Bias binding

1. Take Your Measurements

First of all you’ll need to measure your waist and decide how long you want the skirt to be.

When measuring yourself, let the tape measure rest gently where the skirt will sit. Don’t be tempted to pull it too tight! We’d all like those numbers to be a bit smaller, but being able to breathe is more important!

Jot down your waist measurement, then add 10 cm for seam allowance and ease. If you are planning on cutting 2 half circles instead of 4 quarter circles, you’ll only need to add 6 cm.

When it comes to length, 62 cm is a good length for most people. A skirt of this length will come to just below your knee if you are of average height. If you are either very tall or very small, or if you want a skirt that is longer or shorter, you’ll need to measure yourself.

The easiest way to do this is to dangle the tape measure upside down. When the the end is where you’d want the hem to be, make a note of the number at your waist.

2. Working Out the Squares

You’re going to be cutting the skirt pieces out from squares, so the next job is to work out how big the squares need to be.

You already have some of the information because you’ll have worked out how long you want the skirt to be in the previous step. What you need to work out now is the distance from your waist to what will be the centre of the circle.

The easiest way to do this is to take your waist measurement plus the extra cm for seams and ease, and divide it by 3. Then divide the answer by 2.

Add this to your desired skirt length and this will tell you how big the square will need to be.

3. Cutting Out

The Skirt

Now you can cut the bits out! If you prefer, you can make a pattern piece which might make things a bit quicker if you decide to make another winter circle skirt. I don’t usually bother, partly because I know I’ll forget where I put it!

Cut 4 squares of fabric with each side being the same length as your desired skirt length plus waist divided by 3 divided by 2.

If you are fairly slim, you might be able to cut out half a circle by folding the fabric in half widthways.

The thing to remember is that for your winter circle skirt to hang properly, the grain needs to be running up and down the centre front and back.

Choose which corner will be the top of your skirt. Using pins and a tape measure, start at one side and mark off your desired skirt length plus waist divided by 3 divided by 2. Measure across the skirt to the other side, keeping one end of the tape measure at the top corner.

diy winter circle skirt tutorial

Go back to the top corner and one side, and this time mark off your waist measurement divided by 3 divided by 2.

Now cut out where you have pinned. You should have what looks like a quarter of a doughnut.

diy winter circle skirt tutorial

You’ll need 4 of these!

With cotton fabric, it’s possible to cut out all 4 quarter circles together, but if you’ve chosen something thicker for your winter circle skirt, it’s probably safer to cut them out 2 at a time.

The Lining

Cut the lining out in the same way. Just make your overall length 10 cm shorter.

diy winter circle skirt tutorial

Cutting Out the Waistband

Cut a piece of fabric the same length as your waist plus a bit extra, and 10 cm wide. You might have to cut 2 pieces and join them.

4. Sewing the Skirt Pieces

If you’ve ended up with 4 quarters, sew the front and back sections. If you cut 2 half circles, you can skip this step!

Take 2 of the quarters and pin them, right sides together, along one of the straight edges. These straight edges should have the grain running up and down.

Sew, then trim the seam. Press it open.

Repeat with the other 2 pieces.

5. Sewing the Side Seams

If you have some safety pins handy, you might like to use those instead of pins. This is a tip from Julie of Sum of Their Stories and it definitely beats jabbing yourself with a pin!

Pin one of the side seams near the waist. Put the skirt round you and pin the other side. You might need to adjust the pins a bit so that the seams on each side are the same.

On one side, mark where you have pinned with a pencil or tailors’ chalk, then unpin it. Take the skirt off and repin the side seams. Sew both seams. Trim and press the seams open.

6. Making the Lining

If your lining sections are in quarters, sew them together to get a front piece and a back piece.

Pin the front and back sections together, using the skirt as a guide for the side seams. Sew the seams, trim and press.

7. Installing the Zip

Sewing the zip to your winter circle skirt is much easier if you sew the lining to the skirt first!

Make sure that the side seams are matched up, then sew the lining to the skirt a cm (1/4 inch) or so from the waist. You can do this either by hand or on the sewing machine.

I decided to sew the zip on top of the lining because it’s easiest. If you’d like a neater finish, you could sandwich the zip between the lining and the skirt instead.

Using the zip as a guide, unpick some of the side seam of the lining.

Pin the lining to the skirt at the bottom of the bit you unpicked. Check that the unpicked bit of side seam of the lining is matched up with the side seam of the skirt.

Now pin the zip over the unpicked lining seam and the skirt seam. Tack the zip in place, checking that the teeth of the zip are over the seam.

Sew the zip. This is easiest with a zip foot, but you can still do this if you don’t have one.diy winter circle skirt tutorial

Now unpick the part of the skirt seam that’s covering the teeth of the zip.

diy winter circle skirt tutorial When sewing the zip, it’s easiest to start some way down from the zip pull. When you’ve unpicked the seam, move the zip pull down into the bit you’ve sewn already, then sew the top of the zip.

8. Making the Waistband

If you need to join the pieces of your waistband, do that now.

Fold the waistband in half lengthways and press. Your finger will probably do! If not then use the iron.

Open it out, then fold the long raw edges into the centre. Fold it in half lengthways again and press, with your finger or with the iron.

Unfold the waistband. Pin one of the long edges to the waist of the skirt on the wrong side. The waistband needs to be face down, so that once you have sewn it to the wrong side, you can fold it over the raw edges using the creases you pressed into the waistband earlier.diy winter circle skirt tutorial

Sew the waistband to the skirt, keeping close to the folded edge. Leave a couple of cm either side of the zip.

Now fold the waistband over to waist of the skirt. Tuck the raw edge of the waistband underneath so that all the messy bits are enclosed.

Topstitch around the waistband.
diy winter circle skirt tutorial

When you get to the zip, tuck the ends in and sew.

diy winter circle skirt tutorial

9. Finish the Hems

The easiest way to finish the hem on your winter circle skirt is with bias binding.

As it’s going to take quite a lot, it’s best to leave it on the roll. Starting somewhere inconspicuous (A side seam is a good place), pin one end of the bias binding to the skirt on the right side, so that the right sides are together.

Sew the bias binding to the skirt, keeping close to the folded edge.

When you get back to where you started, overlap the ends of the bias binding by a cm or two and sew over them.

Fold the bias binding over so that it’s all on the underneath of the skirt. Press it, then sew the bias binding to the wrong side of the skirt, keeping close to the other folded edge.

Finish the hem on the lining in the same way.

Trim away any stray threads, run the iron over it and your winter circle skirt is ready to wear!

diy winter circle skirt tutorial

diy winter circle skirt tutorial

Share this:

  • Click to email this to a friend (Opens in new window)
  • Click to share on Pinterest (Opens in new window)
  • Click to share on Facebook (Opens in new window)
  • Click to share on Twitter (Opens in new window)

Filed In: Blog, Sewing Projects / Tagged: beginner, circle skirt, easy, how to, sewing clothes without a pattern

How To Sew a Half Circle Skirt Without a Pattern

October 18, 2016 · 3 Comments

How To Sew a Half Circle Skirt Without a Pattern

I love circle skirts.

They are very easy and quick to make and you don’t need a pattern. They suit pretty much every body shape and they are lovely and swirly to wear.

The only downside is that you need a lot of fabric.

While having a rummage for something the other week, I found a couple of metres of cotton jersey that I’d bought for something and never used.

2 metres is not enough to make a circle skirt for somebody of my dimensions, but it’s plenty for making a half circle skirt!

So that is what I did :).

Being made from jersey, it didn’t need a zip. There was less of it to cut out and less of it to sew, so it was quicker to make.

I used stretch bias binding to finish the hem (affiliate link).

Bias binding is my favourite way to finish the hem of a circle or a half circle skirt as they can be fiddly to hem normally. I opted for a contrast colour instead of aiming for the same colour and it not being quite the same. It’s actually the pinkness at the bottom of the skirt that is my favourite thing about it!how to sew a half circle skirt without a pattern tutorial

How to Make a Half Circle Skirt

You Will Need

2 metres of jersey fabric, 3 metres of stretch bias binding, usual sewing supplies, but check your measurements first!

Calculating Your Measurements

This involves doing some maths but please don’t panic if maths is not your thing! It’s not difficult maths.

Decide how long you want the skirt to be. 60 cm is a good length for most people.

Measure around your waist and add 4 cm. This is to allow for a 1 cm seam.

Take that number and divide by 3.14, or pi. There’ll be a pi button on your calculator, and probably a calculator on your phone if you don’t have one. Or you could just divide by 3.14.

Add the answer to the length of the skirt. This is the size of square you will need.

So my waist measurement plus 4 extra cm was 97 cm. Divided by pi, this was roughly 31 cm. I added 31 cm to 60 cm, giving me 91 cm.

So I needed to cut 2 squares of fabric 91 cm x 91 cm.

That’s the hardest part, the rest is easy!

Cutting Out

1. Take your 2 squares of fabric and lay them out wrong sides together. If you are using a directional print, make sure that both squares are the same way up.

2. Remember the number you ended up with after you divided your waist measurement? Take that number and measure down from the top of the squares by that amount. Pin, then using a tape measure, measure all the way round the top quarter. Mark with pins.how to sew a half circle skirt without a pattern tutorialMy advice is always to iron your fabric first. As you can see, I need to take my own advice!

3. Now take that number added to the skirt length and measure down from the top corner. Mark at the side with a pin, then measure all the way across the bottom of the corner circle.how to sew a half circle skirt without a pattern tutorial

4. Cut where you have pinned. You should end up with 2 pieces that look like a quarter of a doughnut.

5. From the fabric that is left, cut a strip of fabric 10 cm wide and as long as your waist measurement plus the extra cm. It might be necessary to cut 2 strips. You’ll need the waistband to stretch, so check that the grain is running up and down the waistband, not side to side.

Sewing Up

1. Take your 2 quarter circles and, with the right sides together, pin the side seams. Try it on to check that it fits. Adjust the pins if necessary.how to sew a half circle skirt without a pattern tutorial

2. Sew up the side seams.

3. Take the waistband strips and pin them together. Check them against the skirt to ensure that the seams will match, then sew the waistband pieces together.how to sew a half circle skirt without a pattern tutorial

4. With the waistband wrong side up, pin it to the wrong side of the skirt. Start by matching the side seams. Sew the waistband to the wrong side of the skirt.how to sew a half circle skirt without a pattern tutorial

5. Fold the waistband over the top of the skirt. Tuck the raw edge of the waistband underneath and pin it to the top of the skirt.

6. Top stitch around the waistband, keeping close to the bottom edge.how to sew a half circle skirt without a pattern tutorialhow to sew a half circle skirt without a pattern tutorial

7. Starting at one of the side seams, fold one end of the bias binding over and pin it to the bottom of the skirt on the wrong side. Sew the bias binding all around the bottom of the skirt.how to sew a half circle skirt without a pattern tutorial

When you get back to where you started, overlap the bias binding by a cm or 2. Sew it in place and cut off the rest.how to sew a half circle skirt without a pattern tutorial

8. Fold the bias binding over bottom edge of the skirt, tucking the raw edge of the bias binding inwards. Top stitch all the way round.how to sew a half circle skirt without a pattern tutorial

When you get back to the start, carefully fold the ends of the bias binding over and sew in place.

9. Put on you half circle skirt and wait for the compliments!how to sew a half circle skirt tutorialhow to sew a half circle skirt tutorialIf you liked this tutorial, you might also like these:

Cherry Blossom Dress Without a Patterncollage cherry blossom dress

Circle Skirt Without a Patterncollage circle skirt

Skirt With Godets Tutorialcollage godet skirt

Foofy Skirt Tutorial (this has a link to a tutorial I wrote for the Minerva Crafts Bloggers’ Network)foofy skirt square

Tips For Making Clothes Without a Patternclothes without a pattern square

You might also like to take a look at my ebook Making Clothes Without a Pattern: 6 Easy Projects to Kickstart Your Handmade Wardrobe.

You can also sign up to receive updates and free stuff and you’ll be sent a printable copy of the circle skirt tutorial, complete with a page to record your measurements! There’s a form below.

Linking up here.

how to sew a half circle skirt tutorial

Share this:

  • Click to email this to a friend (Opens in new window)
  • Click to share on Pinterest (Opens in new window)
  • Click to share on Facebook (Opens in new window)
  • Click to share on Twitter (Opens in new window)

Filed In: Blog, Sewing Projects / Tagged: bias binding, circle skirt, clothes without a pattern, handmade wardrobe, how to

Foofy Skirt Tutorial

June 17, 2016 · 4 Comments

A Foofy Skirt Tutorial

Who doesn’t love a foofy skirt?

If you have spent any time at all on my blog, it will come as no surprise that love circle skirts! They are lovely and swirly to wear and, unlike something with gathers or elastic, they add no bulk to areas severely affected by excessive babies or cake.

I love them so much that last year I designed a project for a dress, made by adding 2 bodice pieces to a circle skirt. This was my Cherry Blossom dress and I love it so much I wear it all the time. I even made a second one in different fabric!

So to do something else a little bit different with a circle skirt, I wanted to make a foofy version using chiffon and layers of net.

I found a lot of tutorials showing how to make a net petticoat, but they all involved at least 9m of net and lots of gathering. Because net naturally sticks out anyway, I wanted to see whether the same effect could be achieved simply by adding several layers of net circle skirt underneath.

I am pleased to tell you that it did work!foofy skirt tutorial

The full tutorial for the foofy skirt can be found on the Minerva Crafts Bloggers Network.

These are affiliate links for the stuff I used.
[1_third]


3m lining fabric  [/1_third]
[1_third] 3m lavender net
Concealed zip[/1_third]
[1_third_last] 3m mint net


10 m lilac bias binding

[/1_third_last]

The skirt has 6 layers. Each one is a circle skirt. The top layer is chiffon on the top. Then underneath there are 4 layers of net, alternating purple and green. Then there is a final layer of lining fabric (net can be itchy!).

The hems of the chiffon and the lining are finished with bias binding. The net did not need to be hemmed, yay!

The only tricky spot was the zip. Even using the method I usually do, it was difficult because there were so many layers.foofy skirt 2

Tips

As chiffon is unstable, use plenty of pins.
It frays quite badly, and as it is a delicate fabric, French seams are probably the way to go. You can find a tutorial for doing French seams here.
When sewing the net, use a wide zigzag.
Measure the side seams of the first layer that you complete, then use this when sewing the side seams on the other layers. This saves having to re-measure every time.

If you like circle skirts and you’d like some ideas of other things you can make using a circle skirt as a starting point, you might like to have a look at my new ebook.making clothes without a pattern

Linking up here.

Share this:

  • Click to email this to a friend (Opens in new window)
  • Click to share on Pinterest (Opens in new window)
  • Click to share on Facebook (Opens in new window)
  • Click to share on Twitter (Opens in new window)

Filed In: Blog, Sewing Projects / Tagged: circle skirt, foofy skirt, how to

I'm Anna and I live in rural Norfolk in the UK. My mum taught me how to use a sewing machine when I was 10 and I haven't looked back! I love making all sorts of things and I hope you find inspiration here.

Join the list

Join the mailing list to receive updates, useful and interesting links and free pages from the Sewing Journal.

My New Ebook

things to male and do in the autumn

Bunting Makes Everything Better Tote Bag

Featured Kit

The Sewing Journal

My Kits and Patterns on Etsy

Shop the Christmas Shop at Sew and So


Join the List

Join the mailing list to receive updates, useful and interesting links and free pages from the Sewing Journal.

Privacy Policy

For information about cookies and Tea and a Sewing Machine's privacy policy, please click here.

Instagram

Instagram Widget by SnapWidget


UK Sewing Blogs

Theme by 17th Avenue · Powered by WordPress & Genesis

loading Cancel
Post was not sent - check your email addresses!
Email check failed, please try again
Sorry, your blog cannot share posts by email.