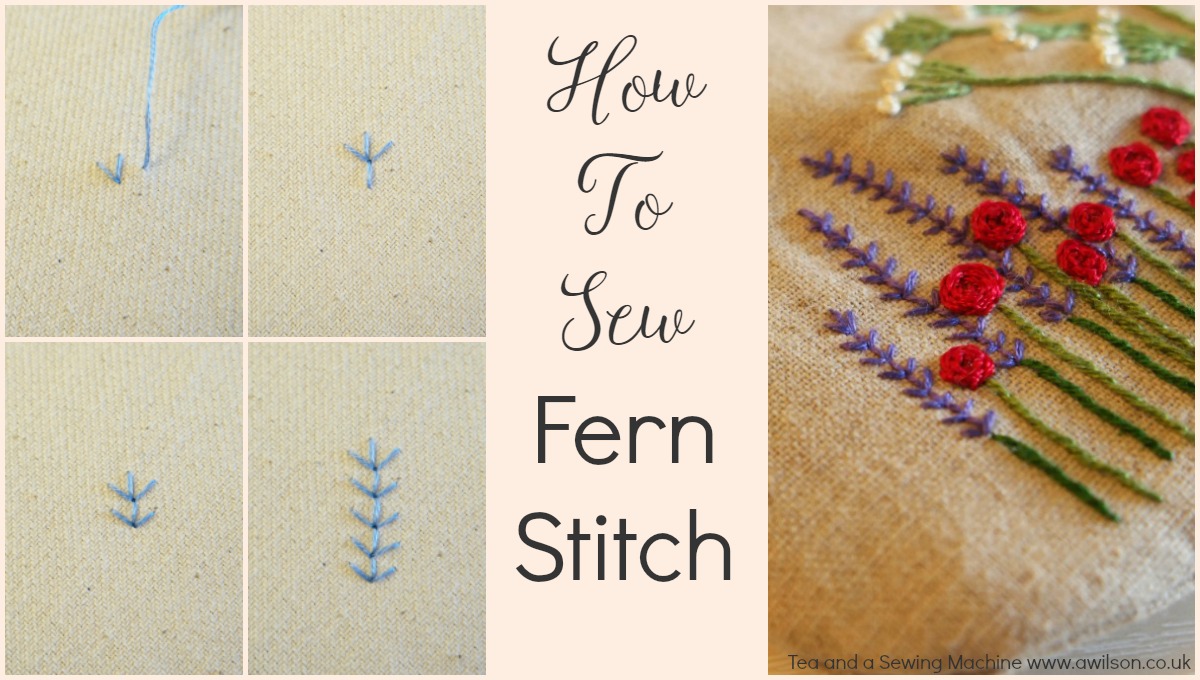
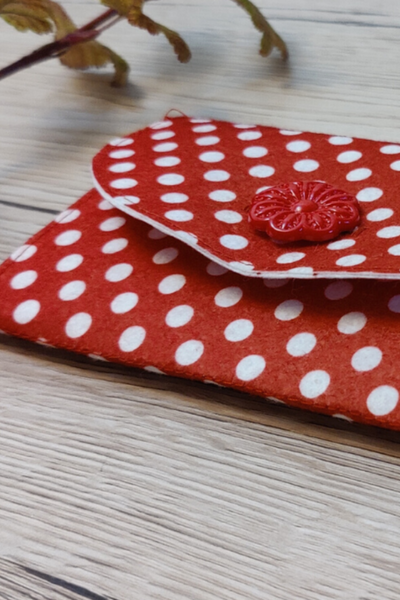
• Home
  • About
  • Blog
  • Ebooks and Printables
  • Etsy
  • Sewing Journal

Make it Yourself. Yes You Can!

  • Sewing Projects
  • Tips and Techniques
  • Embroidery
  • Other Crafts
    • Crochet
    • Felting
    • Jewellery
    • Wreaths
  • Christmas

Easy Scrappy Pincushions

March 1, 2018 · 3 Comments

Easy Scrappy Pincushions

Although I’ve got better over the last few years, I still have a tendency to start things but not finish them, which is why lots of the projects on Tea and a Sewing Machine are usually fairly quick things! That way I stand more chance of getting them finished, although I do have an impressive pile of unfinished projects as well!

At the moment my concentration is so bad I’m even wondering whether I might have a grown up version of ADD!

Sometimes we want to make stuff even if we can’t concentrate, and doing something creative is believed to help with all kinds of issues relating to mental health. The answer isn’t to give up completely, but to accept that something complicated that’s going to take a while probably isn’t a great idea, while making something quick and easy is.

So earlier in the week I decided to make some scrappy pincushions. With things as they are at the moment, even finishing these was a challenge. The fact that I started 7 and only finished 3 probably says it all!

Scrappy pincushions are good for lots of reasons. You can make them in all different kind of ways (just look on Pinterest!), it’s handy to have a few, you probably have stuff to hand to make them already, you can use up bits and pieces left over from other projects and they make nice presents for friends and family who like to sew.

These scrappy pincushions measure about 10 cm square, and have a piece of plain fabric, a print, a scrap of ribbon and a button.

The three I actually finished are all made in the same way. I used linen for the plain fabric, but anyything plain would work.

If you don’t have any suitable buttons, you could see if you have any on old clothes that you don’t wear anymore, or you could try junk shops or ebay (affiliate link).easy scrappy pincushions

How to Make Scrappy Pincushions

You Will Need

Scraps of plain fabric, scraps of patterned fabric, ribbon or lace, buttons, polyester filling.

Instructions

1. From the plain fabric, cut a piece 7 cm x 11 cm and a square 11 cm x 11 cm, and from the patterned fabric a piece 6 cm x 11 cm.easy scrappy pincushions

2. Sew the plain piece of fabric to the patterned piece. Trim the seam and press it open. You should end up with something that is vaguely square. If not, don’t worry, you can sort it out later.easy scrappy pincushions

3. Sew a piece of ribbon or lace over the seam between the plain fabric and the patterned fabric.easy scrappy pincushions

4. Pin the section you’ve just completed to the plain square piece you cut out earlier, with the right sides together. This will be the bottom of the pin cushion. Sew around the edge, leaving a gap in one side.easy scrappy pincushions easy scrappy pincushions

5. Turn it out and fill with polyester stuffing. Remember to fill it so that it is firm; you don’t want it to yield too much when you stick pins into it. Slip stitch the opening.easy scrappy pincushions

6. Sew a button in the centre. I sewed from the back of the pincushion through to the front, into the button, through the front and out through the back again. Then I tied the ends together. This works better than tying a knot because I found that pulling the thread tight just pulled the knot through! An alternative is to tie the end to a smaller button, then sew through the pincushion to attach the button on the top.easy scrappy pincushions easy scrappy pincushions easy scrappy pincushions easy scrappy pincushions

If you like this tutorial, you might also like this one for a wrist pincushion.

how to make a wrist pincushion tutorial

Share this:

  • Click to email this to a friend (Opens in new window)
  • Click to share on Pinterest (Opens in new window)
  • Click to share on Facebook (Opens in new window)
  • Click to share on Twitter (Opens in new window)

Filed In: Blog, New to Sewing? Start Here!, Sewing Projects / Tagged: beginner, craft fair, easy, gifts, how to, scrap projects

Sewing a Backpack

May 26, 2017 · 6 Comments

Sewing a Backpack

One of the things I have discovered about being a parent is the sheer amount of stuff you end up carrying about.

When my boys were babies, it was little cups, bibs, nappies, wipes and spare clothes. Now they’re older, there’s not much less stuff, it’s just different stuff! No cups now, but bottles of water, macs, jumpers, post its and pencils (a great distraction if the smaller ones are getting restless!), cameras and assorted rocks, twigs and bus timetables they pick up while we are out.

Last summer, while we were in Germany, my husband was carrying all this stuff about, and it occurred to me that my no longer babies were perfectly capable of carrying this stuff for themselves!

So I came up with a design for an easy backpack.sewing a backpack

As I was going to need to make 4, I needed them to be easy and quick to make. I also needed them to be big enough and strong enough to hold their clobber, without being too big.

The bag part is very simple. It’s 2 rectangles sewn together with boxed corners. The lining is made in the same way, then they are sewn together at the top.easy backpack tutorial sewing a backpack

When sewing a backpack, if you use plain fabric or a non directional print. Then you wouldn’t even need to cut the rectangles. You could just fold the fabric in half instead.

Once the bag part is made, the casing is sewn to the outside. I used bias binding in the same colour as the lining.how to sew a backpack sewing a backpack  Each bag has a different lining so that the boys know which bag is theirs.

The straps have some wadding in them to make them comfortable to carry. I don’t want to end up carrying 4 little back packs! I sewed webbing to the ends of the straps and 2 more pieces of webbing are sewn to the bottom corners. easy backpack tutorial sewing a backpackA plastic buckle makes the straps adjustable, so I could make them all the same and then adjust them according to the size of the boy.

To finish them off, I threaded the casing with coloured elastic and added a toggle.easy backpack tutorial sewing a backpack

Sewing a backpack is simple and fairly quick to do. However I am ashamed to admit that I although I finished one, the others ended up in the unfinished projects pile. I took my own advice to start with and batched them, but I wanted to get one finished so that I could post the tutorial. So one got finished and the others didn’t.

We have had some trips away since, but they were to cold places and at cold times of the year so people were going to be wearing waterproof coats and were unlikely to need bottles of water, so the backpacks stayed unfinished.

Now the warm weather has come back round again and we’ve got a trip planned to the Peak District. The boys are going to need their macs and things, so I got them out again and I’ve actually finished them!

When I retrieved them I found that I’d done more on them that I had thought! All I needed to do was sew on the straps and the webbing and thread the elastic through the casing.sewing a backpack

Each boy will have his own bag with his water, camera, mac and micro fleece. They can also carry their own rocks and bus timetables.sewing a backpacksewing a backpack

If you want to read the full tutorial for sewing a backpack, you can find it here.

The fabric is fun isn’t it?

It came from Minerva Crafts, along with the webbing. These are affiliate links.

Superhero fabric

Webbing

Linking up here.


Share this:

  • Click to email this to a friend (Opens in new window)
  • Click to share on Pinterest (Opens in new window)
  • Click to share on Facebook (Opens in new window)
  • Click to share on Twitter (Opens in new window)

Filed In: Blog, Sewing Projects / Tagged: children, gifts, how to

Cross Body Bag Tutorial

March 18, 2017 · 21 Comments

Cross Body Bag Tutorial

One of the things I find about being a parent is that I don’t really take less stuff out with us now that my boys aren’t babies any more. It’s just different stuff.

I no longer need nappies and spare clothes (although wipes are still useful). Now it’s hats and gloves, snacks and knitting or crochet so that I have something to do while they’re occupied.

I also need space for books that they no longer feel like holding, and space for rocks, sticks and feathers that they pick up while we’re out.

I have some pretty huge bags!

This time I wanted to make something smaller, in a different kind of shape.

The bag is big enough for my purse and my phone (I can put that in the pocket!), my knitting and my diary. There’s space for some of the boys’ stuff too.

It has a zip closure and a pocket on the inside and on the outside.

The tutorial shows how to make the pattern yourself, but if you prefer, I have the pattern for sale here.how to make a cross body bag tutorial

Here’s my cross body bag tutorial.

A 1 cm seam allowance is included.

How to Make a Cross Body Bag

You Will Need

Half a metre of fabric for the outer, half a metre for the lining, half a metre of sew in interfacing, 1 15 cm dress zip, 2 chunky zips, a 25 cm one and a 20 cm one (I could only find 25 cm chunky zips so I just cut a bit off the end of the pocket one), 1 metre of bias binding, 2 metres of webbing, 2 D rings, 1 buckle with 3 bars.

Making the Pattern

I have the pattern for sale if you don’t want to do this!

For the main part of the bag, draw a rectangle 27 cm x 37 cm. Extend the bottom line by 5 cm on each side. Join the ends of the bottom line to the ends of a top line so that you have a 4 sided shape that’s wider at the bottom.

For the outer pocket, draw a rectangle 24 cm x 17 cm.

For the inside pocket, draw a rectangle 15 cm x 12 cm.

For the zip pieces, draw a rectangle 27 cm x 5 cm.

Cutting Out

Using the main bag piece, cut 2 from outer fabric, 2 from the lining and 2 from interfacing.

Cut 1 outer pocket on the fold, from the lining.

Cut 1 inside pocket on the fold, from the lining.

Cut 2 zip pieces from the outer and 2 from lining.

Sewing Up

Making the Pockets

1. Take one of the bag outer pieces and one of the pocket pieces. If the fabric you are using for the pockets is quite light, you might want to use some fusible interfacing to give it a bit more weight.

Lay the pocket piece onto the outer with the right sides together. The top of the pocket will need to be 7 cm down from the top of the bag.

2. On the pocket piece, measure 3 cm down from the top of the pocket. Draw a horizontal line there 20 cm long. Draw a rectangle around the line so that the rectangle is about a cm wide. Draw a triangle at each end. Sew around the rectangle.how to make a cross body bag tutorial

3. Cut along the line and the triangles, leaving the bottom of the triangles attached.how to make a cross body bag tutorial

4. Push the pocket piece through. If it puckers, check that you have cut the corners of the triangles as close to the stitches as you can (without cutting the stitches!).how to make a cross body bag tutorial

5. Pop the zip over the opening, on the wrong side. Sew the zip to the pocket piece and the folded part of the outer. Basically what you are doing is sewing the sides of the zip to sides of the rectangle that you cut in step 3. how to make a cross body bag tutorial how to make a cross body bag tutorial

6. Take a 2nd pocket piece and lay it on top with the right sides together. Sew around the outside of the pocket.how to make a cross body bag tutorial

The pocket in the lining is made in the same way, except that the top of the pocket needs to be 10 cm down from the top of the bag. The line needs to be 2.5 cm down from the top of the pocket and 12 cm long.

Making the Outer

1. Take the 2 bag outer pieces. With the right sides together, pin, then sew, the sides and the bottom.

2. Take one of the corners and squish it flat so that the seams are together. Measure 4 cm up from the corner and pin. Sew where you have pinned at right angles to the seam. how to make a cross body bag tutorial Repeat for the other corner, then cut the corners off. how to make a cross body bag tutorial There’s a detailed tutorial showing how to sew boxed corners here if you need it.

Making the Lining

Make the lining in the same way as you did the outer, and a 3rd section in the same way from interfacing.

When you have made the outer, lining and interfacing sections, turn the outer the right way out.

Slip the interfacing, then the lining inside the outer. Check that the pockets are on opposite sides.

The Zip

1. Take one of the lining zip pieces and lay the zip on top of it. The lining and the zip both need to be right side up.

2. Lay the outer piece on the top, right side down. Pin together (remember to pin within the seam allowance if you’re using oilcloth), then sew. Sewing a zip is much easier with a zip foot!how to make a cross body bag tutorial

3. Pull the lining and the outer away from the zip so that the wrong sides are together. Top stitch in line with the zip.how to make a cross body bag tutorial

4. Repeat for the other zip pieces.how to make a cross body bag tutorial

Tip The zip pull can get in the way a bit, so sew half way along, then lift the presser foot and pull the zip pull down past the foot to where you have already sewn.

Attaching the D Rings

1. Cut 2 pieces of webbing about 8 cm long. If it’s the nylon kind, you might like to melt the ends to prevent fraying. The way to do this is to gently pass it over a candle flame, a cm or 2 away from the flame.how to sew a satchel tutorial messenger bag changing bag bag for college school

2. Slip a D ring onto one of the pieces of webbing. Fold the webbing over.

3. Pin the webbing with the D ring to the side of the bag, over the seam. Sew it in place.how to make a cross body bag tutorial

Making the Strap

1. Cut another piece of webbing 175 cm long. This was the right size for me. It might be an idea to check the length on yourself before cutting. Remember that if you’re going to use your bag in the winter, you might also be wearing a thick coat, so make sure you have allowed enough for that too.

2. Melt the ends with a candle as described above.

3. Take your buckle and sew one end of the webbing to the middle bar.

4. Take the other end and loop it through one of the D rings on your bag. Thread it through the buckle, then through the other D ring.how to sew a satchel tutorial messenger bag changing bag bag for college school Fold the end over the D ring and sew.

Finishing Off

Attaching the zip to the top of the bag is a bit tricky. Don’t worry too much though, because any slightly messy bits will be hidden by the bias binding.

1. Pin the edges of the zip pieces to the top of the bag so that the lining sections are together.

2. Sew the zip pieces to the top of the bag.You could use the sewing machine for this, or you might prefer to sew it by hand.how to make a cross body bag tutorial how to make a cross body bag tutorial

3. Starting on the inside, ie the bit with the zip, sew the bias binding to the top of the bag.how to make a cross body bag tutorial

4. Fold the bias binding over and top stitch all the way round.how to make a cross body bag tutorial

Tip My sewing machine objected to sewing over the zip and I found it hard to get it neat. So what you could try instead is to leave the ends with the zip and hand sew the bias binding to those little bits.

You could also hand sew the bias binding to the top of the bag. If you’re using oil cloth, this can be difficult as it’s quite thick. However you will have holes in it already from sewing the bias binding to the inside of the top, so you could use those holes.

Trim away any loose threads and your cross body bag is finished!how to make a cross body bag tutorial how to make a cross body bag tutorial how to make a cross body bag tutorial how to make a cross body bag tutorial

If you liked this cross body bag tutorial, you might also like these:

Easy Messenger Bag

Oil Cloth Satchel Tutorial

Easy Backpack Tutorial

Linking up here.how to make a cross body bag tutorial


Share this:

  • Click to email this to a friend (Opens in new window)
  • Click to share on Pinterest (Opens in new window)
  • Click to share on Facebook (Opens in new window)
  • Click to share on Twitter (Opens in new window)

Filed In: Blog, Sewing Projects / Tagged: bag, craft fair, gifts, how to

A Satchel Tutorial: How to Make an Oilcloth Satchel

March 12, 2017 · 8 Comments

Satchel Tutorial

This satchel tutorial has been on my to do list for a long time!

I wanted to make a bag that was big enough without being huge, with pockets but not too many and in a fabric that I loved.

Designing the bag was no problem. The problem was finding the perfect fabric! I wanted it to be oilcloth because I needed it to be waterproof, but after hours of searching the internet I still hadn’t found what I wanted.

Then I discovered that I could have my own design printed onto oilcloth. Problem solved! One site that offers printing onto a variety of fabrics is Contrado.

I love Scandinavian retro prints at the moment, so I designed something along those lines. I used Canva and Picmonkey, then uploaded it onto the Contrado site. They printed it and sent it to me and I had it within a week!how to sew a satchel tutorial messenger bag changing bag bag for college school

I love it! I was able to get the flowers the correct size so that I could have 4 on the main sections of the bag, and pattern match the pocket on the front.how to sew a satchel tutorial messenger bag changing bag bag for college school

The bag has an internal divide and 2 pockets on the front. I made the strap out of webbing for convenience, but if you want something thicker and wider, you could sew a strap instead.how to sew a satchel tutorial messenger bag changing bag bag for college school

I also used Annie’s Soft and Stable instead of normal interfacing. It was the first time I’ve used it, on the recommendation of Vicky of Vicky Myers Creations. I don’t think I’ll be going back to the regular stuff, for bags at least!

Here’s the satchel tutorial (and I have the pattern for sale on Etsy here).

(The satchel tutorial is quite long, so if you’re a skimmer, here’s an overview:
Make the pocket for the front and sew it onto the front
Make the outer
Make the lining with the divide
Make the flap
Sew the lining to the outer at the front and the sides
Attach the flap in between the lining and the outer and sew (2 step process if you’re using Annie’s Soft and Stable)
Sew on the D rings
Make the strap)how to sew a satchel tutorial messenger bag changing bag bag for college school

How to Sew a Satchel

You Will Need

Fabric for the outer (oilcloth or some other heavy weight fabric is best. Anything lighter will need interfacing to give it some weight), fabric for the lining, interfacing (I used Annie’s Soft and Stable.), 2 tuck locks, bias binding, webbing, buckle slider, D rings, usual sewing supplies.

Cutting Out

For the pocket, cut 1 rectangle 27 cm x 17 cm from outer, lining and interfacing.
For the front and back pieces, cut 2 rectangles 39 cm x 24 cm from outer, lining and interfacing.
For the gusset outer, cut 1 piece 10 cm x  92cm. You could either cut this as 1 piece on folded fabric, or as 2 pieces 10 cm x 46 cm. You’ll need to do the 2nd option if you’re using fabric with a directional print.
For the gusset lining, cut 2 pieces 6 cm x 92 cm. As with outer, you could cut this as 2 pieces 6 cm x 46 cm, cut on the fold, or as 4 pieces 10 cm x 46 cm.
For the flap, cut 1 rectangle 37 cm x 24 cm from outer, lining and interfacing.
For the internal divide, cut a piece of lining fabric and a piece of interfacing 46 cm x 41 cm. If you’re using foam or Annie’s Soft and Stable for the divide, cut it 46 cm x 20 cm.

For the front and back, flap lining and pocket, you might like to round the corners.

Sewing Up

Pocket

1. Take the pocket lining and place it face down. Put the interfacing piece on top of it, then the outer piece face up. Sew down the centre.how to sew a satchel tutorial messenger bag changing bag bag for college school

2. To attach the bottom part of the clasp lock, check that the feet are unfolded and straight, then press down onto the fabric. The feet will leave a mark. This is where you’ll need to cut 2 little slits to push the feet through. how to sew a satchel tutorial messenger bag changing bag bag for college school The locks need to go in the corner of each pocket. You’ll be sewing bias binding around the edge in a minute, so just make sure there’s enough space for that too.

3. Push the feet through the slits that you made in the previous step. You might want to push them through the interfacing too. I found that the Annie’s Soft and Stable was a bit thick and caused puckering, but as the oilcloth is fairly thick anyway, it was fine. If you are using a lighter fabric, either push them through the interfacing or fuse some extra to the wrong side of the outer.how to sew a satchel tutorial messenger bag changing bag bag for college school

4. Slip the metal back piece over the feet and fold the feet over. If you find it puckering, adjust the slits (they’ll be hidden by the buckle) and try to bend them over less tightly.how to sew a satchel tutorial messenger bag changing bag bag for college school

5. Starting with the wrong side, sew the bias binding around the outside edge of the pocket. Remember to turn the end over before you start.how to sew a satchel tutorial messenger bag changing bag bag for college school

6. Fold the bias binding over to the right side and top stitch all the way round.how to sew a satchel tutorial messenger bag changing bag bag for college school

Outer

The outer pieces are all sewn with the interfacing.

1. Position the pocket on the front piece of the bag outer. Sew the sides and the bottom of the pocket to the front outer piece, over the top stitching on the bias binding.how to sew a satchel tutorial messenger bag changing bag bag for college school

2. If the gusset is in 2 pieces join them at the short ends to make a longer piece. If you are using a directional print, join them at the bottom.

3. Starting at the centre of the gusset and the centre of the bottom of the bag, pin the gusset (don’t forget the interfacing) to the bag front. Sew.how to sew a satchel tutorial messenger bag changing bag bag for college school

4. Pin the gusset to the back piece, with the interfacing, in the same way. Sew the gusset to the bag back.how to sew a satchel tutorial messenger bag changing bag bag for college school

Lining and Divide

1. If you’re using Soft and Stable, fold the piece of fabric for the divide over the interfacing. If you are using an interfacing that is not very thick, fold it over with the fabric.

2. If you need to join the gusset sections, do that now.

3. Pin both halves of the gusset to the divide, with one on each side. Sew. If you find this too fiddly, you could sew the gusset pieces to the divide one at a time.how to sew a satchel tutorial messenger bag changing bag bag for college school

4. Pin, then sew the lining front to the gusset, as you did for the outer.

5. Attach lining back to the gusset in the same way.how to sew a satchel tutorial messenger bag changing bag bag for college school

Flap

1. Place the lining and the outer flap pieces with the wrong sides together and the interfacing in the middle.

2. Starting on the wrong side of the flap, sew the bias binding to the sides and the bottom.

3. Fold the bias binding over the raw edges. Top stitch it to the front of the flap.how to sew a satchel tutorial messenger bag changing bag bag for college school

Sewing Together the Lining, Outer and Flap

1. Pop the lining inside the bag so that the right sides are together. Pin the lining to the outer at the sides and the front (if you’re using oilcloth, remember to pin inside the seam allowance).

2. Sew the lining and outer sides and the front together. how to sew a satchel tutorial messenger bag changing bag bag for college school Turn it the right way out.

3. To attach the flap, it depends on what interfacing you are using. If you are using the regular stuff that’s not too thick, slip the flap in between the outer and the lining. Fold the raw edges of the outer and the lining inwards. Sew the flap in place.

OR

If you’re using Soft and Stable, you might find this way a bit tricky as it’s so thick, so here’s a second way.

With the outer sections together, pin the flap to the bag outer keeping clear of the lining. Sew. how to sew a satchel tutorial messenger bag changing bag bag for college school Bring the flap up so that the seam is pointing downwards, between the outer and the lining. Fold the raw edge of the lining over and pin to the flap. how to sew a satchel tutorial messenger bag changing bag bag for college school Sew the lining in place. You could either use the machine or you could sew it by hand. By hand will be neater :).

4. Top stitch round the sides and front of the bag.

Attaching the Other Halves of the Tuck Locks

1. Slip 1 of the remaining sections of the tuck locks onto the bottom of the flap. It is possible to open the tuck lock out slightly if you need to.how to sew a satchel tutorial messenger bag changing bag bag for college school

2. Line it up with the section of the lock attached to the pocket. Mark where the holes are with a pen.

3. Remove the tuck lock and make the holes. Officially you should probably use an awl. I don’t have an awl so I used to pointy bit of the unpicker to make the hole, then enlarged it with a knitting needle.how to sew a satchel tutorial messenger bag changing bag bag for college school

4. Slip the tuck lock back on. Push one of the little pins through the holes in the tuck lock and the hole you made in the fabric. If the hole isn’t quite big enough, stick your knitting needle/ awl through the hole again, no need to remove the lock. Do the same with the other pin.how to sew a satchel tutorial messenger bag changing bag bag for college school

5. Pop the back onto the end of the pin. Repeat with the other lock.how to sew a satchel tutorial messenger bag changing bag bag for college school

This part is fiddly, so it might take a few attempts.how to sew a satchel tutorial messenger bag changing bag bag for college school

Attaching the D Rings

1. Cut 2 pieces of webbing about 8 cm long. If it’s the nylon kind, you might like to melt the ends to prevent fraying. The way to do this is to gently pass it over a candle flame, a cm or 2 away from the flame.how to sew a satchel tutorial messenger bag changing bag bag for college school

2. Slip a D ring onto one of the pieces of webbing. Fold the webbing over.

3. Unpick the stitches on one side, at the centre of the gusset. Pop one of the folded webbing pieces in between the lining and the outer. Sew the webbing in place, over where you unpicked the stitches.how to sew a satchel tutorial messenger bag changing bag bag for college school

Making the Strap

1. Cut another piece of webbing 175 cm long. This was the right size for me. It might be an idea to check the length on yourself before cutting. Remember that if you’re going to use your bag in the winter, you might also be wearing a thick coat, so make sure you have allowed enough for that too.

2. Melt the ends with a candle as described above.

3. Take your buckle and sew one end of the webbing to the middle bar.

4. Take the other end and loop it through one of the D rings on your bag. how to sew a satchel tutorial messenger bag changing bag bag for college school Thread it through the buckle, then through the other D ring. how to sew a satchel tutorial messenger bag changing bag bag for college school Fold the end over the D ring and sew.how to sew a satchel tutorial messenger bag changing bag bag for college school

Trim away any stray threads and your bag is ready!how to sew a satchel tutorial messenger bag changing bag bag for college schoolhow to sew a satchel tutorial messenger bag changing bag bag for college school

Tips

If you’re sewing with oilcloth or laminated cotton, remember to pin in the seam allowance.

If you need your bag to be a certain size, just change the size of the pieces accordingly.

Attaching a tuck lock can be fiddly, but don’t give up! It took me several attempts and it was worth it!

Leaving the divide out will make it easier and quicker. You could add an internal pocket instead if you wanted to.

Without a divide, you could sew the webbing tabs for the D rings to the outside of the bag.

If you liked this satchel tutorial, you might also like these posts.

Messenger Bag Tutorial

Easy Backpack Tutorial

Linking up here.

how to sew a satchel tutorial messenger bag changing bag bag for college school

Share this:

  • Click to email this to a friend (Opens in new window)
  • Click to share on Pinterest (Opens in new window)
  • Click to share on Facebook (Opens in new window)
  • Click to share on Twitter (Opens in new window)

Filed In: Blog, Sewing Projects / Tagged: bag, craft fair, gifts, how to, oil cloth

Fern Stitch: Hand Embroidery

February 28, 2017 · 6 Comments

Fern Stitch: Hand Embroidery

Fern stitch is a useful stitch to know, especially if you’re sewing plants and flowers. Obviously you can use it to sew ferns and other plants, but it can be used in other ways as well! On the little purse I’ve been making, I’ve used fern stitch for the lavender.how to sew fern stitch hand embroidery

Fern stitch is made up of three little stitches, sewn in the same way and repeated along a line. It is worked from top to bottom.how to sew fern stitch hand embroidery

How to Sew Fern Stitch

1. Bring your needle up to the right side of the fabric at the top of the first stitch. Make a vertical stitch.how to sew fern stitch hand embroidery

2. Bring the needle back up to the side, then take the thread through the same spot as the bottom of the vertical stitch.how to sew fern stitch hand embroideryhow to sew fern stitch hand embroidery

3. Bring the needle up on the other side and make another stitch in the same way, ending in the same place as the others.how to sew fern stitch hand embroidery

4. Make another vertical stitch by bringing the needle up just underneath the first stitch, then taking it back through where the first stitch ends.how to sew fern stitch hand embroidery

5. Make the stitches at the sides in the same way as previously, ending the stitches at the bottom of the second vertical stitch.how to sew fern stitch hand embroideryhow to sew fern stitch hand embroidery

You are basically sewing a backstitch, while stopping off to make the stitches at the side.

To keep it neat, try to ensure that the stitches are the same size.

If you worry about neatness, you could draw 3 lines, equally spaced apart. The centre line would be where you would sew the vertical stitches and the lines at the side would be a guide for the stitches that come out at the sides. The top of the stitch would touch the line. I didn’t bother with drawing lines, I found just sewing the stitches by sight was fine. If the odd stitch was a bit wonky, I just undid it!

If you like learning embroidery stitches, you might also like these posts.

Lazy daisy stitchhow to sew fern stitch hand embroidery

Woven wheel stitch

Stem stitchhow to sew fern stitch hand embroidery

And if you would like the embroidery design that I’ve used on the little purse pictured above, you can download it for free here!

These are affiliate links for embroidery stuff on Hobbycraft.

DMC thread

DMC Moulin‚ Special 25 Variegated Cotton Thread Colour Code 52

Anchor thread
Anchor Stranded Cotton Thread

Embroidery hoops
Wooden Embroidery Hoop 5 Inches

Needles

Prym No. 5 to 10 Fine Embroidery Needles 16 Pack

Linking up here.

Share this:

  • Click to email this to a friend (Opens in new window)
  • Click to share on Pinterest (Opens in new window)
  • Click to share on Facebook (Opens in new window)
  • Click to share on Twitter (Opens in new window)

Filed In: Blog, Embroidery / Tagged: craft fair, embroidery, gifts, how to, stitches

  • 1
  • 2
  • Previous Entries
I'm Anna and I live in rural Norfolk in the UK. My mum taught me how to use a sewing machine when I was 10 and I haven't looked back! I love making all sorts of things and I hope you find inspiration here.

Join the list

Join the mailing list to receive updates, useful and interesting links and free pages from the Sewing Journal.

My New Ebook

things to male and do in the autumn

Bunting Makes Everything Better Tote Bag

Featured Kit

The Sewing Journal

My Kits and Patterns on Etsy

Shop the Christmas Shop at Sew and So


Join the List

Join the mailing list to receive updates, useful and interesting links and free pages from the Sewing Journal.

Privacy Policy

For information about cookies and Tea and a Sewing Machine's privacy policy, please click here.

Instagram

Instagram Widget by SnapWidget


UK Sewing Blogs

Theme by 17th Avenue · Powered by WordPress & Genesis

loading Cancel
Post was not sent - check your email addresses!
Email check failed, please try again
Sorry, your blog cannot share posts by email.