• Home
  • About
  • Blog
  • Ebooks and Printables
  • Etsy
  • Sewing Journal

Make it Yourself. Yes You Can!

  • Sewing Projects
  • Tips and Techniques
  • Embroidery
  • Other Crafts
    • Crochet
    • Felting
    • Jewellery
    • Wreaths
  • Christmas

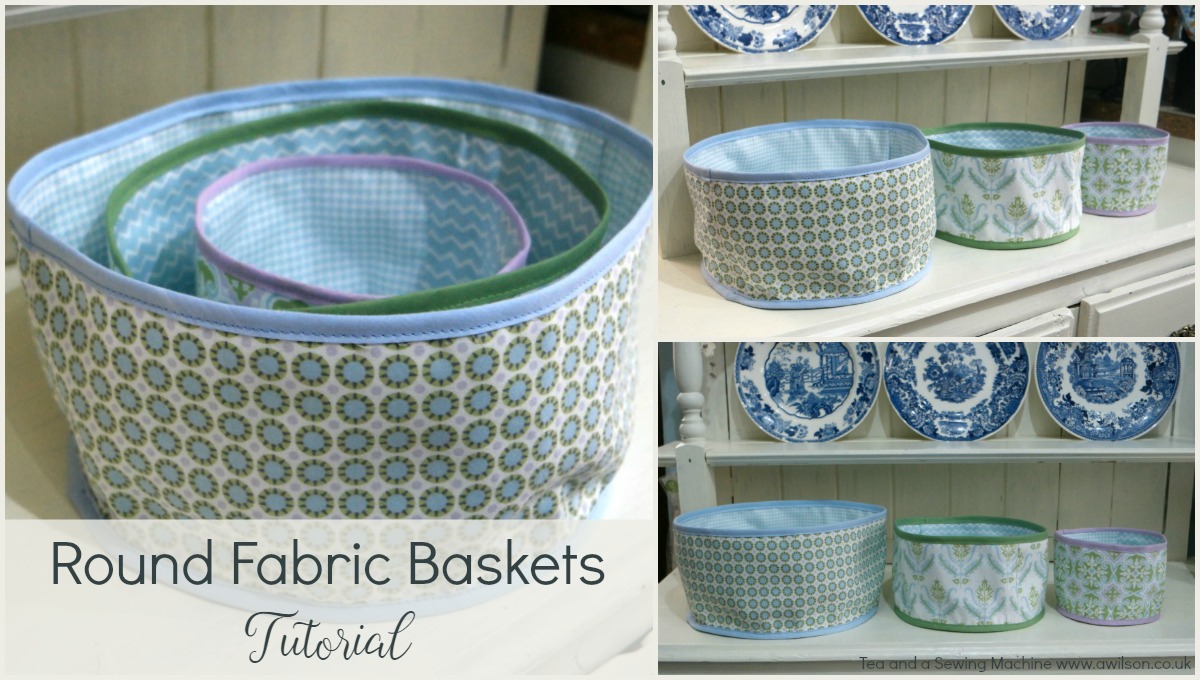
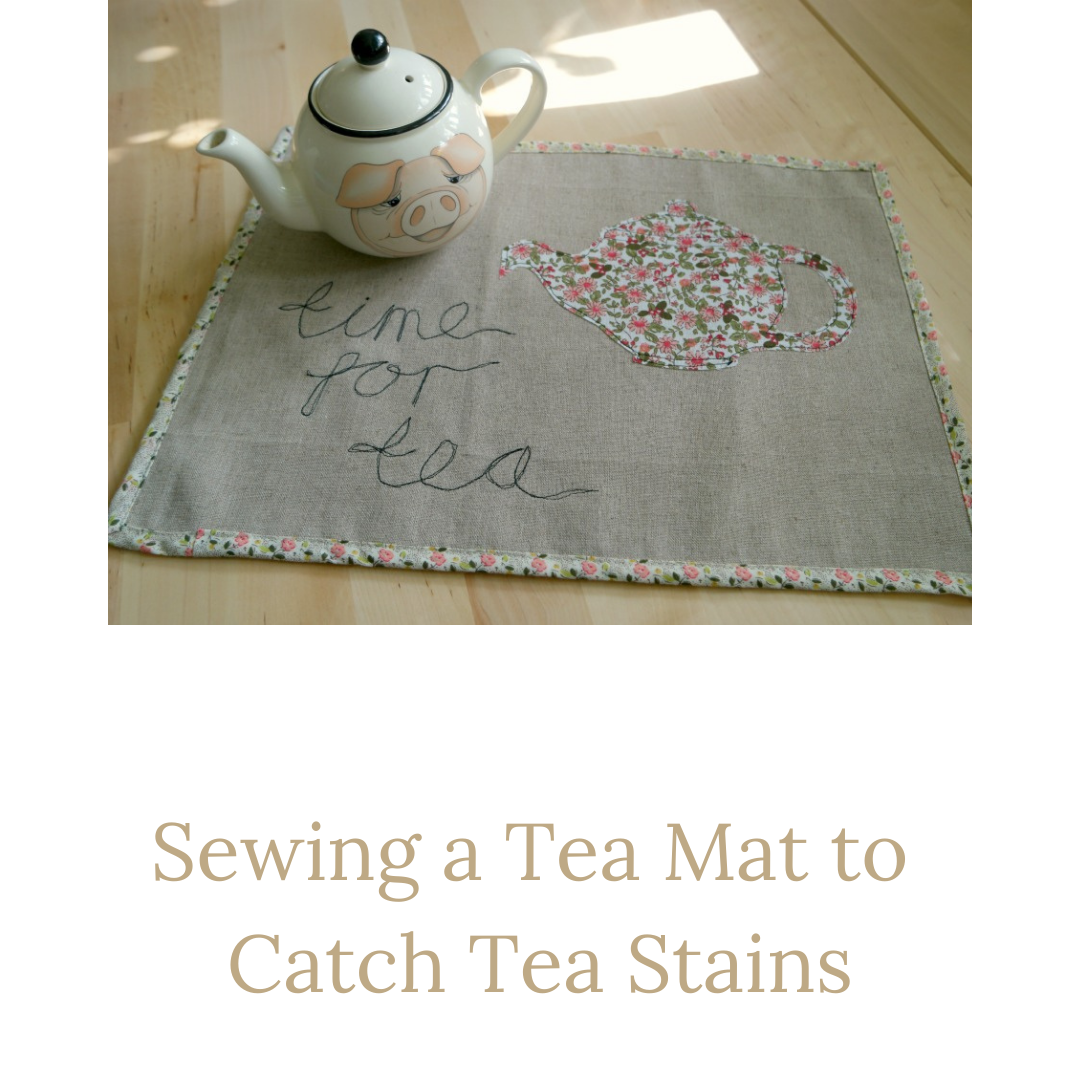
Sewing a Tea Mat To Catch Tea Stains

February 25, 2021 · Leave a Comment

sewing a tea mat

This tea mat project originally appeared on the Minerva Crafts Bloggers’ Network. Since their site relaunched, some of the older stuff has gone, including this. As I’ve had several people ask about it, I’ve rewritten the post with the pattern here.

When we moved into our funny old house 18 years ago, one of the things we wanted to do was replace the kitchen. It took us 14 years to get round to it, and it was such an improvement!

One of the things we did was swap the horrible laminated chipboard worktops for pretty wooden ones. The only slight problem is that they need a little bit more looking after.

I am a human teapot. I’m also a spiller. So when I needed to zap the tea stains on the laminate worktop, I used bicarb and vinegar and it worked a treat. However I wouldn’t want to use anything that harsh on my wooden ones, so the obvious answer was to try to avoid the tea stains in the first place.

So I made a tea mat that could live on the worktop next to the kettle, and when I spilt tea on it I could pop it in the washing machine and the worktops would be fine. Also the linen blend I used was already tea coloured, so if the tea didn’t wash out it wouldn’t show very much!

Another option would be to use the tea mat to line a tray. This was what I’d planned to do originally but all the trays in my house had partially finished Lego models in them!

As well as the linen, I used a cotton spotty print for the underside. The fabric for the bias binding and the teapot came from a fat quarter pack. I also used some sew in interfacing to give the tea mat some weight.

If you need to buy fabric for this project, Fabric Godmother is an independent fabric shop on the south coast. This isn’t an affiliate link. I want to help small businesses at a time when lots of people are finding things tough.

I used machine embroidery to applique the teapot and embroider the letters. It was the first time I’d tried machine embroidering letters, and I’m happy with how it’s turned out! I went over the letters twice as they looked spidery after the first time.

Having an embroidery foot really helped as it allowed me to see what I was sewing! If you read the post I wrote about sewing machine feet, you’ll know that I don’t believe that having lots of feet is necessary. However it can be useful to have particular feet for certain tasks, and using an embroidery foot definitely made it easier.

Sewing a tea mat

Instructions For Making a Tea Mat

You Will Need

Fabric for the top (I used a linen cotton blend)
Fabric for the underside (cotton is a good choice)
Sew in interfacing
A small piece of cotton print for the teapot
Fusible interfacing (optional, but useful especially if the teapot fabric frays easily)
Fabric to make the bias binding, or you could use some pre made.

If you are making your own bias binding, a bias binding maker is handy.

The template for the teapot and the lettering can be downloaded by filling in the form at the the end of the post.

Cutting Out

You will need to cut an A3 sized piece from the linen (42 cm x 30 cm, or 16 1/2″ x 12″), the spots and the sew in interfacing.

For the teapot, you will need a piece of the floral fabric roughly A5 sized (21 cm x 15 cm, or 8 1/2″ x 6″).

You might like to iron on a piece of fusible interfacing to the wrong side of the fabric before you cut out the teapot.

Making the Bias Strips

If you’re using ready made bias binding, you can skip this bit!

1. Take the floral fabric with the roses and fold one edge over to make a triangle. 

2. From the folded edge, measure 2.5 cm all the way along. Draw a line.SAM_3757.JPG

3. From that line, measure 5 cm and draw another line.

4. Cut along the lines. This is easiest with a rotary cutter. If you’re using scissors, make sure you use plenty of pins!

5. You should now have 3 bias strips, all 5 cm wide. Cut the ends off so that they are square.

6. Take 2 of the strips and put the ends together at right angles. Check that the print is running the same way! Sew across the square from top left to bottom right. Add the third strip in the same way.SAM_3798.JPG

7. Cut the corners off and press the seams open.SAM_3799.JPG

SAM_3805.JPG

8. Fold the bias strip in half lengthways and press. If you have a bias binding maker, you can use that to finish making your bias binding. There’s a tutorial showing how to use one here.

If you don’t have a bias binding maker, fold the raw edges into the middle and press. Fold the strip in half and press again.SAM_3806.JPG

Now put your bias binding to one side while you make the rest of the tea mat!

Appliqueing the Teapot

1. Take the linen and the piece of sew in interfacing. Position the the teapot on the linen and pin it on, through the linen and the interfacing.SAM_3758.JPG

3. Applique the teapot using a straight stitch.SAM_3770.JPG

4. Add the extra details like the lid and the base using machine embroidery. SAM_3776.JPGIf you’ve never done this before, use a short stitch and an embroidery foot if you have one. The embroidery foot is not essential, but it will allow you to see more of your sewing.

Embroidering the Letters

1. To transfer the letters to the fabric, I traced them onto the interfacing, then used a plastic box and a torch as a homemade light box to trace the letters from the interfacing to the linen.SAM_3781.JPGSAM_3782.JPG

2. Starting at the end of the cross bar of the tea, embroider the letters. Each word will need to be worked separately, but all the letters of each word are joined up so you can do each word all in one go.SAM_3786.JPG

This is a bit fiddly! Use a short stitch and go slowly. Be ready to move the fabric and pay attention to where there are curves and where there are points.

3. Once you have embroidered the letters, go over them again.SAM_3788.JPG

Finishing Off the Tea Mat

1. Pin the piece of spotty fabric to the back of the linen and the interfacing.SAM_3795.JPG

2. Fold over one end of the bias binding by about 1 cm. Starting at the bottom, pin the bias binding to the wrong side of the tea mat so that the raw edges are together.SAM_3808.JPG

3. Sew the bias binding to the wrong side, keeping close to the fold. When you get back to where you started, overlap the ends and sew them in place.SAM_3811.JPG

4. Fold the bias binding over the raw edge. Sew it in place on the right side, taking care to fold the corners when you sew them.SAM_3822.JPGSAM_3816.JPG

Run the iron on it, trim away any threads ands your tea mat is ready to keep your worktops stain free!SAM_3835.JPGSAM_3842.JPGSAM_3854.JPG

To download the teapot template and the lettering, please enter your email address in the form below.

Please note that in doing this, you will be added to the Tea and a Sewing Machine email list. This will usually arrive in your inbox weekly, and usually at the weekend. I don’t send spam. The newsletter is updates, links, things I think you might find interesting and the occasional free thing. You can unsubscribe from the newsletter at any time. If you’d like more information about why I do this, please click here.

Share this:

  • Click to email this to a friend (Opens in new window)
  • Click to share on Pinterest (Opens in new window)
  • Click to share on Facebook (Opens in new window)
  • Click to share on Twitter (Opens in new window)

Filed In: Blog, Sewing Projects / Tagged: applique, embroidery, home, how to, kitchen, machine embroidery

How To Sew Napkins: Nice But Not Fussy!

April 11, 2020 · 6 Comments

how to sew napkins

It’s the first time in several years that we’re actually at home for Easter. This isn’t what we’d planned! Easter is a good time to go on holiday. The bank holidays mean extra days and the weather is often alright (and sometimes lovely!).

We had planned a trip to Japan, but because of the current situation we’ve had to postpone it.

I’m trying not to think about it too much. At least we are all at home and safe. And Easter, like Christmas and springtime, swings round again regardless of whatever else is going on.

I wanted to make the table nice for our lunch on Easter Sunday, so I decided to sew napkins. I had plans to make a similar thing but larger for the centre, but I ran out of time.

As you probably know already, I like things that are pretty! I’m not a huge fan of fussy though. And living in a house full of boys, there is a limit to what I can get away with!

So I opted to sew napkins in a pretty blue colour. Easter is a special time, and I wanted my napkins to be special too, but simple and not fussy.

how to sew napkins

The technique I’ve used here involves pulling out some of the threads and sewing so that the others don’t become loose. I actually did this once before, years ago, when my eldest was a baby and I made him a christening gown for his dedication.

For the scalloped edge, I actually used the fancy stitches setting on my sewing machine, which I don’t think I’ve ever used before!

The napkins also have mitred corners so that they’re nice and neat.

I like these napkins so much I might make some more in different colours!

The fabric I used came from this shop in Swindon. This isn’t an affiliate link; I just want to do my bit at the moment to support smaller businesses when lots are struggling.

how to sew napkins long image

Instructions For How To Sew Napkins

You Will Need

Fabric for your napkins. Cotton is best.
A small amount of interfacing. The iron on kind is easiest, but you can use what you have.
An unpicker
Usual sewing supplies

Cutting Out

Cut your fabric into squares. Mine were about 25 cm (10 inches) square. If you have a fat quarter, you could just fold it into 4 and you’ll have 4 squares about 25 cm square.

Cut the interfacing into strips 25 cm x 1 cm (10 inches x 1/4 inch).

Decorating the Napkins

Scalloped Edging

Attach the interfacing to which ever side will be the wrong side, about 1 cm (1/4 inch) up from the bottom edge. If it’s not the fusible sort, pin it but be sure that you can get to the pins easily!

Set your sewing machine to make scallops. It’s a good idea to practise first.

My practise attempts were a disaster until I realised that the bobbin footplate area probably needed cleaning as the feed dogs haven’t been working properly for a while. After removing a shocking amount of fluff, I’m pleased to say that everything is working well! Practising will also help you to determine what size you’d like them. You might need to change the foot, so check before you start.

Sew the scallops about a cm (1/4 inch) up from the bottom edge, over where you attached the interfacing.

how to sew napkins long image

Trim the fabric away from the bottom of the scallops. Small, sharp scissors are best for this task!

The Drawn Threads

Sew a line of stitches about 2 cm up from the scallops, then another 0.5 cm above the first row.

how to sew napkins

Using an unpicker, pull one of the horizontal stitches out between the 2 rows of machine stitching. This is a little bit fiddly, especially if you are using a closely woven fabric, but once you’ve removed a couple of threads it gets easier.

how to sew napkins

Pull out more threads until you are left with only vertical threads between the row of machine stitches.

how to sew napkins
how to sew napkins

Officially I think you’re supposed to hand sew round the threads, but I didn’t because I liked it as it was.

If you find this bit too fiddly, you could just leave it or sew a length or ribbon or lace onto the napkin instead.

Sewing the Napkins

All you need to do now is to hem the three raw edges!

Mitred corners will make them nice and neat. To do this, take a corner and fold it inwards on the wrong side.

how to sew napkins

Fold it over again and pin.

how to sew napkins

Do this with the other corner as well.

Fold raw edge inwards, then over again so that the raw edge is enclosed. The corners will be neat and you won’t get a weird bulge that your sewing machine might object to.

how to sew napkins
how to sew napkins

Run the iron over your napkin and it’s ready to make your table pretty!

how to sew napkins
how to sew napkins
how to sew napkins

Tips

If your sewing machine doesn’t do fancy stitches, you could either sew a scalloped edge or, for an easier alternative, use trim as an edging instead.

Pulling the threads out is a task for earlier in the day job if you have eyesight issues.

It’s harder to pull the threads out of closely woven fabric, although it becomes easier once you’ve pulled out a couple of rows. Looser fabric is easier.

This is the kind of project where you can batch like tasks, especially as you’ll probably want to make a few!

If you like this post about how to sew napkins, you might also like these:

Cutlery pockets

Picnic placemat

Share this:

  • Click to email this to a friend (Opens in new window)
  • Click to share on Pinterest (Opens in new window)
  • Click to share on Facebook (Opens in new window)
  • Click to share on Twitter (Opens in new window)

Filed In: Blog, Sewing Projects / Tagged: easter, home, how to, table

DIY Bunting Tea Towel

March 8, 2019 · Leave a Comment

DIY bunting tea towel

DIY Bunting Tea Towel

There are lots of good things about being able to sew.

One of them is that there’s no need to be trawling the shops or the internet because there’s something you want or need, and nothing you find matches what’s in your head! You can just make the thing instead.

When I hit a gloomy patch, something that I find to be helpful is to remind myself of what’s important and focus on that. Unsurprisingly my family are at the top of the list!

Although I object to the amount of mess they all make sometimes, I actually quite like pottering about at home. And I like to make things for my house that are an expression of who I am.

So the other day I decided to make a present for my kitchen. I know that tea towels aren’t very exciting, but most of mine are old and have gone grey from being washed a lot. A nice new tea towel with bunting on it was just the thing!

The fabric behind my bedroom door is bordering on out of control. Every so often it falls over and nobody can get in or out! So I had a rummage in there to see what I could find. I found some white cotton and some red and white gingham.

I did start to overthink a little bit about whether the cotton was suitable, whether it was thick enough, whether I could reuse an old nappy to line it, before remembering that if you make it yourself, you can decide on these things as there’s not necessarily right or wrong!

So in the end I used the white cotton, some towelling, gingham ribbon and scraps of gingham fabric. I also found some red checked fabric left over from the curtains I made for the kitchen. I think I was saving it for something, but I can’t remember what! So I turned that into tea towels too.

diy bunting tea towel

How To Make DIY Bunting Tea Towels

You Will Need

Cotton or linen fabric
Towelling (you could not bother with this if the cotton you’re using is thicker than the stuff I had.
Scraps of fabric for applique
Fusible interfacing (optional)
Ribbon

Instructions

Cut a rectangle from the cotton fabric and another the same size from the towelling. You can make your tea towel whatever size you want, but if you need a template, use an existing tea towel as a guide.

If the fabric you’re using for the appliqued bunting looks like it might fray, you’ll need to iron some fusible interfacing to it before cutting out.

Cut 7 flags from the fabric. There are tips for cutting flags for bunting here.

Pin the flags to the fabric.

Cut a length of ribbon the same width as the cotton. Pin it to the cotton about 5 cm up from the bottom edge.

DIY bunting tea towel

Check that everything is how you want it, then applique the flags to the cotton and sew on the ribbon.

diy bunting tea towel

Pin the cotton to the towelling with the right sides together. Leaving a gap for turning out, sew around the outside edge.

diy bunting tea towel

Trim the seams and cut across the corners. Turn it out. Pin the opening. Top stitch around the edge.

diy bunting tea towel

If you are using thicker cotton and don’t want to line your diy bunting tea towel with towelling, you could hem it with a folded hem instead.

diy bunting tea towel

Share this:

  • Click to email this to a friend (Opens in new window)
  • Click to share on Pinterest (Opens in new window)
  • Click to share on Facebook (Opens in new window)
  • Click to share on Twitter (Opens in new window)

Filed In: Blog, Sewing Projects / Tagged: beginner, home, how to

How to Sew a Log Cabin Quilt Block

January 27, 2018 · 2 Comments

How to Sew a Log Cabin Quilt Block

I’ve been planning to make quilts for my boys for ages, and before Christmas I finally got my act together and started on the first one.

Having the attention span of a gnat (I’m really starting to think I might have an adult version of ADD!), it’s necessary to keep things as simple as possible or the quilt will end up on the pile of unfinished projects.

So instead of making dozens of tiny blocks, I’m making 12 big ones.

Not wanting to mess it up, I planned out what I was going to do before Christmas. If you’d like to read about planning a quilt, you can find that post here.

As well as using large blocks, I’m also planning to back it with fleece and not actually quilt it all. I know this is cheating! But in the end, I want Dominic to have his quilt and I also want to keep my sanity.

Now all the bits are cut out and I’m ready to start sewing!how to sew a log cabin quilt block

Log Cabin Quilt Block

The log cabin quilt block I’m using is made up 13 pieces, 7 different pieces in total.how to plan a patchwork quilt how to sew a log cabin quilt block

During the planning stage, I worked out how many of each piece I would need. Pieces 1 and 2 are the same, as are 3 and 4, 5 and 6, 7 and 8, 9 and 10, 11 and 12.

So that’s 6 different sized pieces, plus the 13th.

For those 6 pieces, I cut 24 of each, and 12 of the 13th piece.

Here’s a table showing the sizes for each piece and how many you need.how to plan a patchwork quilt how to sew a log cabin quilt block

Sewing the Log Cabin Quilt Block

To sew the log cabin quilt block, you start in the centre and work outwards.

Pieces 1 and 2 are the same size, so take 2 of the smallest bits and sew them together. Trim the seams and press them open.how to sew a log cabin quilt block

Then along the lower long edge, sew one of the second size. Then sew the other piece this size at right angles to it.how to sew a log cabin quilt block how to sew a log cabin quilt block

Pieces 5 and 6 are the 3rd size up. Sew one of these along the opposite long edge to piece 3, and the other one to the side opposite piece 4.how to sew a log cabin quilt block how to sew a log cabin quilt block

Keep going like this so that you’re making up your block in a clockwise direction. You could go anti clockwise if you prefer, but it will look better if you don’t change your mind half way through!how to sew a log cabin quilt block how to sew a log cabin quilt block how to sew a log cabin quilt block how to sew a log cabin quilt block how to sew a log cabin quilt block how to sew a log cabin quilt block how to sew a log cabin quilt block

Remember to trim and press seams as you go. And if you find that the pieces aren’t quite the right size, you can trim them down. Just be aware that the blocks will be easier to sew together if they’re the same size!

The next post will be showing how to sew the log cabin quilt blocks together and sewing the backing.


Share this:

  • Click to email this to a friend (Opens in new window)
  • Click to share on Pinterest (Opens in new window)
  • Click to share on Facebook (Opens in new window)
  • Click to share on Twitter (Opens in new window)

Filed In: Blog, Sewing Projects / Tagged: children, decor, gift, home, how to, quilt

Easy Plastic Bag Storage Tutorial

April 28, 2017 · 11 Comments

Easy Plastic Bag Storage Tutorial

One of my tasks for this week was to venture into the black hole that is the utility room and declare war on the mess. I battled with the mess in the autumn and won 🙂 but unfortunately the utility room has been a dumping ground for stuff that we don’t know what else to do with for so long that six months on it is a mess again.

I’ve seen so many beautiful laundry rooms on Pinterest I’m determined to make ours if not beautiful then at least less manky.

In the last War of the Utility Room I did not tackle the bags of stuff that were hanging on the back of the door. My main objective was to clear it up enough to be able to admit a man who could fix the boiler, so this was a job that was overdue!

Most of the mess was carrier bags. Some of them had stuff in them. Most of the stuff was rubbish. So stuff that was rubbish went in the bin, stuff that was not rubbish went away, leaving me with a pile of plastic bags.

Now I know it would be a good thing to go bag free. Apparently turtles mistake them for jelly fish and they take forever to biodegrade. However I do actually use plastic bags a lot: for nappies, for rubbish, for clearing up cat sick, for putting clothes in that have been weed on/ pooed on/ sicked on/ are wet/ are filthy, as a dry patch on a wet bench, for wellies, for shoes, even for shopping sometimes.

The plastic bags were living in another plastic bag, but this had spread to a couple of other plastic bags, a rucksack and the floor. Needless to say none of the beautiful laundry rooms on Pinterest had plastic bags on the floor.

So I’ve made a pretty plastic bag storage bag from a couple of fat quarters I had lurking upstairs in my fabric hoard. Here’s the tutorial if you want to make one yourself!easy plastic bag storage holder tutorial

How to Make a Plastic Bag Storage Bag

You Will Need

Some fabric (2 fat quarters or half a metre is enough), 40 cm elastic, safety pin, usual sewing supplies.

Cutting Out

For the main part of the storage bag, cut a rectangle approximately 64 cm x 56 cm. If you’re using 2 different fabrics, join them together to make them the right size. I used one piece 45 cm x 56 cm and a second piece 21 cm x 56 cm, then joined them along the longer edges.easy plastic bag storage holder tutorial

For the handle, cut a strip 56 cm x 12 cm.

Sewing Up

1. Fold the strip in half lengthways.

2. Fold the raw edges into the middle, then fold it in half again so that the raw edges are enclosed.easy plastic bag storage holder tutorialeasy plastic bag storage holder tutorial

3. Sew along the open edge. To keep things symmetrical, you might like to sew along the other edge too.easy plastic bag storage holder tutorial

Put the handle to one side.

4. Fold the large rectangle in half so that the long edges are together. Pin, then sew.easy plastic bag storage holder tutorial

5. Take one of the ends and fold the raw edge over about a cm. Fold it over again and pin it in place. How much you fold over depends on the width of your elastic, so make sure it is wide enough, plus a bit extra.easy plastic bag storage holder tutorialeasy plastic bag storage holder tutorial6. Sew along the lower edge, keeping close to the fold. Stop sewing about 2 cm short of where you started so that you have a gap for threading the elastic.easy plastic bag storage holder tutorial

Repeat with the other end.

7. Take the handle and pin it to the casing. Sew it in place over where you sewed the casing, and also at the top of the casing, close to the folded edge. easy plastic bag storage holder tutorial8. Pin, then sew the other end of the handle to the opposite side of the storage bag.

It’s probably a good idea to sew over the handle end a few times. Although bags are not heavy, people might pull on it while they’re getting bags in and out.


9. Cut the elastic in 2 20 cm lengths. Using a safety pin, thread one piece of elastic through the casing at one end. Tie the ends together. Repeat with the other end.easy plastic bag storage holder tutorialeasy plastic bag storage holder tutorial

10. Turn your plastic bag storage bag right way out and stuff with plastic bags!easy plastic bag storage holder tutorialeasy plastic bag storage holder tutorial

You might also like these posts:

Oven gloves tutorial

Tea mat tutorial

Shopping bag tutorial

Fabric basket tutorial

Linking up here.

easy plastic bag storage holder tutorial


Share this:

  • Click to email this to a friend (Opens in new window)
  • Click to share on Pinterest (Opens in new window)
  • Click to share on Facebook (Opens in new window)
  • Click to share on Twitter (Opens in new window)

Filed In: Blog, Sewing Projects / Tagged: decor, easy, home, how to, plastic bag storage

  • 1
  • 2
  • Previous Entries
I'm Anna and I live in rural Norfolk in the UK. My mum taught me how to use a sewing machine when I was 10 and I haven't looked back! I love making all sorts of things and I hope you find inspiration here.

Join the list

Join the mailing list to receive updates, useful and interesting links and free pages from the Sewing Journal.

My New Ebook

things to male and do in the autumn

Bunting Makes Everything Better Tote Bag

Featured Kit

The Sewing Journal

My Kits and Patterns on Etsy

Shop the Christmas Shop at Sew and So


Join the List

Join the mailing list to receive updates, useful and interesting links and free pages from the Sewing Journal.

Privacy Policy

For information about cookies and Tea and a Sewing Machine's privacy policy, please click here.

Instagram

Instagram Widget by SnapWidget


UK Sewing Blogs

Theme by 17th Avenue · Powered by WordPress & Genesis

loading Cancel
Post was not sent - check your email addresses!
Email check failed, please try again
Sorry, your blog cannot share posts by email.