
A Wrist Pincushion Tutorial
A Wrist Pincushion Tutorial
There is an updated version of this tutorial on how to make a wrist pincushion! Also the craft kits are back on Etsy, and you can find them here.
I have a confession to make.
I used to put pins in my mouth. And when I think nobody is looking, I still do.
It’s awful. I know I shouldn’t do it, but I do anyway.
This article describes what happened to somebody who managed to inhale a pin while she was holding some in her mouth. And much closer to home, when Cosmo was about 18 months old, I caught him copying me by putting pins in his mouth.
The problem is it’s convenient. Having pins in a little tin is not. In your mouth, they’re where you are, within easy reach and all the same way up.
But aspirating on a pin is probably not much fun. And what might happen to a little child with a mouth full of pins doesn’t bear thinking about.
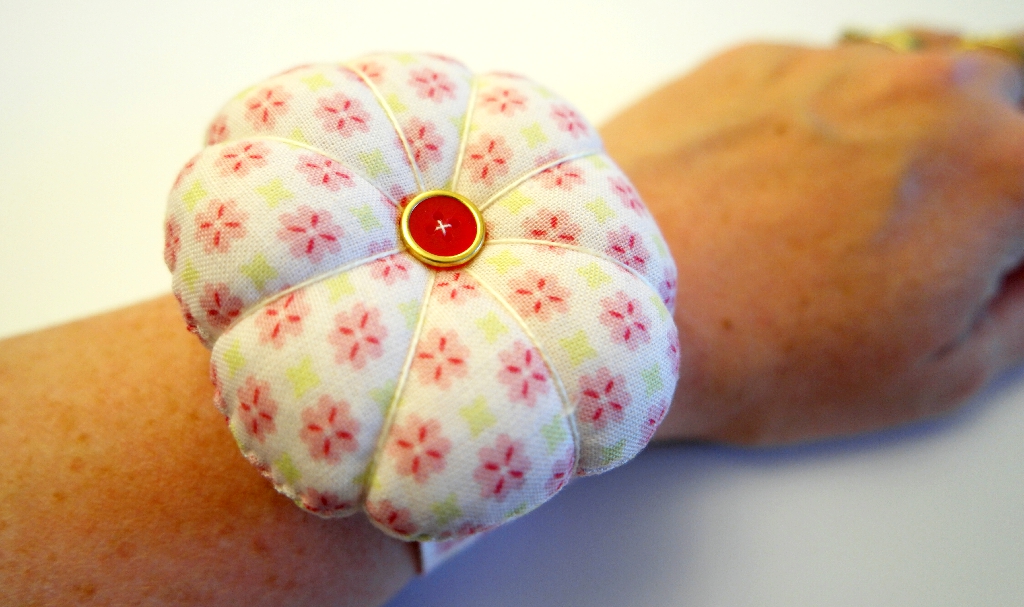
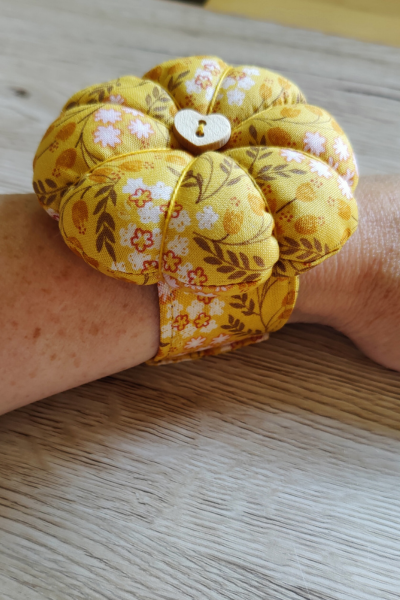
So when I saw the pretty pincushion that Angeline was wearing on her wrist in The Great British Sewing Bee, I decided to make one similar.
I’m so happy I did! It’s pretty, it’s comfortable, and I can take my pins with me without losing them under a pile of fabric or behind the sewing machine.
So if you are a pins in the mouth person, or if you have more restraint but you want a better option than jabbing yourself in the finger with your pins every time you put your hand in the pin tin, here’s a tutorial so you can make one too!
*** You might be interested to know that I have pincushion kits for sale on Etsy here. ***

How to Make a Wrist Pincushion
You Will Need
Scraps of cotton fabric (I used this, but if you have a rummage you may well find that you have a scrap of something gorgeous that you’ve been saving for a project just like this), a small piece of velcro, a button (my button was a spare one from a cardi I bought from Primark!), polyester filling, strong thread in a complimentary colour, usual sewing supplies.
Cutting Out
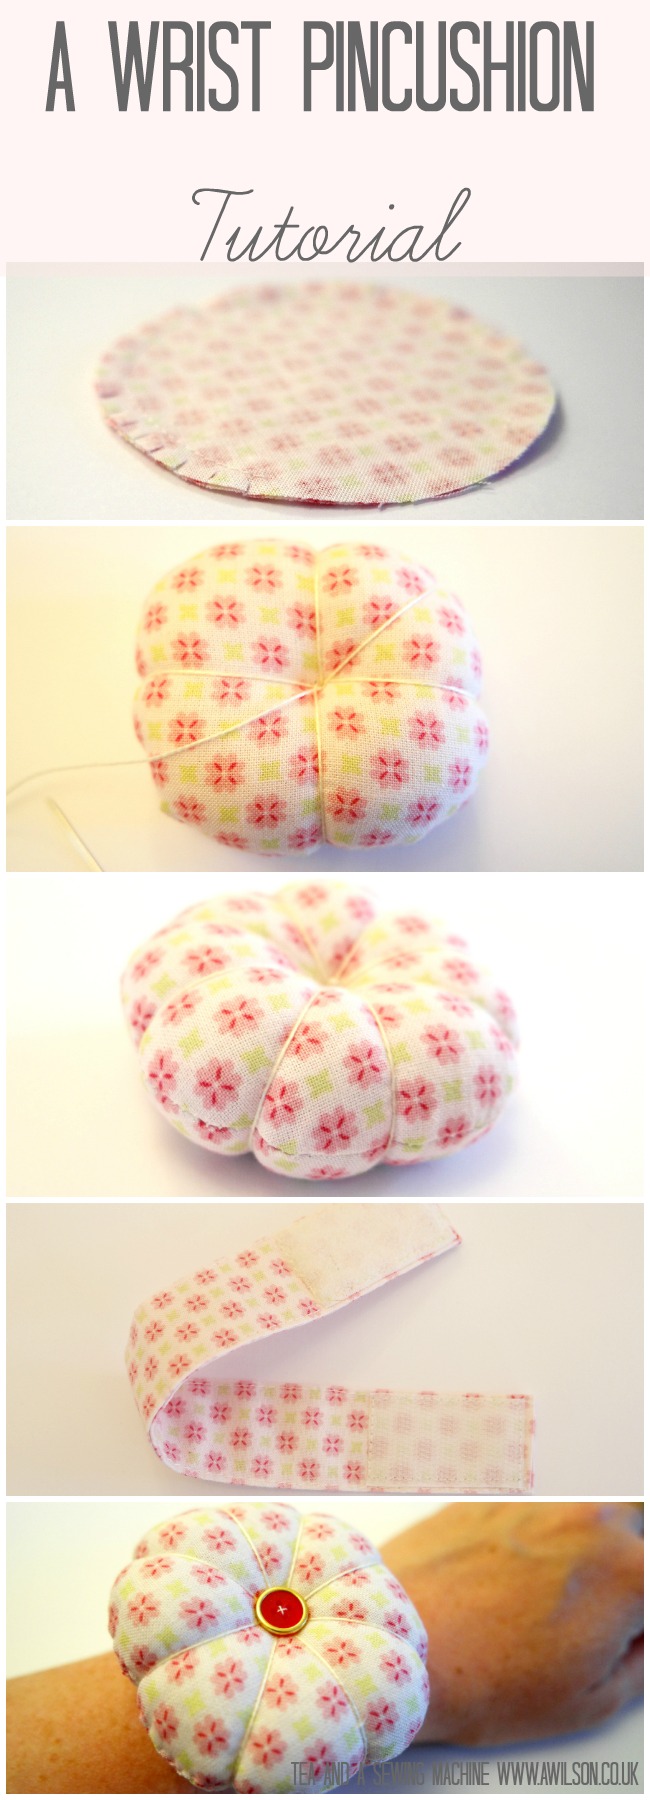
From your fabric, cut 2 circles about 10 cm in diameter (distance across the circle passing through the middle). I used a roll of sellotape.
Cut a rectangle about 10 cm wide and long enough to go around your wrist and overlap by 3 -4 cm. Mine was 25 cm long,but I have freakishly skinny wrists.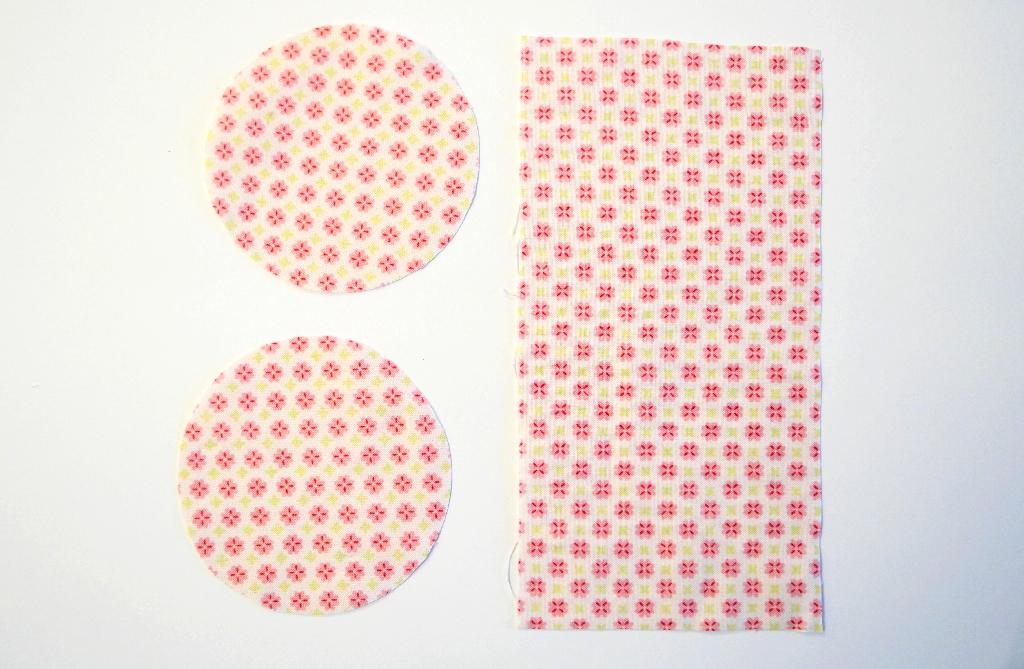
Sewing Up
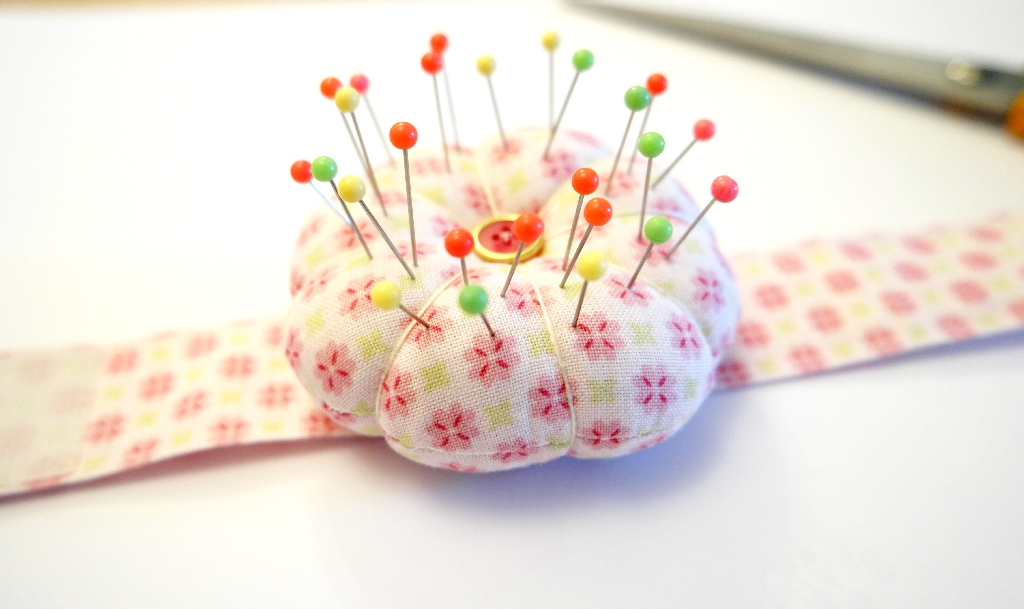
1. Sew the 2 circles together with the right sides together. Leave a gap. Clip the seam allowance.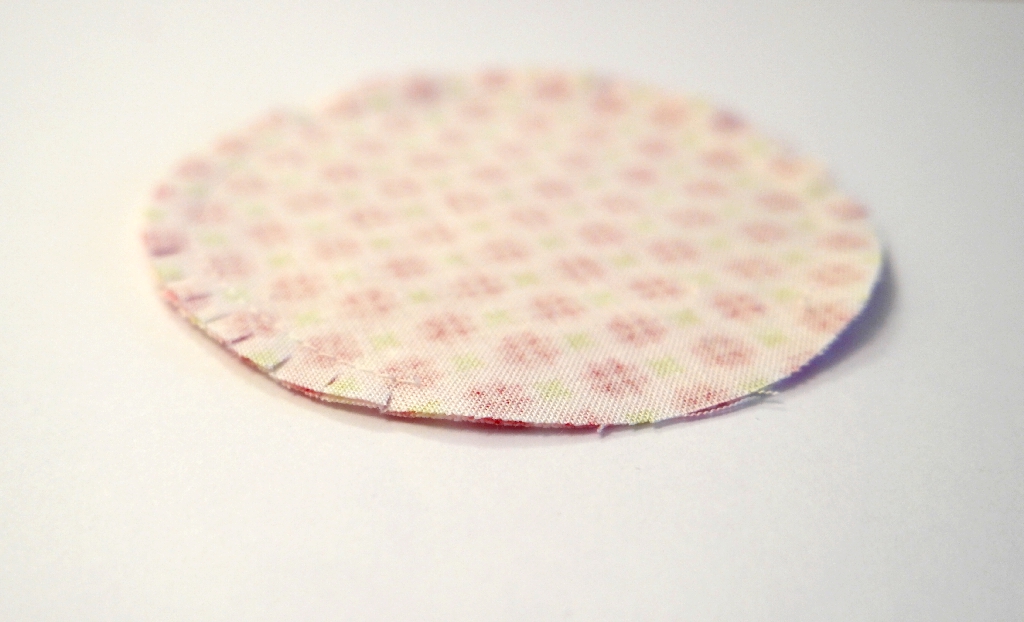
2. Turn the circles the right way out and stuff with polyester filling. It will need to be firm so that it doesn’t yield too much when you stick the pins in it. Slip stitch the opening.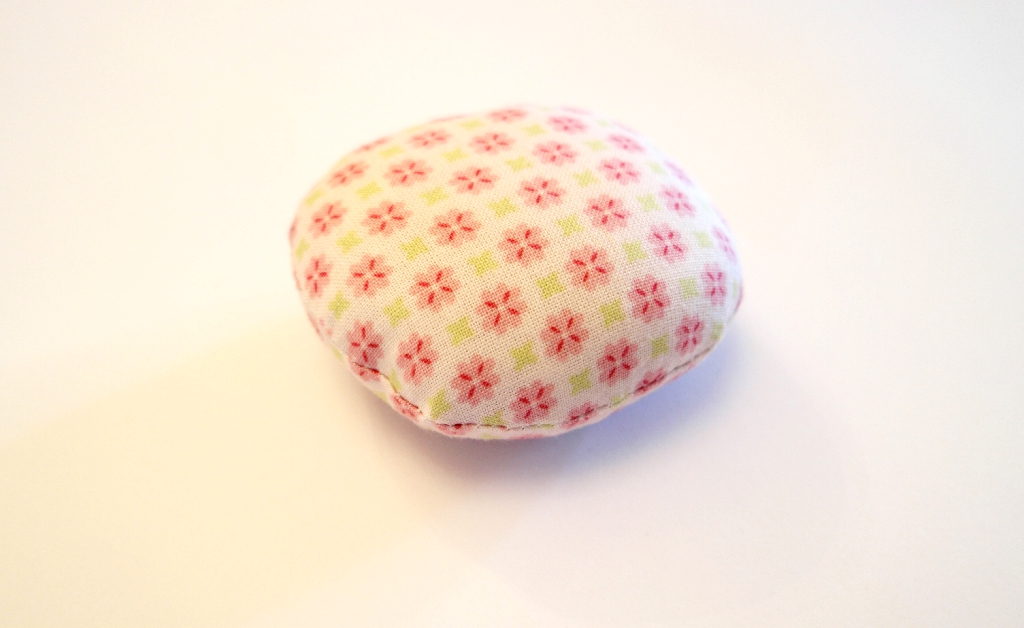
3. Cut a length of your strong thread (I used Perle cotton embroidery thread, but sewing thread doubled will probably do) and tie a good big knot at one end.
4. Bring your thread through the middle of your pincushion. Take the thread over the pincushion and put the needle in again where you started. Bring it through again and pull it tight. 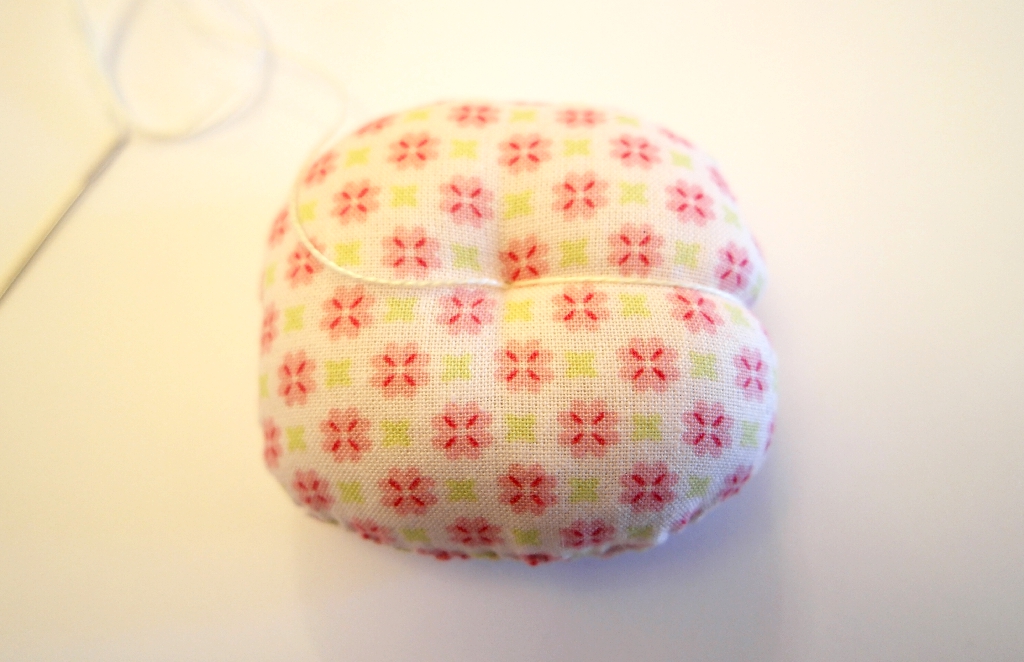 Take the thread round the outside of the pincushion on the opposite side, then back in through where you started.
 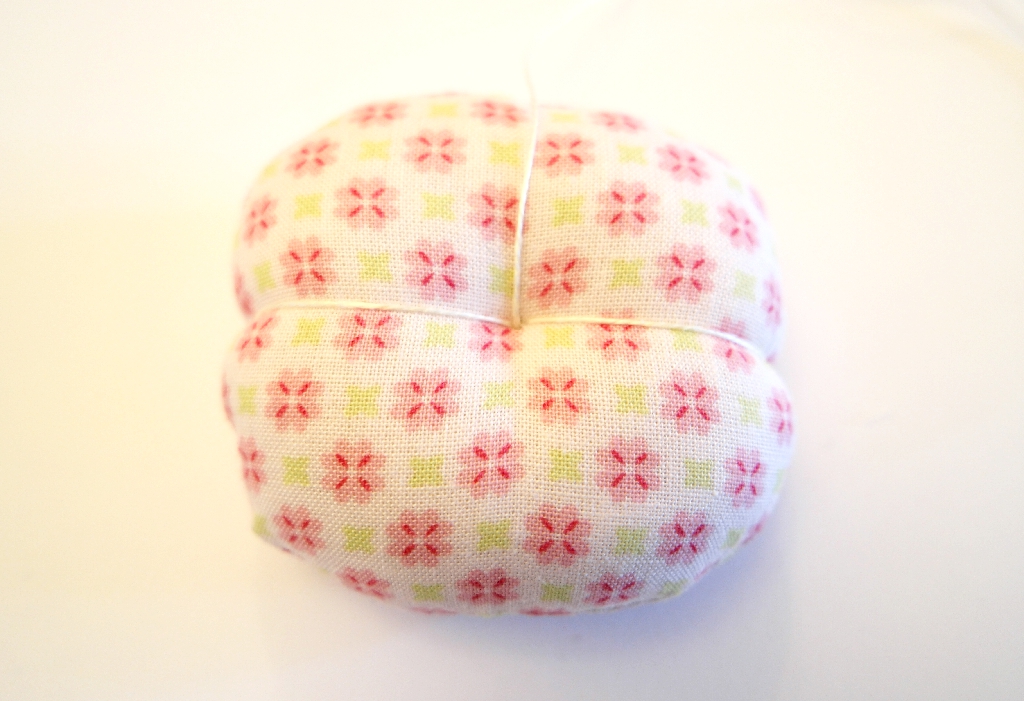 Keep going in this way until the pincushion is divided up into 8.
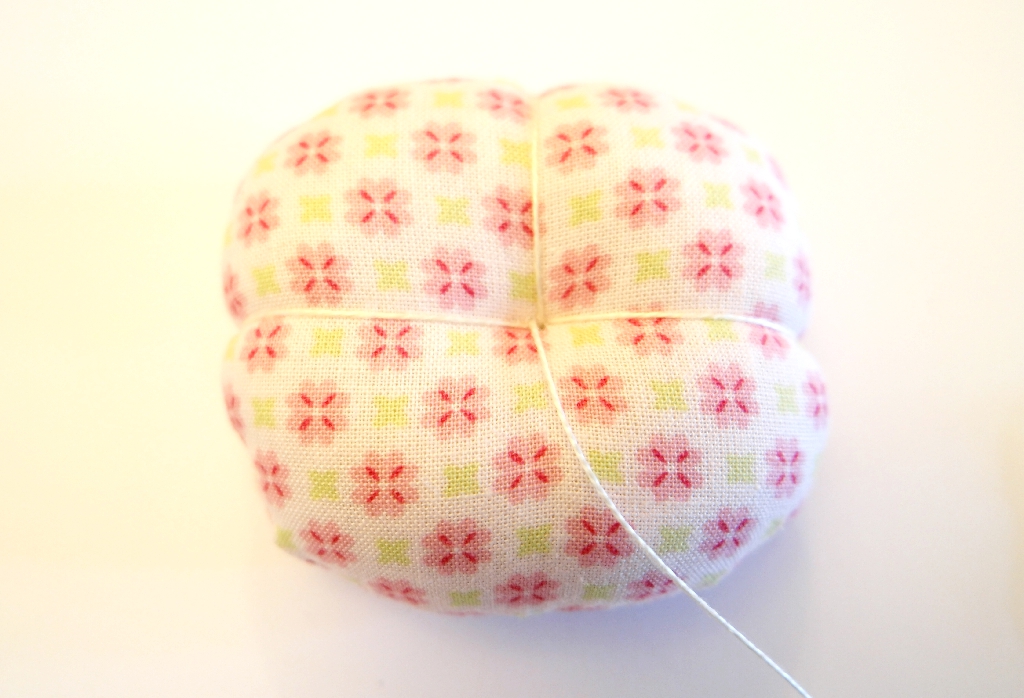
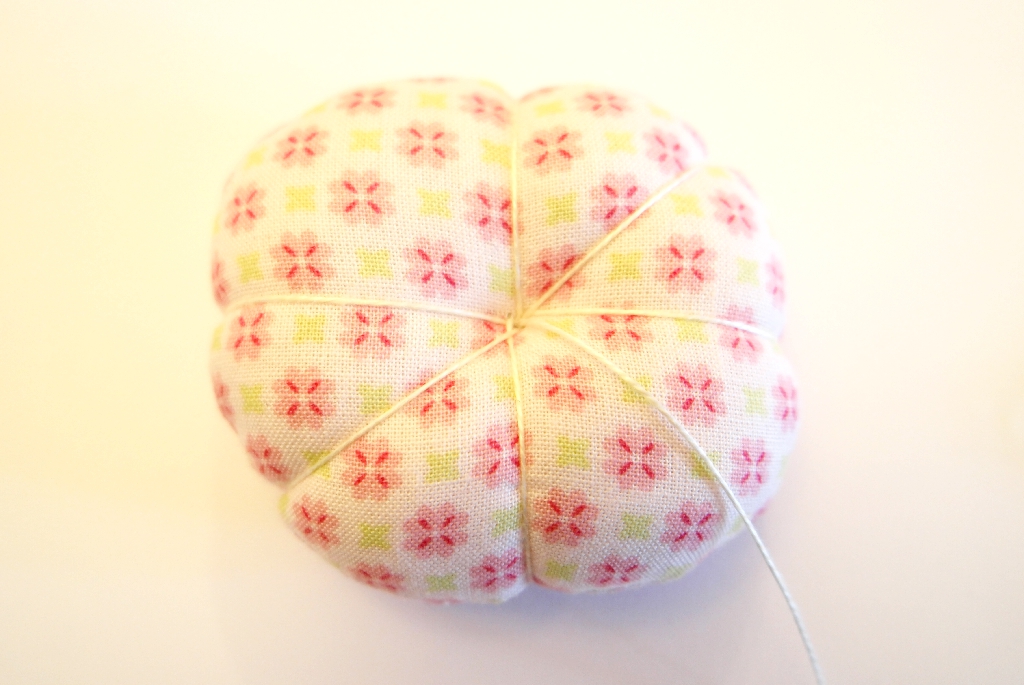
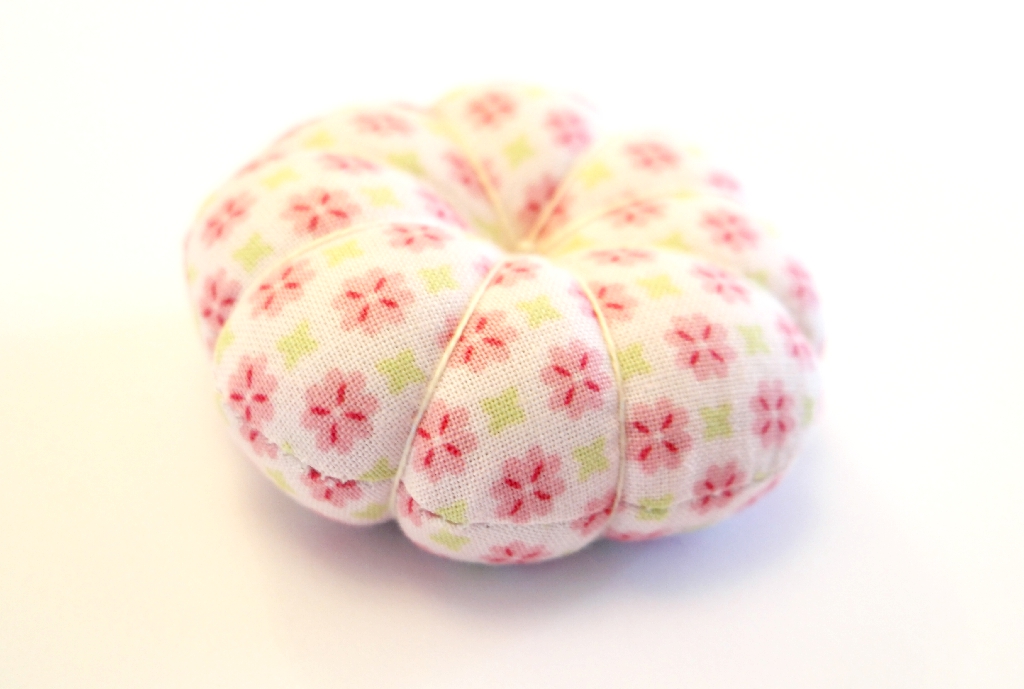 Tie the thread off.
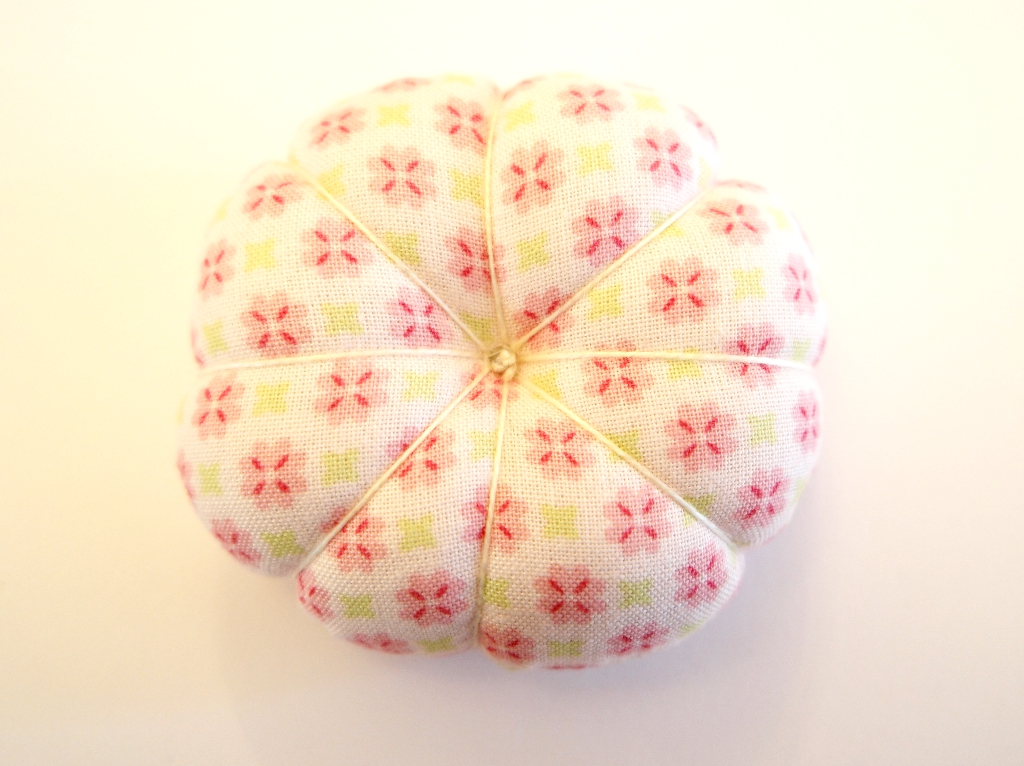
5. Pick the side that looks neatest and sew a button at the centre.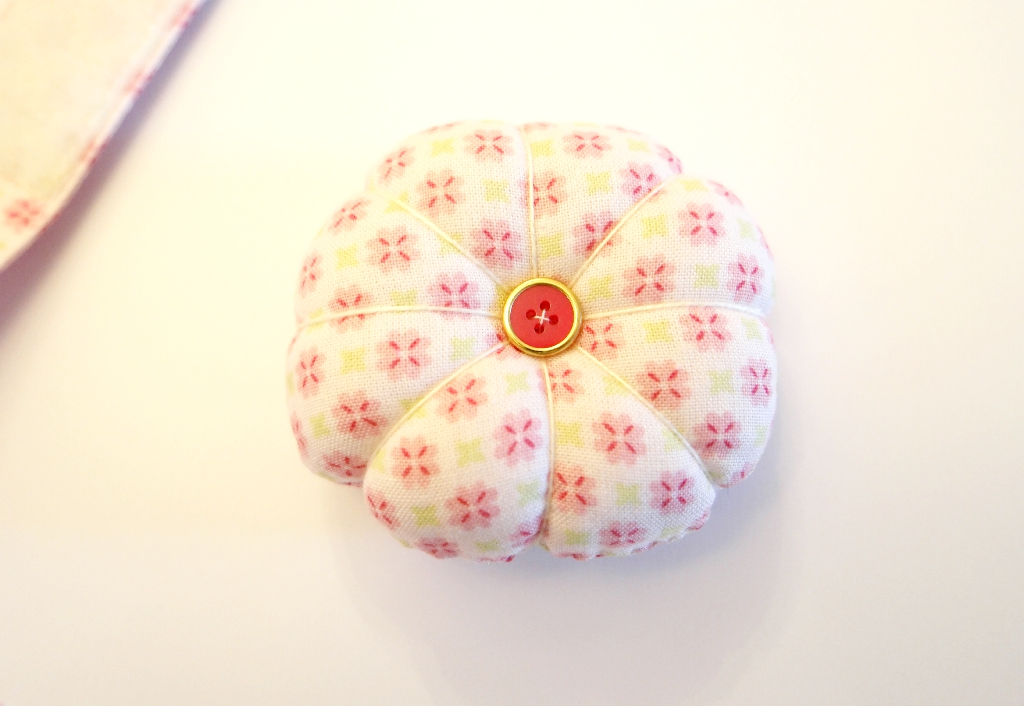
6. To make the strap, fold your strip of fabric in half lengthways. Open it out, then fold the raw edges inwards to the centre.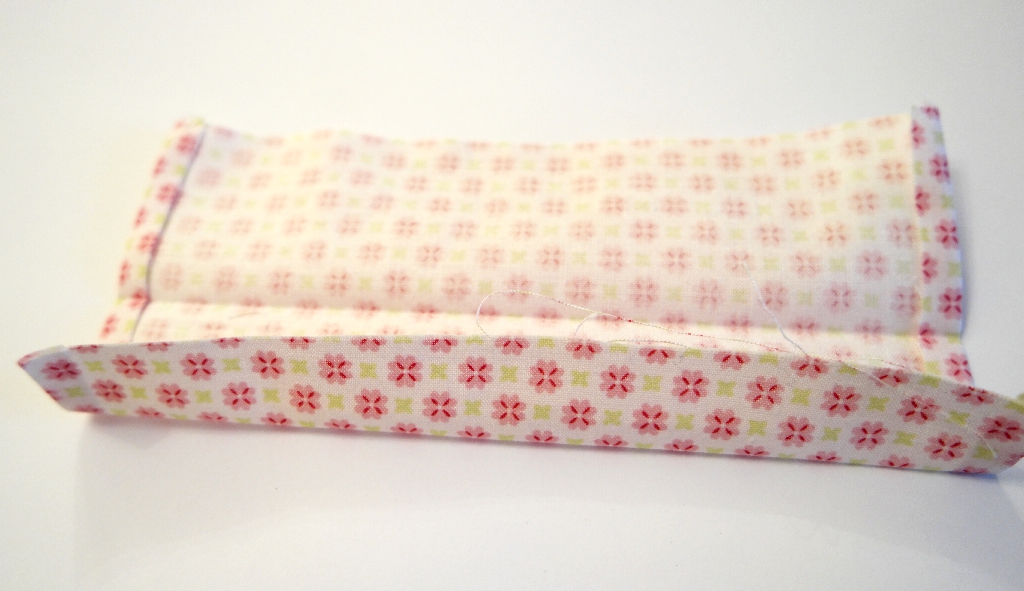
7. Tuck the ends in, then sew along both long edges of the strap. You don’t really need to sew down both edges as only one is open, but I like to so that it looks symmetrical.
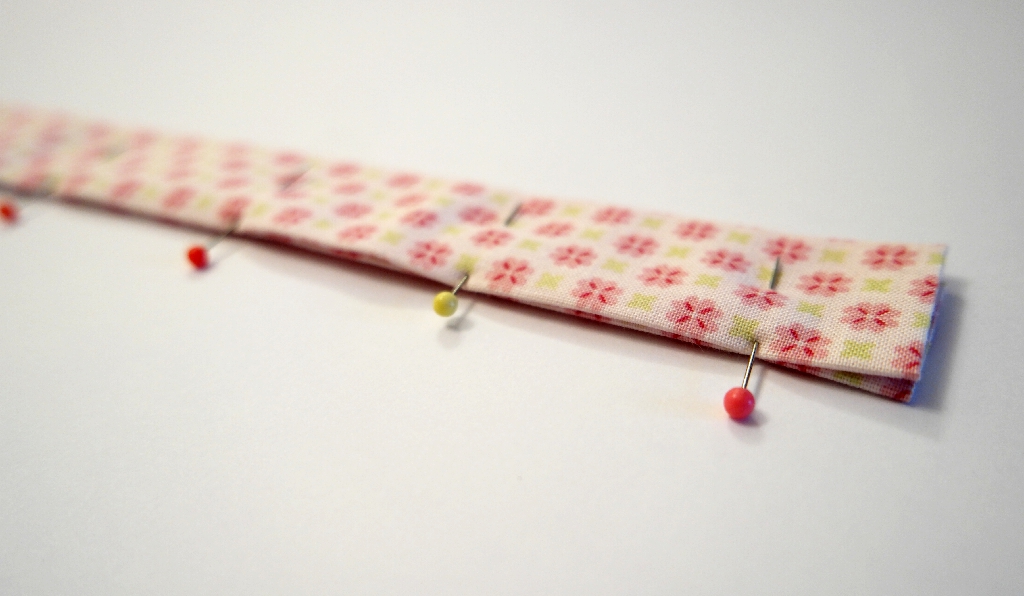
8. Cut a small piece of velcro (about 3-4 cm) and sew to the ends of the strap. You will need one piece on one side, and the other piece on the other side.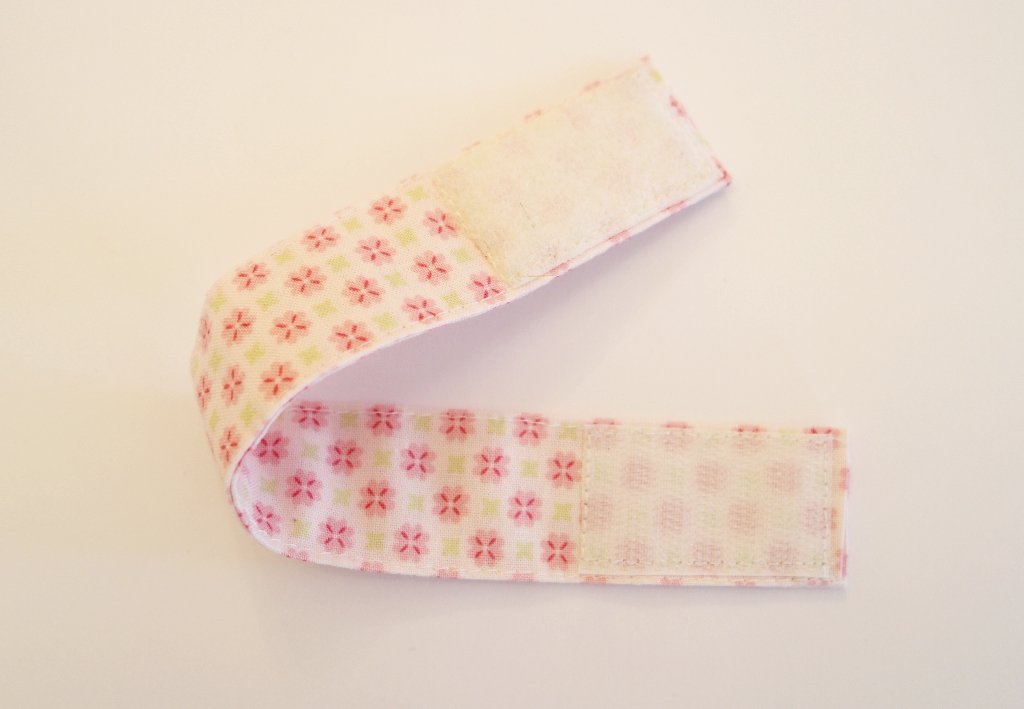
9. Hand sew the pincushion to the middle of the strap.

If you like quick projects to use up odds and ends, you might like these:

Hello,
Thank you for the tutorial and pattern!
Made mine this afternoon and love it to bits 💕
Greetings
“Sew” easy! Thank you “sew” much. I made mine in a jiffy and than made several more to give. It is comfortable on my wrist and light weight. When sewing for periods of time, I have forgotten to take it off.
Thank you again!
Thanks Bev! I forget to take mine off too!
This is fantastic! I’m going to hand see one tomorrow!
Lovely!
Thank you for tutorial, easy to follow and made mine very quickly. I added sawdust to the stuffing to keep it firm and a piece of card on the bottom for safety. However have decided to use wide elastic inserted into fabric wristband as it’s easier to put on. Will also attach band to one half of circle before stitching circles together, easier than hand stitching once it’s stuffed.
Good ideas, thank you
Thank you for the superb tutorial. I now have a lovely wrist pin cushion which is so comfortable to wear. It also works a treat.
You’re welcome! Glad you like it 🙂
Your tutorial is great & I loved how this turned out!! Thanks so much! I ended up hot glueing a baby-snap button & the cushion to the strap (I’m terrible at hand-stitching!)
love & blessings from the U.S.
Thanks Leah 🙂 Good idea to glue it, sewing the pincushion to the strap is a bit fiddly!
Thank you I am guilty of putting pins or needles in my mouth or jumper when sewing, not a good idea. Your delightful wrist pin cushion is something I have been meaning to make, and what a great present for a friend.
I’ve put pins in my jumper too, then I find them on the floor when they’ve dropped out. A pincushion is much safer!
What a fab idea, I hadn’t even thought about the possibilties of someone swallowing or even worse inhaling a pin before, so this is a great way to stop that from happening. I love how cute it is with the little button in the middle. I’m sure if I was more of a sewer I’d make myself one of these for my projects.
Thanks for sharing with me on #Trash2Treasure
Thank you. I’d never thought about possibly inhaling a pin either before I read that article.
I’ve been meaning to make one of these for ages. I end up pinning through my sleeve as often as not.
I’ve stuck them in my clothes too, probably not great for the washing machine as I always forget!
I have to confess something too, I still put pins in my mouth. But I’m not shy so I don’t mind who is looking at me… I know, I shouldn’t do it but as you say, it is so convenient. I think I must try and make a pretty pincushion like yours.
I picked this as my feature for this week’s party, don’t forget to stop by Sweet Inspiration to grab your button. Congrats!!
Pili recently posted…Coastal Filing Cabinet Makeover With Saltwash
Thank you Pili
I just love it! thanks for sharing on craft schooling Sunday!
Thank you 🙂
Lovely pincushion! I don’t sew a lot but when I do, I must admit I put the pins in my mouth at times, yikes! so yeah, it’ll be a lot healthier and safer to make one of these cute cushions for my wrist! Good to see you at Sweet Inspiration! have a good weekend!
Thank you xx
I’m in great need of new pin cushion! Thank you for sharing this awesome tutorial. I will probably just make the pin cushion without the wrist strap, because I am too clumsy to keep from missing the cushion and sticking myself! Lol! But the cushion itself is so darn cute! Found this on Sweet Inspirations. 🙂
Thank you! Putting it onto a piece of elastic would make it easier:)
What a great little pincushion! I’ve got a Craft Gossip post scheduled for tomorrow evening that features your tutorial: http://sewing.craftgossip.com/?p=88489
–Anne
Anne recently posted…Free pattern: Fleece butterfly softie
Yay, thanks!
I have the exact same pin cushion as worn by Angeline, bought mine from Asda. It’s great but I have a habit of pushing the pin straight through into my wrist. I love this one and I am going to make my own thanks to your wonderful tutorial, I’m thinking of putting something stir in the bracelet part so the pin can’t go through. I’m not sure what I’m going to use yet but I will find a way. Thank you for the great tutorial.
Sorry autocorrect strikes again, I’m going to put something stiff in the bracelet.
lol
Ouch! Maybe a large tiddlywink? Maybe even a disc cut from a cardboard box would be enough 🙂
Dawn, you know that flexible plastic that come in non disposable shopping bags that reinforce the bottom? I cut a strip of it and sewed it in the bracelet part. It gave it shape and so needles do not come through. Works great!
That’s genius 🙂
Cut a piece of plastic from the side of a plastic milk carton
That’s a good idea 🙂
Hi folks , I teach sewing up in County Durham and one of my ladies found the ideal solution for the pins going straight through the pincushion into your arm . Plastic milk container. Cut a circle from the side of a plastic milk container. Washed of course, Sew your pincushion as normal and insert the plastic circle inside the pincushion then insert the stuffing on top . Manipulate the stuffing as required making sure the circle stays where you want it to sit. The plastic is still soft enough for a sharp needle to go through the centre to form the eight segments but it deflects the pins .
That’s a good idea 🙂